1. Route Violation Report
A) Move on Report screen - click on “Report ” menu on Side Bar
B) Click on Route Violation Report Menu
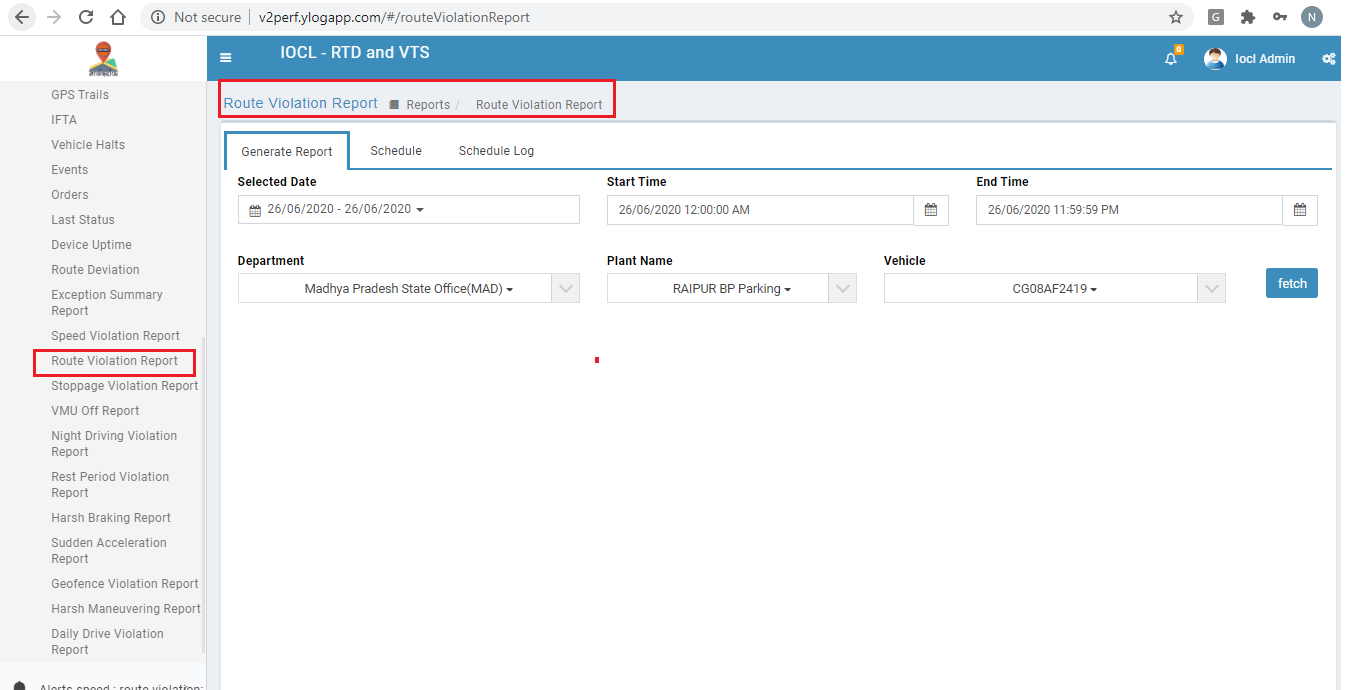
C) In Route Violation Report have two option one is Generate Report in which get data immediately and another is schedule that mean Report will be receive on Mail.
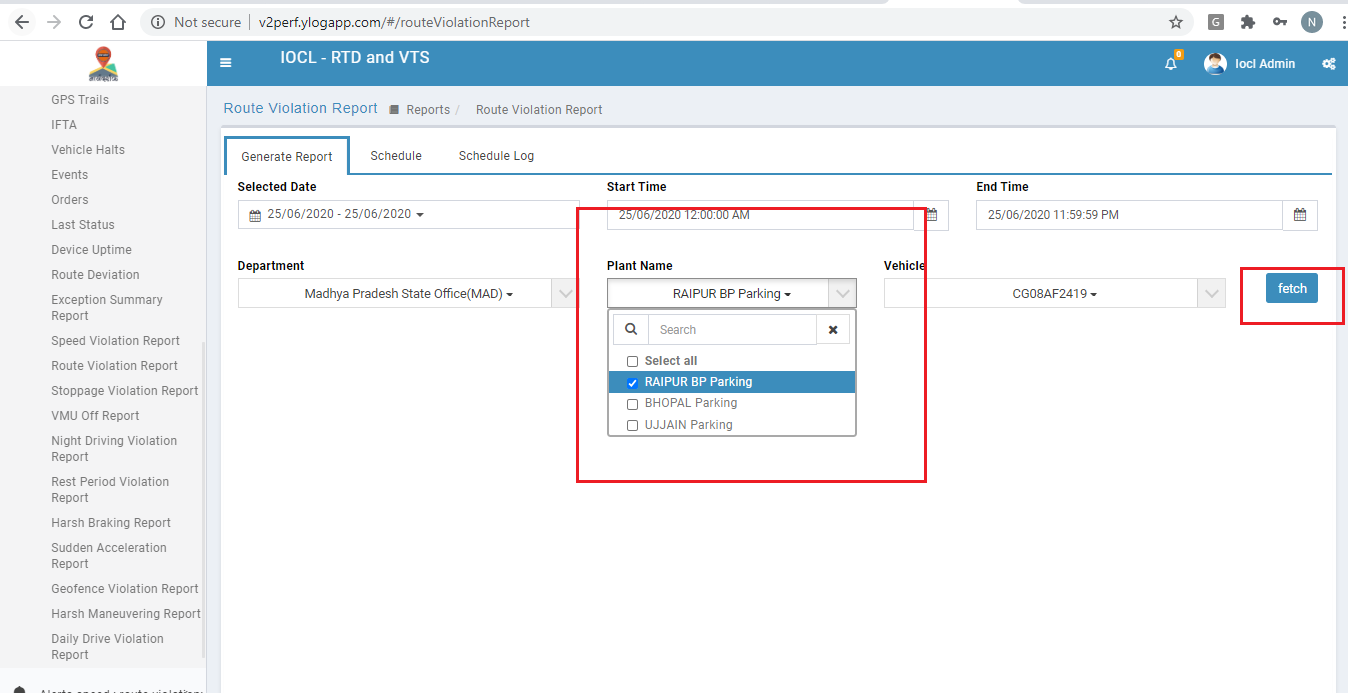
D) Fill the required field for getting data
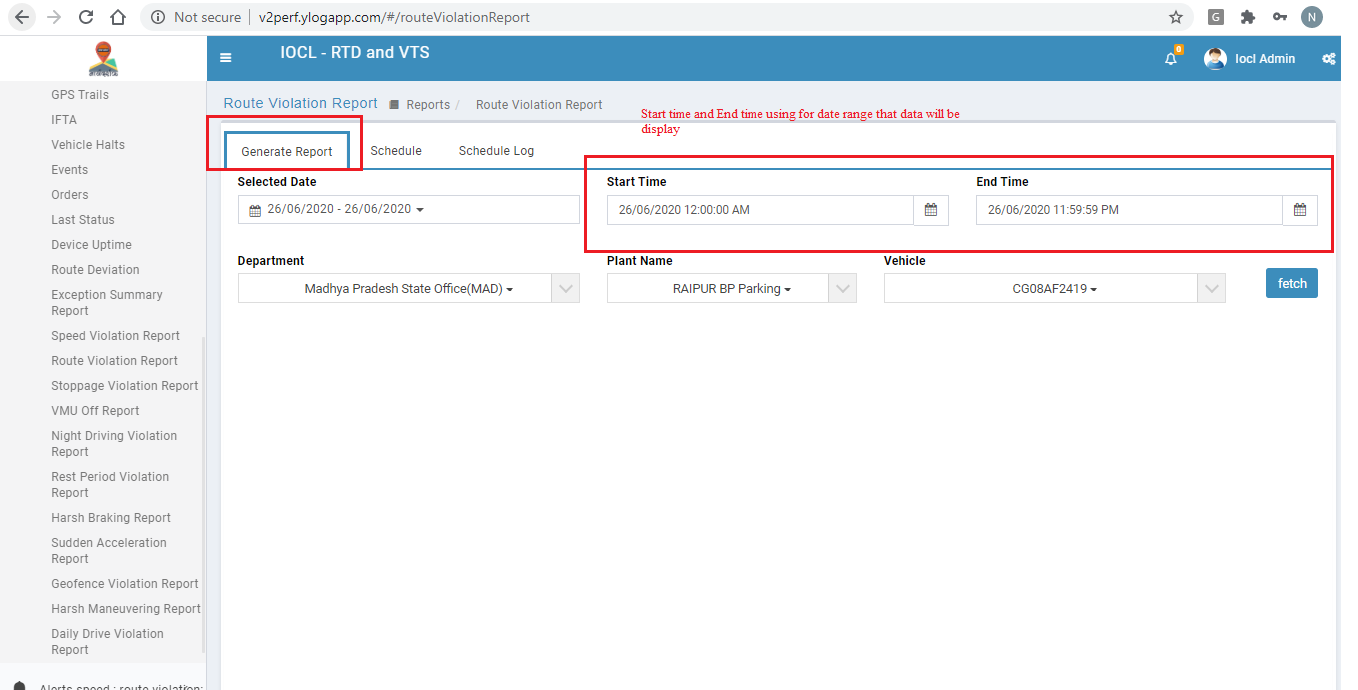
i. Selected Date - it is range of Start time to end time
ii. Start time - Data form this date and time
iii. End time - Data to this date and time
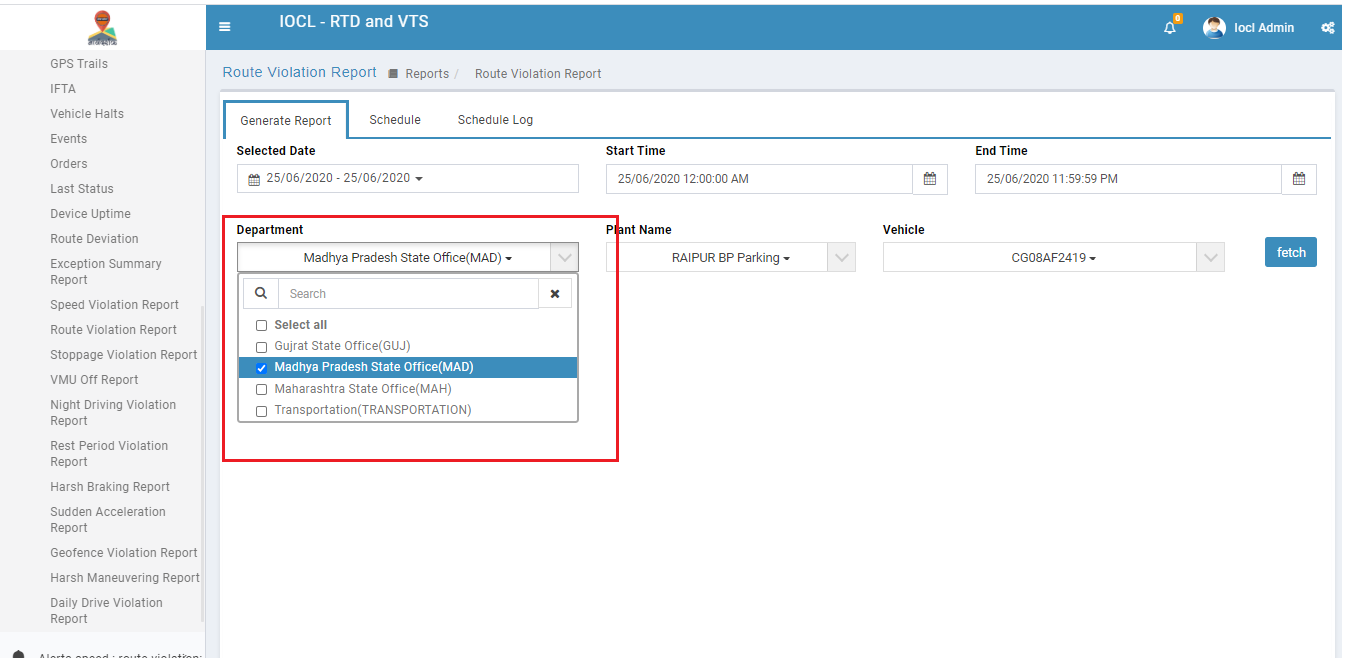
iv. Department - Get Dropdown of all Department of company -can you select multiple Department
v. Plant Name - Get Dropdown of Plant Name under the Selected Department
vi. Vehicle - Get Dropdown of vehicles under the selected Plant Name
vii.Click on Fetch Button
E) Click on Fetch Button
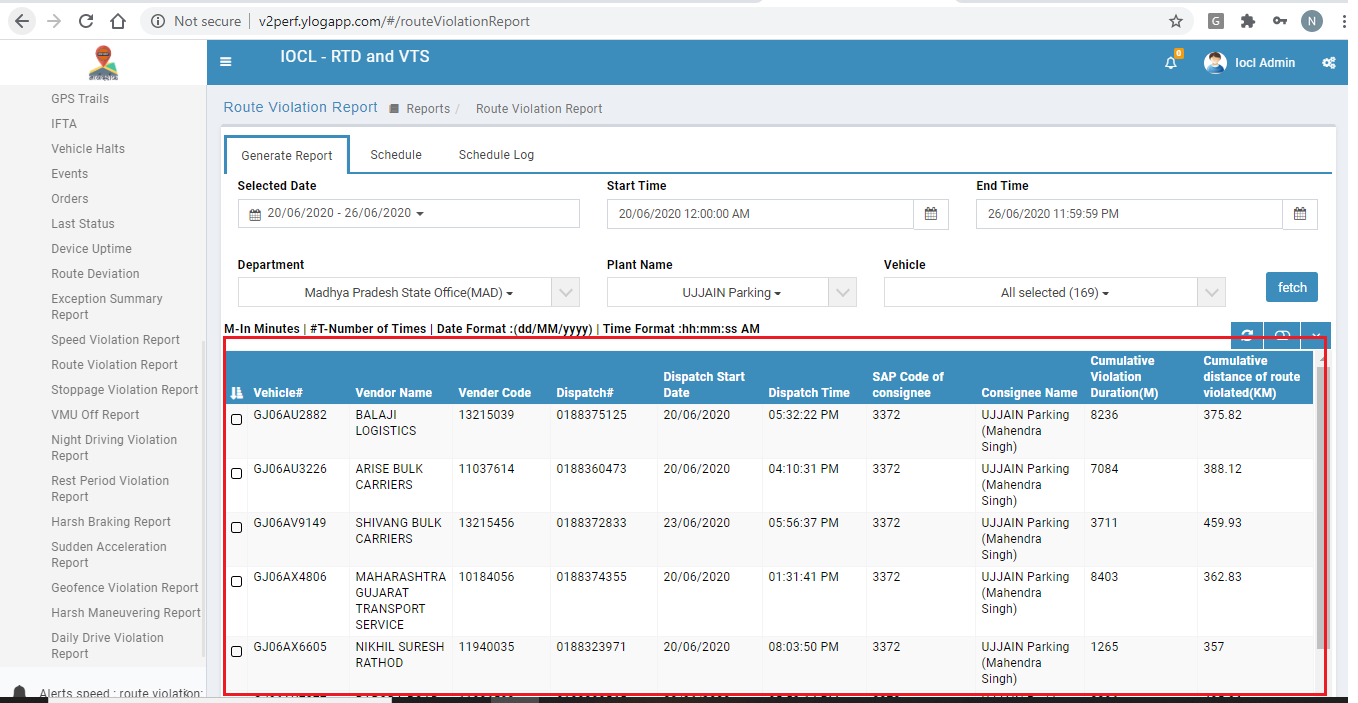
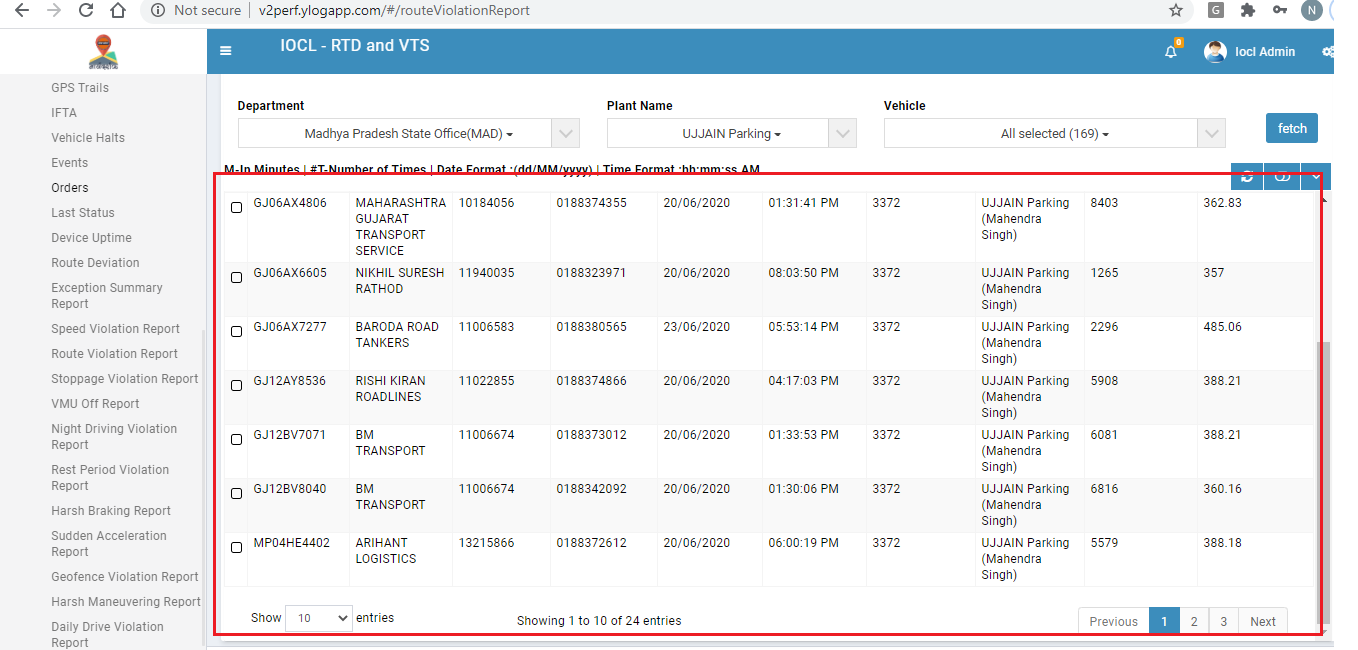
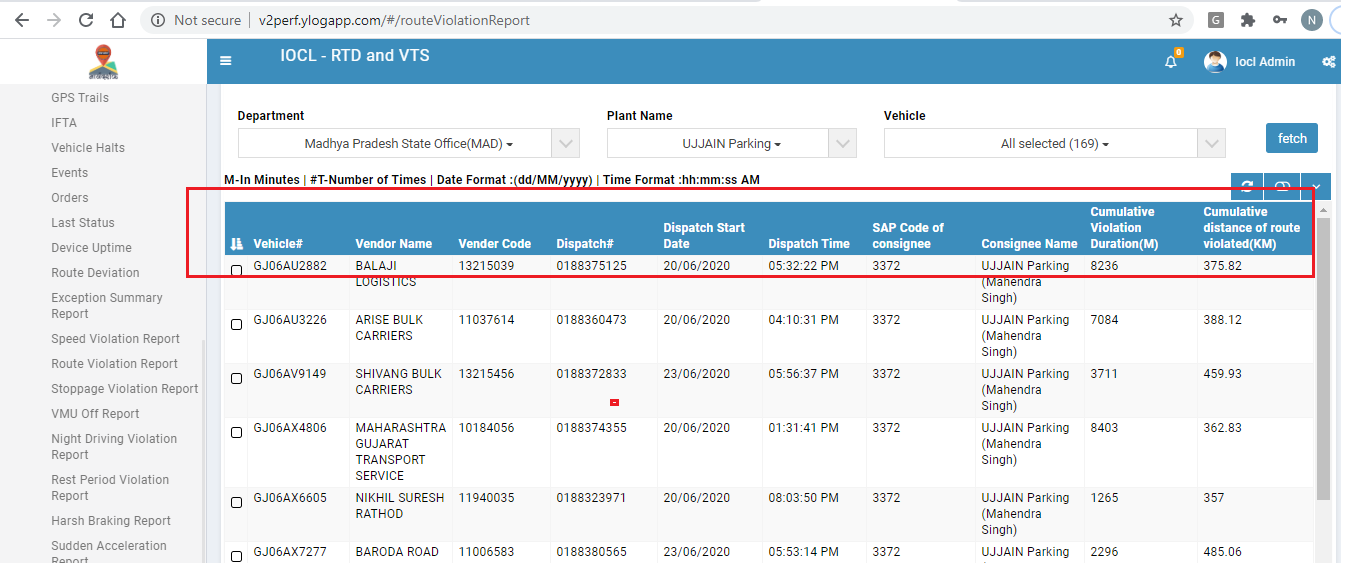
Heading Name Details :-
1. Vehicle Number - This is vehicle Number
2. Vendor Name - This is vendor name of vehicle
3. Vendor Code - This is vendor code of vehicle
4. Dispatch Number - This is dispatch Number that assign that vehicle
5. Dispatch Start Date - Dispatch schedule date
6. Dispatch Time - Dispatch schedule time
7. Sap code of Consignee - Destination Plant sap code
8. Consignee Name - Destination Plant Manager Name or Destination route name
9. Cumulative Violation Duration(M) - duration of violation
10. Cumulative distance of route violated(KM) - distance of violation
F) Data can be Export
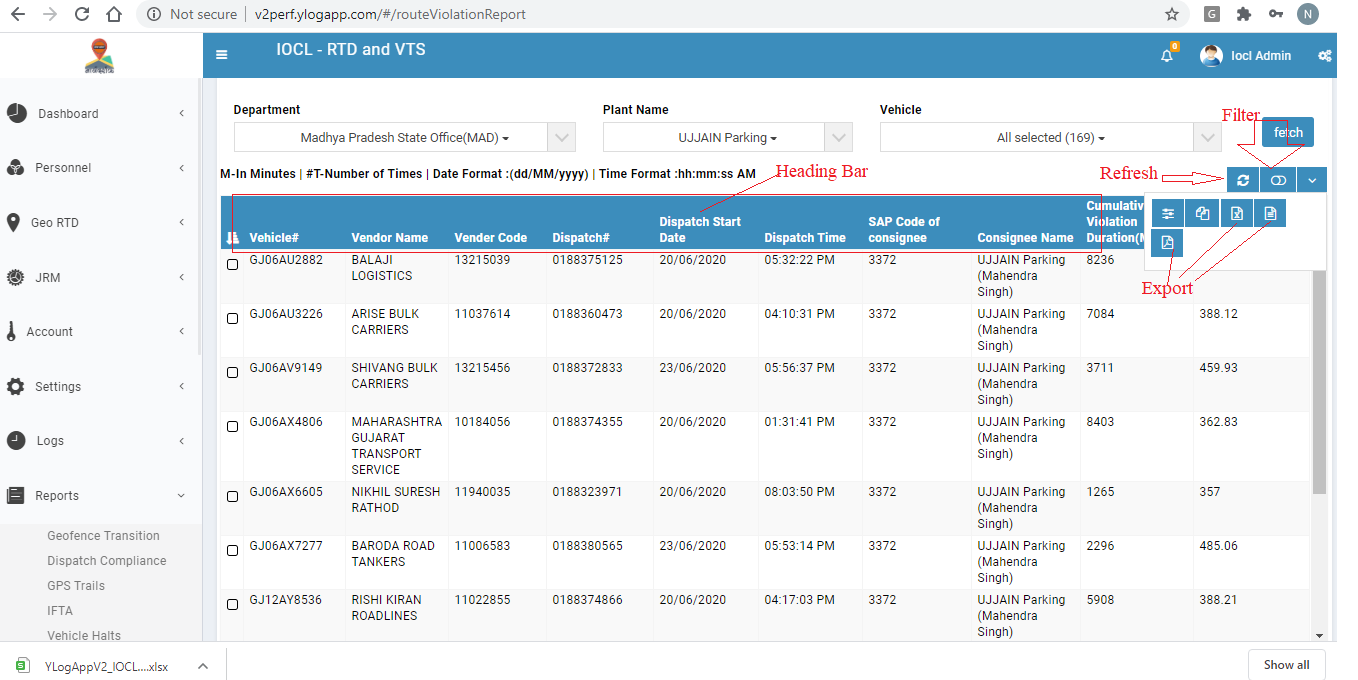
i. Refresh - Get latest data of Select Criteria
ii. Toggle - When click on this action, will appear filter text box under heading bar. iii. More - Export Option
a) CSV
b) Excel
c) PDF
d) Copy data
e) Toggle Column
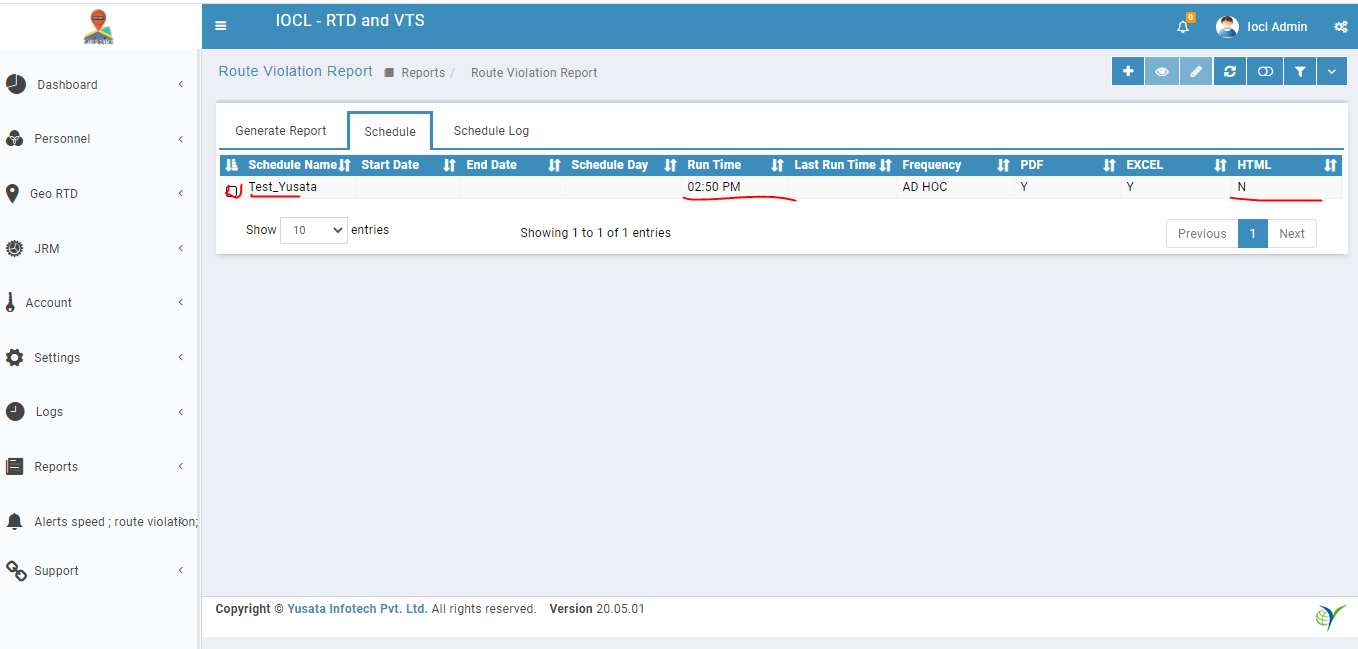
G) Now can we add a schedule for report on Mail - Click on Schedule

i. Add - Add a new Schedule
ii. View - View added new schedule
iii. Edit - Edit any schedule except Ad-hoc
iv. Toggle
v. Filter
vi. More -Export Option
1. CSV
2. Excel
3. Pdf
4. Copy
5. Toggle Column
H) For add a new schedule then click on Plus Icon
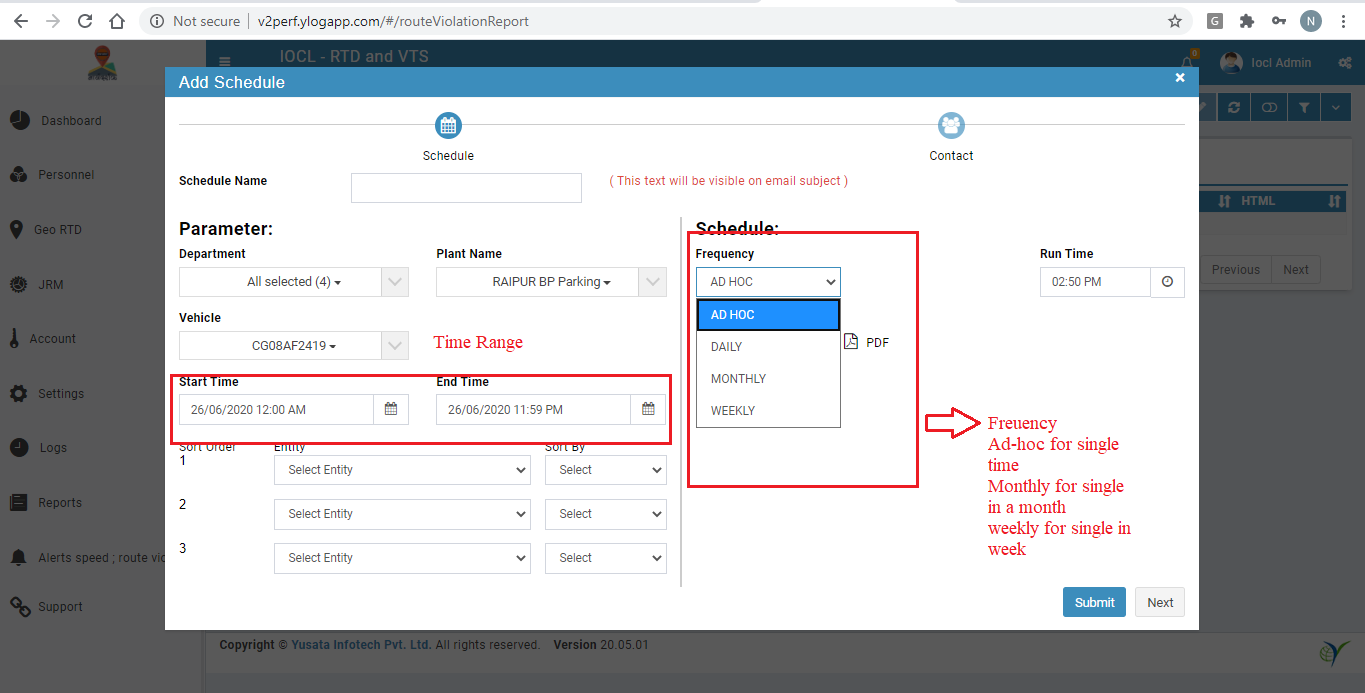
Fill the required fields
i. Schedule Name
ii. Start time - Data form this date and time
iii. End time - Data to this date and time
iv. Department - Get Dropdown of all Department of company -can you select multiple Department
v. Plant Name - Get Dropdown of Plant Name under the Selected Department
vi. Vehicle - Get Dropdown of vehicles under the selected Plant Name
vii. Sort order - You can add sorting criteria for PDF and Excel
viii. Run time - Run Time for schedule
ix. Frequency -
a) Ad-hoc - Single run time
b) Daily
c) Monthly - single time in a month
d) Weekly - single time in a week
I) File the data according to Requirement
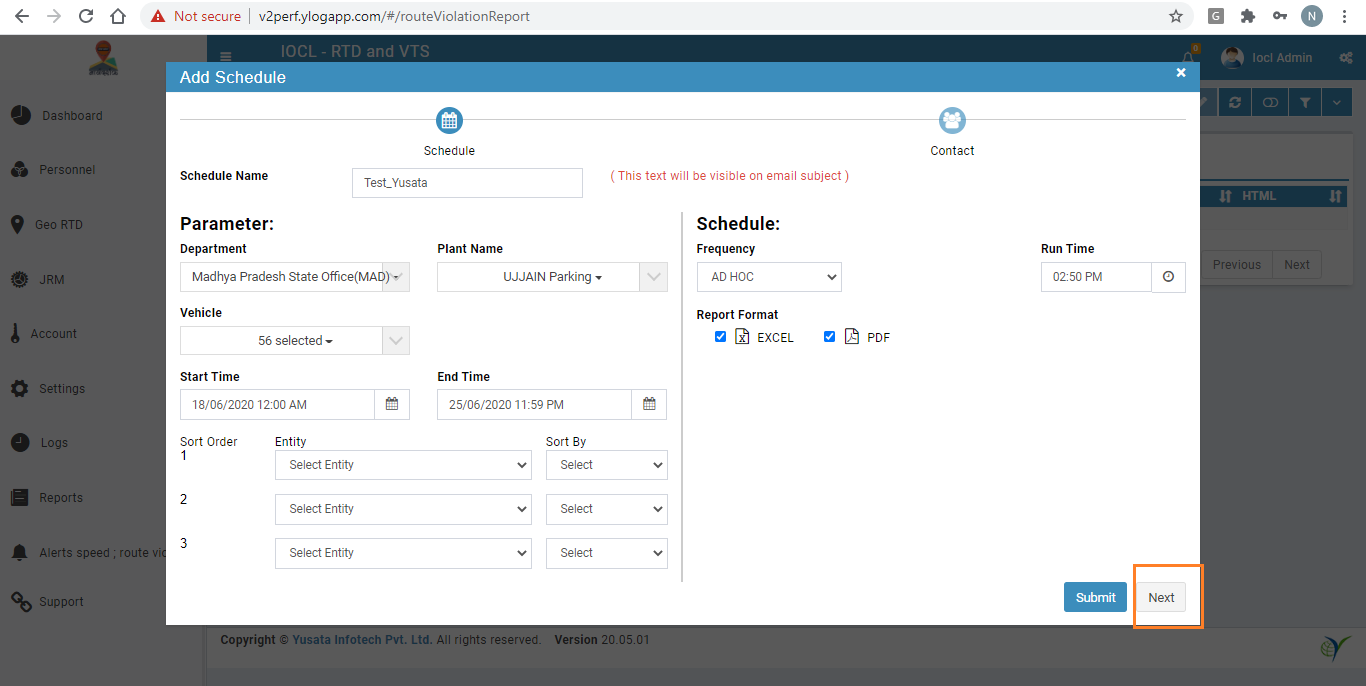
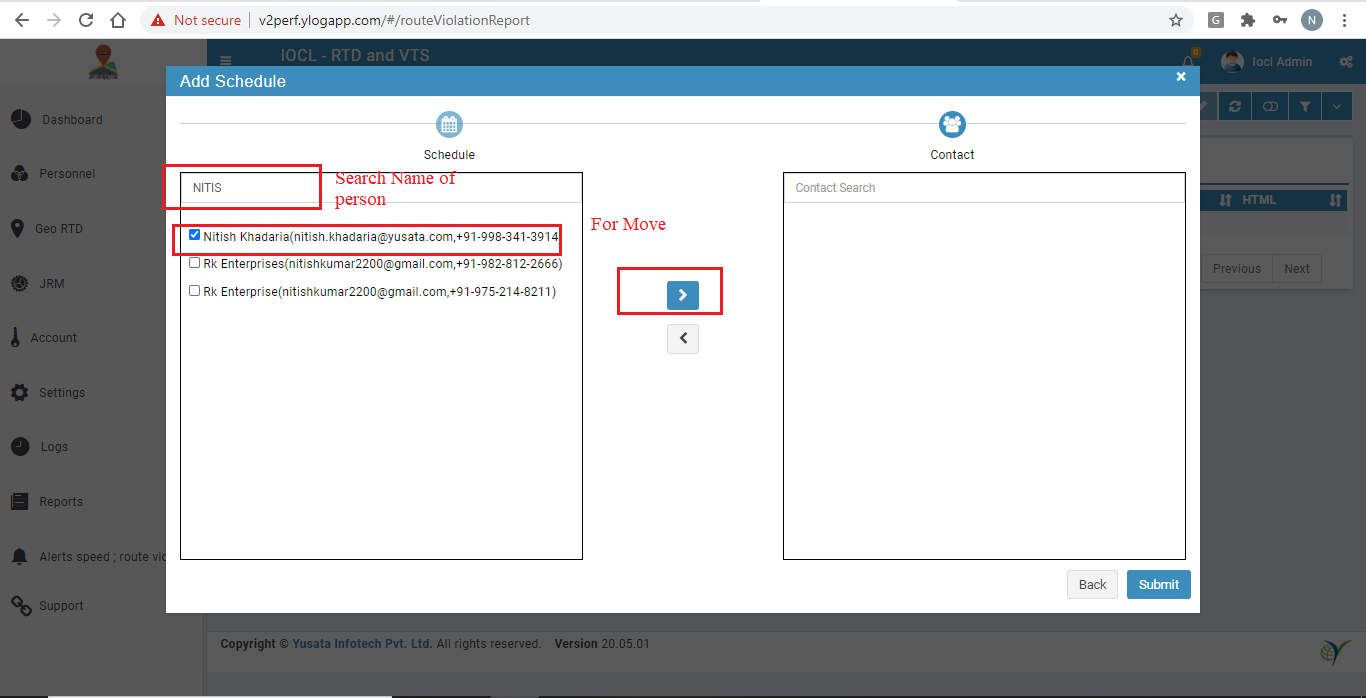
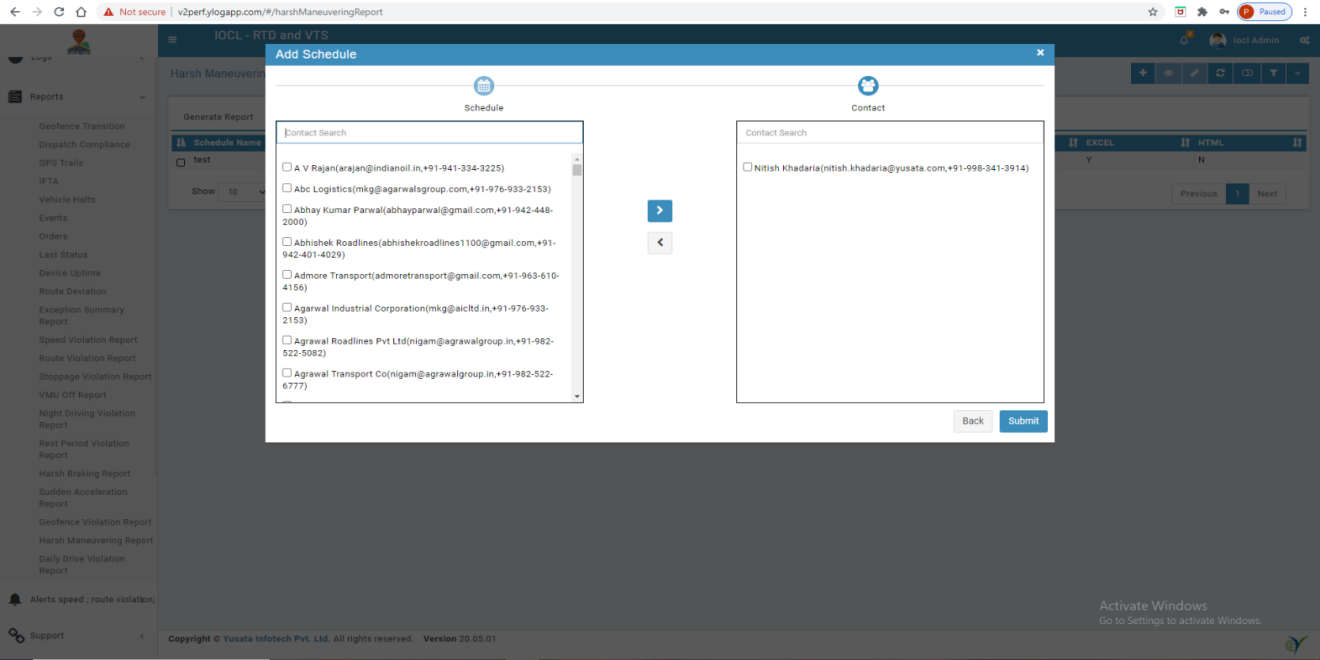
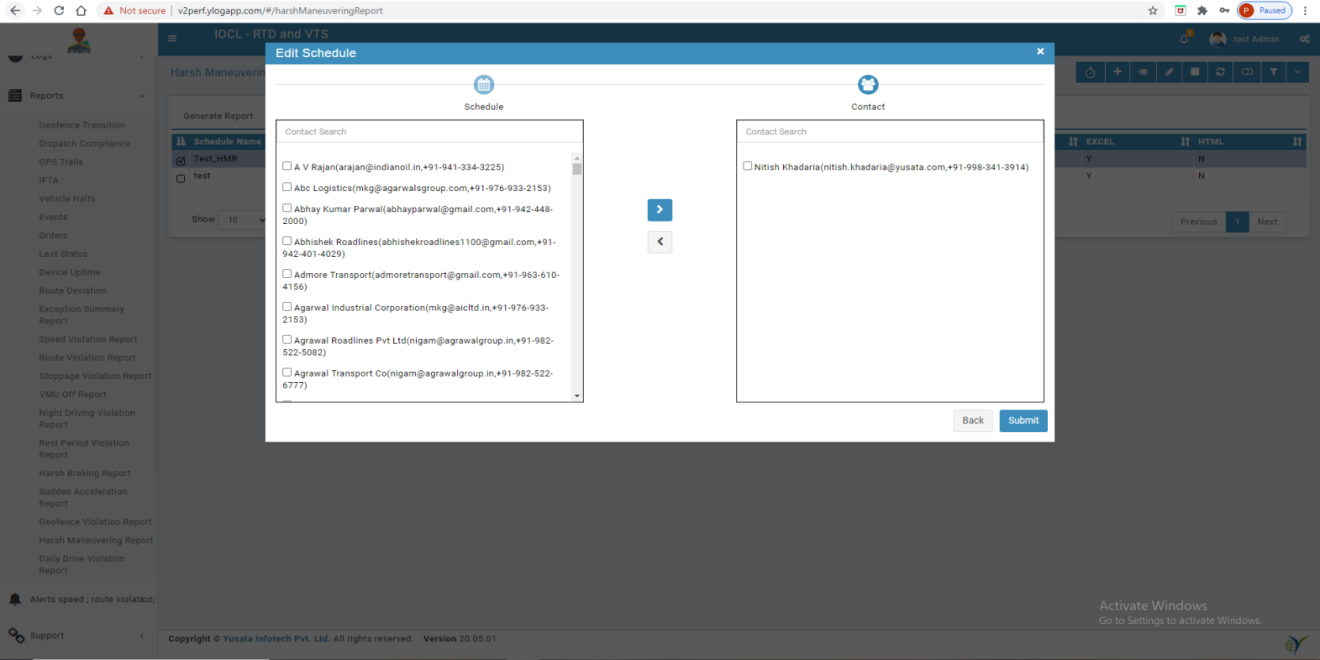
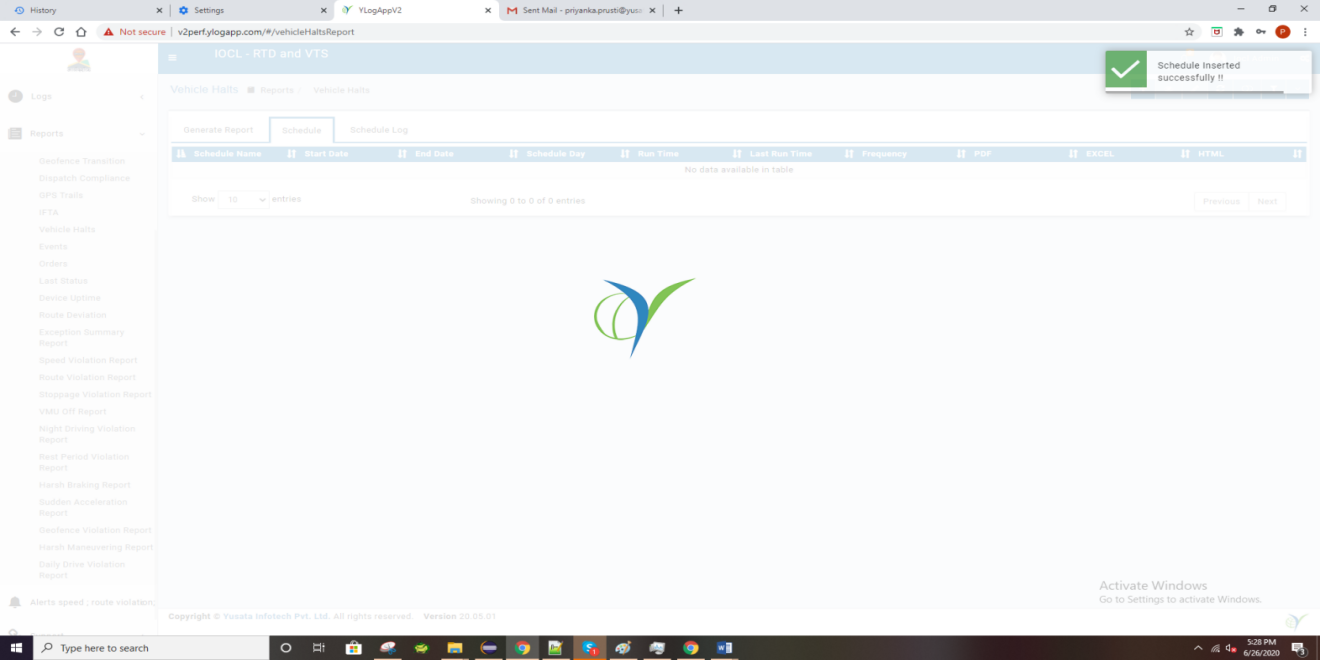
J) Click on Next and Map contact For Mail and Click On Submit
K) Now you can Check added schedule in List
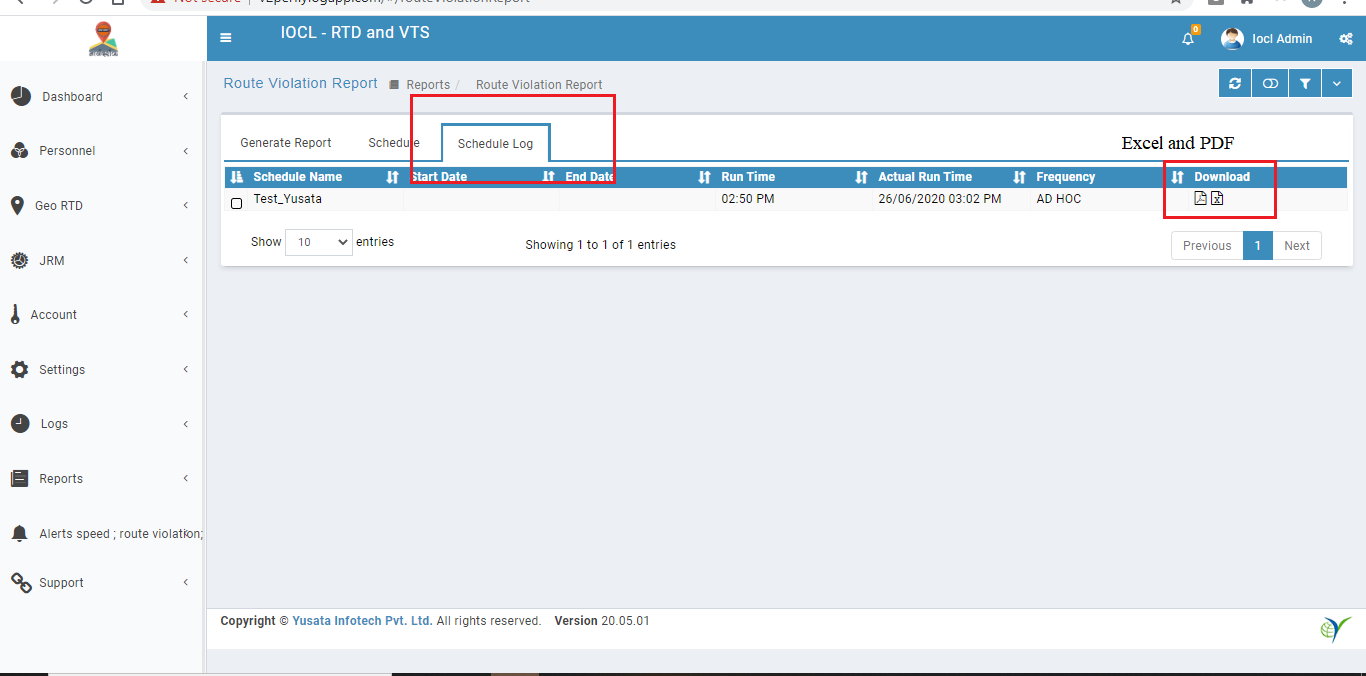
L) Schedule log for check the data of Particular schedule
https://drive.google.com/file/u/1/d/1f2ebE96dCfJOzDutuzRCBsdc8Q-0G264/view?usp=drive_open
https://drive.google.com/file/d/1TNHii0vshPYS72uyVa626eCB4Ow6199F/view
2. Geofence Violation Report
A) Click On Geofence Violation Report on Side bar menu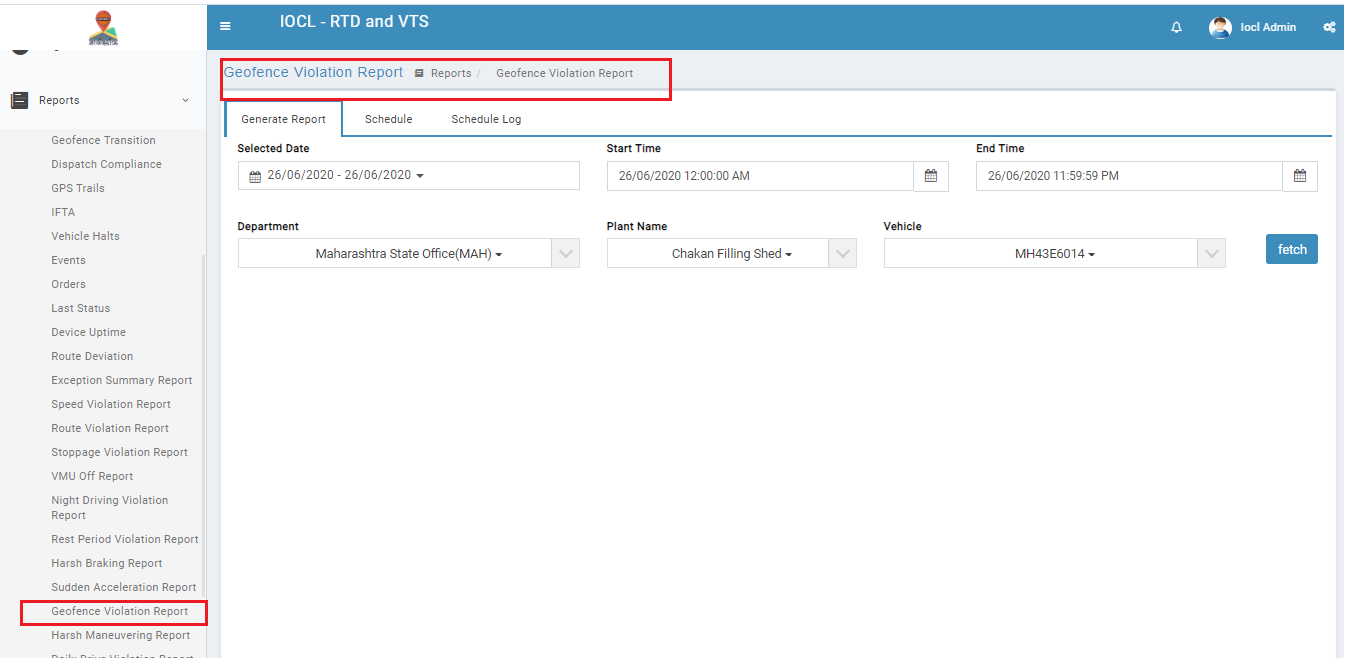
Fill the required field for getting data
a) Selected Date - it is range of Start time to end time
b) Start time - Data form this date and time
c) End time - Data to this date and time
d) Department - Get Dropdown of all Department of company - User can select multiple Departments
e) Plant Name - Get Dropdown of Plant Name under the Selected Department
f) Vehicle - Get Dropdown of vehicles under the selected Plant Name
g) Click on Fetch Button
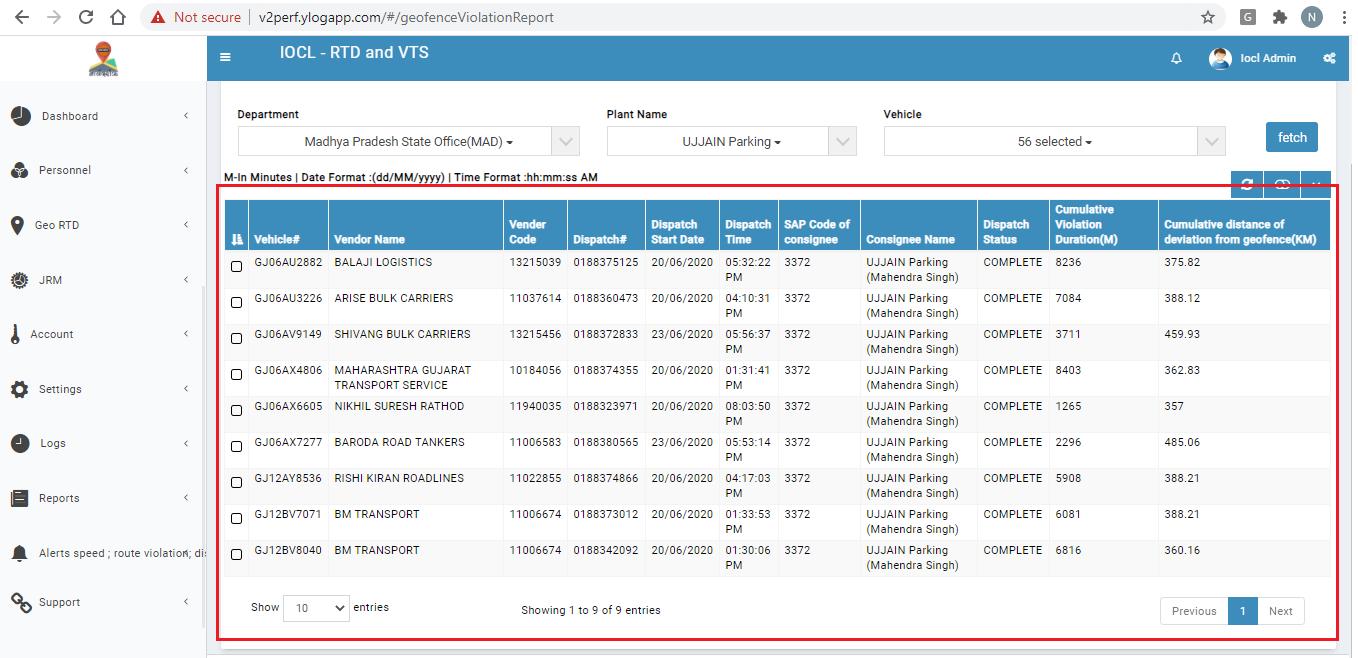
B) Enter the data according the requirement
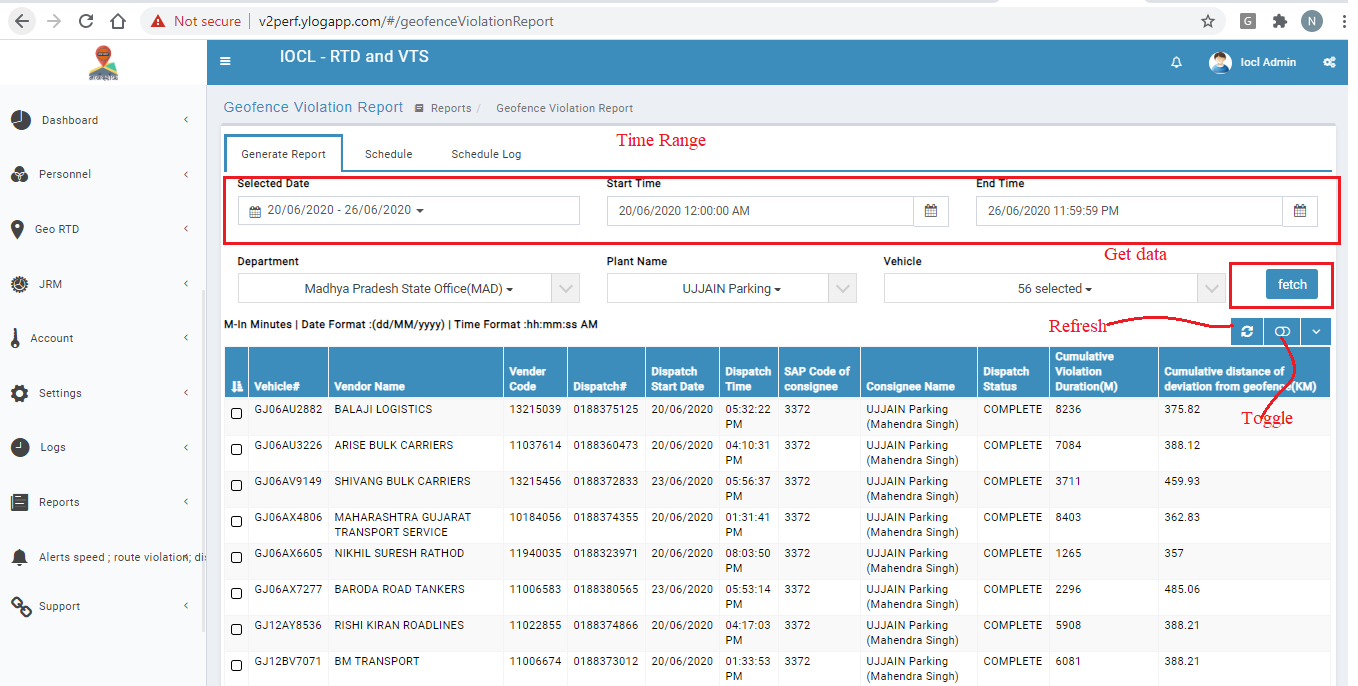
i. Refresh - Get latest data of Select Criteria
ii. Toggle - When click on this action, will appear filter text box under heading bar. iii. More - Export Option
A.CSV
B.Excel
C. PDF
D.Copy data
E. Toggle Column
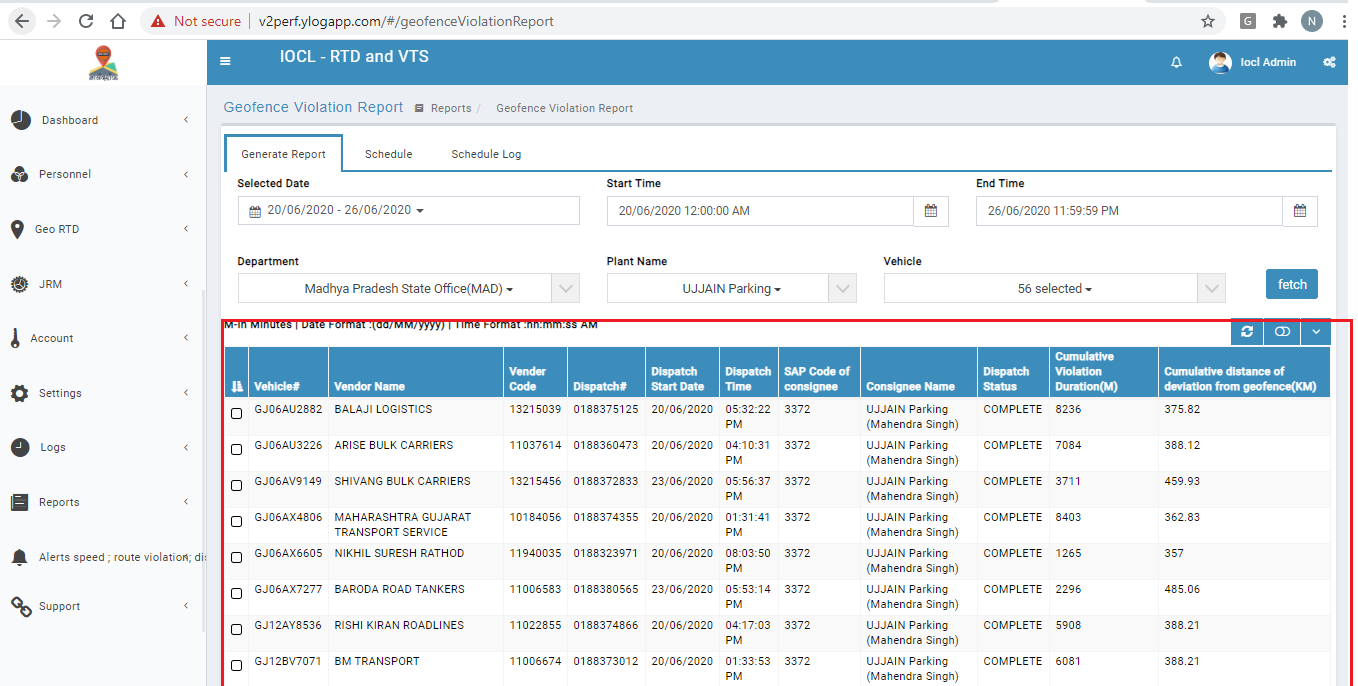
Heading Names Details:
1.Vehicle Number - This is vehicle Number
2.Vendor Name - This is vendor name of vehicle
3.Vendor Code - This is vendor code of vehicle
4.Dispatch Number - This is dispatch Number that assign that vehicle
5.Dispatch Start Date - Dispatch schedule date
6.Dispatch Time - Dispatch schedule time
7.Sap code of Consignee - Destination Plant sap code
8.Consignee Name - Destination Plant Manager Name or Destination route name
9.Cumulative Violation Duration(M) - duration of violation
10.Cumulative distance of route violated(KM) - distance of violation
M) You can add a schedule for report

C) Add a contact for schedule
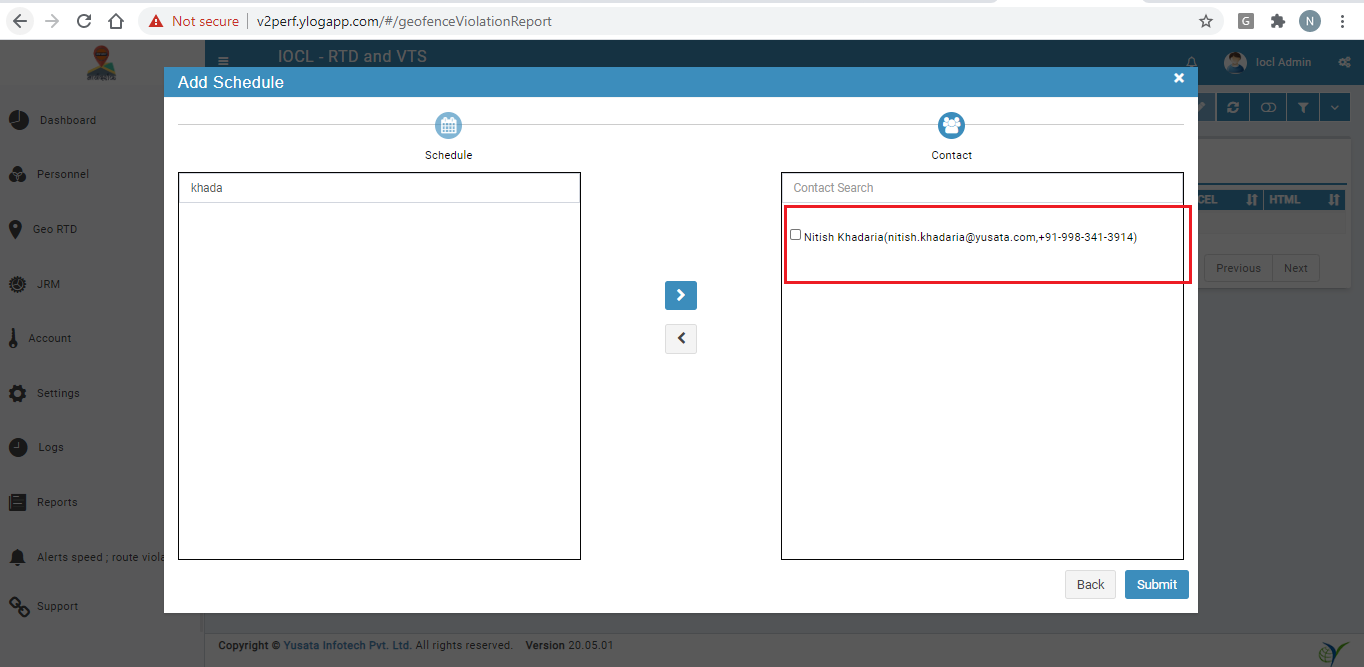

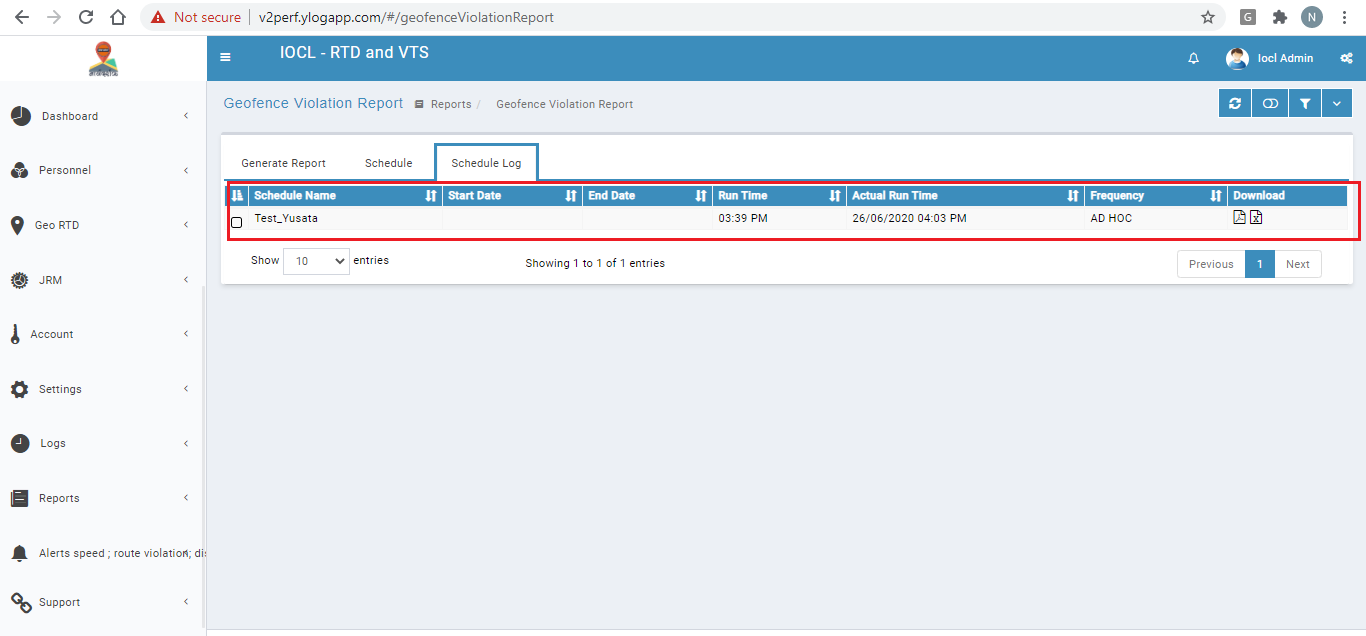
D) Check in schedule Log
E) Check in Mail box
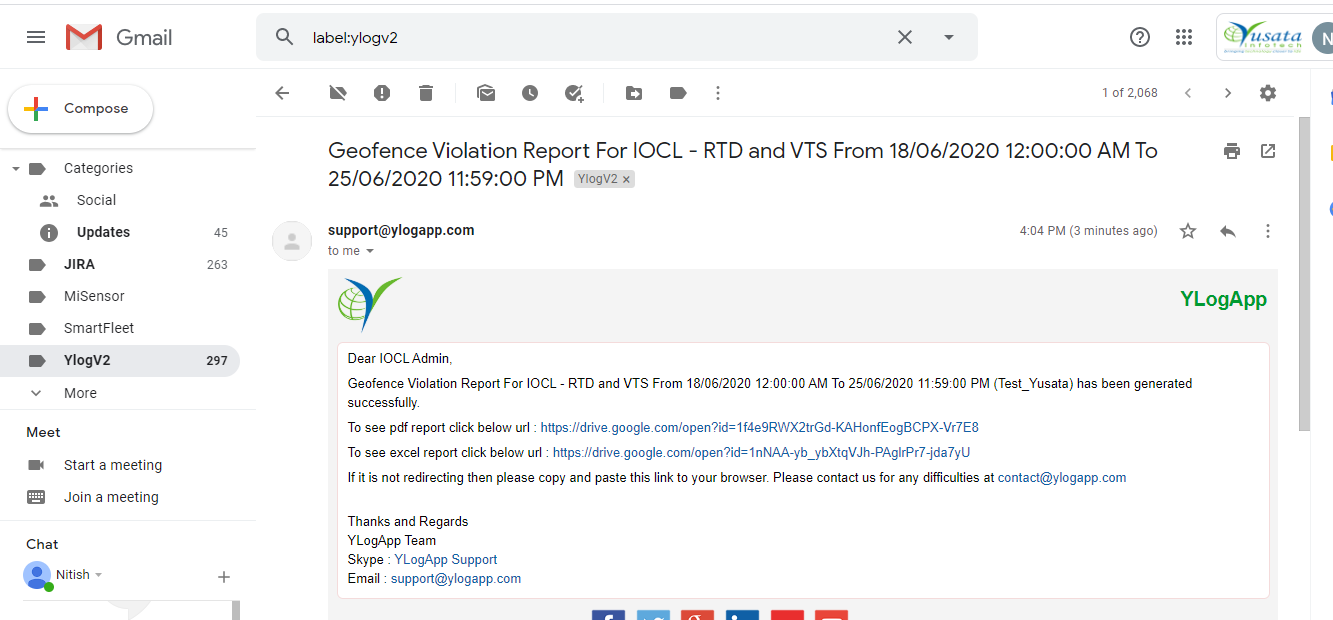
https://drive.google.com/file/u/1/d/1f4e9RWX2trGd-KAHonfEogBCPX-Vr7E8/view?usp=drive_open
https://drive.google.com/file/d/1nNAA-yb_ybXtqVJh-PAglrPr7-jda7yU/view
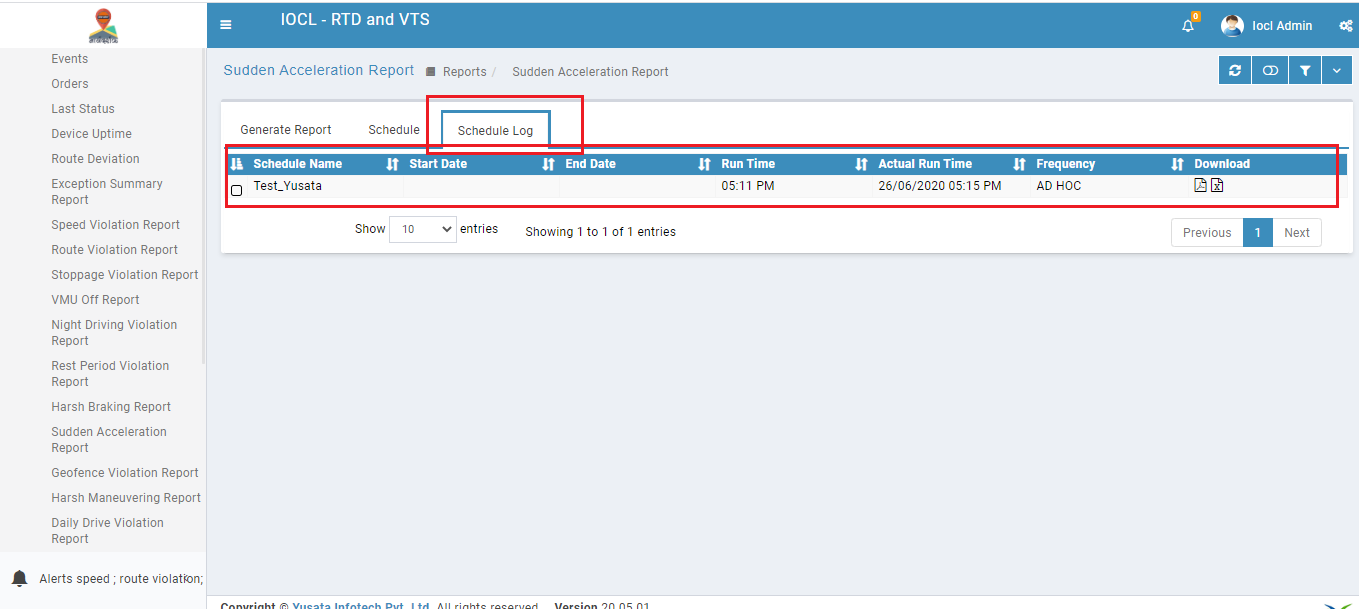
3. Sudden Acceleration Report
A) Click to sudden Acceleration Report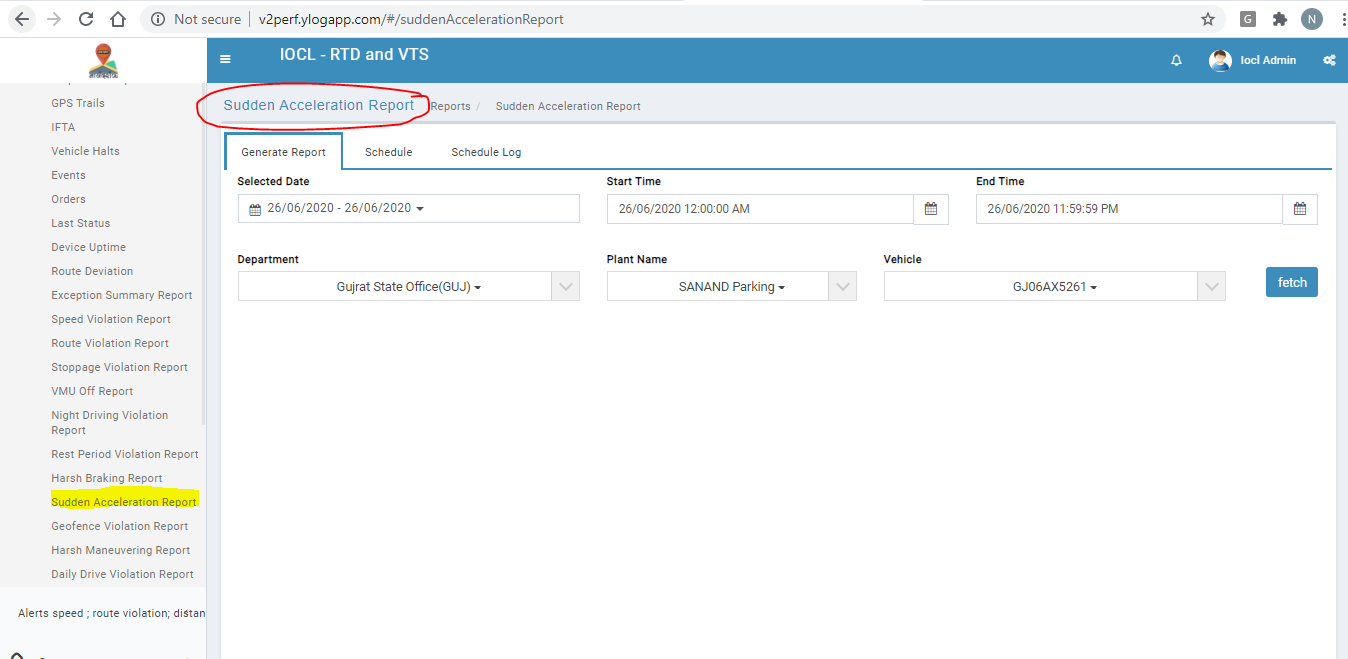
B) Enter the criteria according to requirement
i. Fill the required field for getting data
ii. Selected Date - it is range of Start time to end time
iii. Start time - Data form this date and time
iv. End time - Data to this date and time
v. Department - Get Dropdown of all Department of company -can you select multiple Department
vi. Plant Name - Get Dropdown of Plant Name under the Selected Department
vii. Vehicle - Get Dropdown of vehicles under the selected Plant Name
viii. Click on Fetch Button
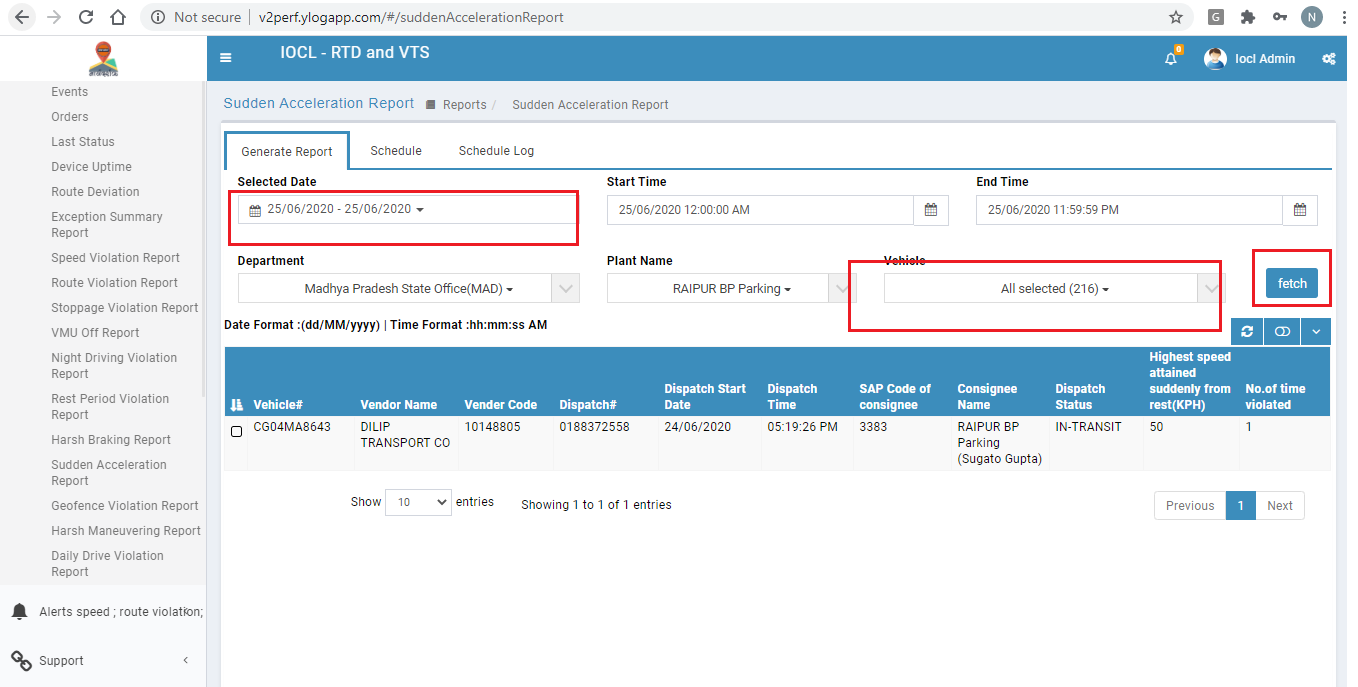
C) Click on fetch for getting data
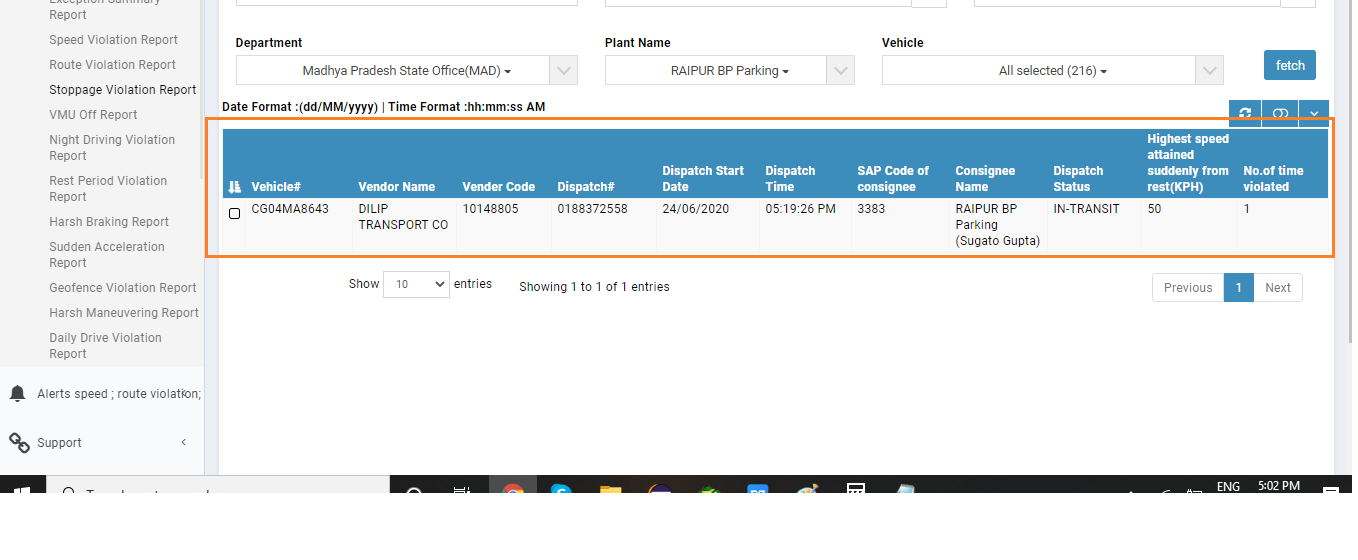
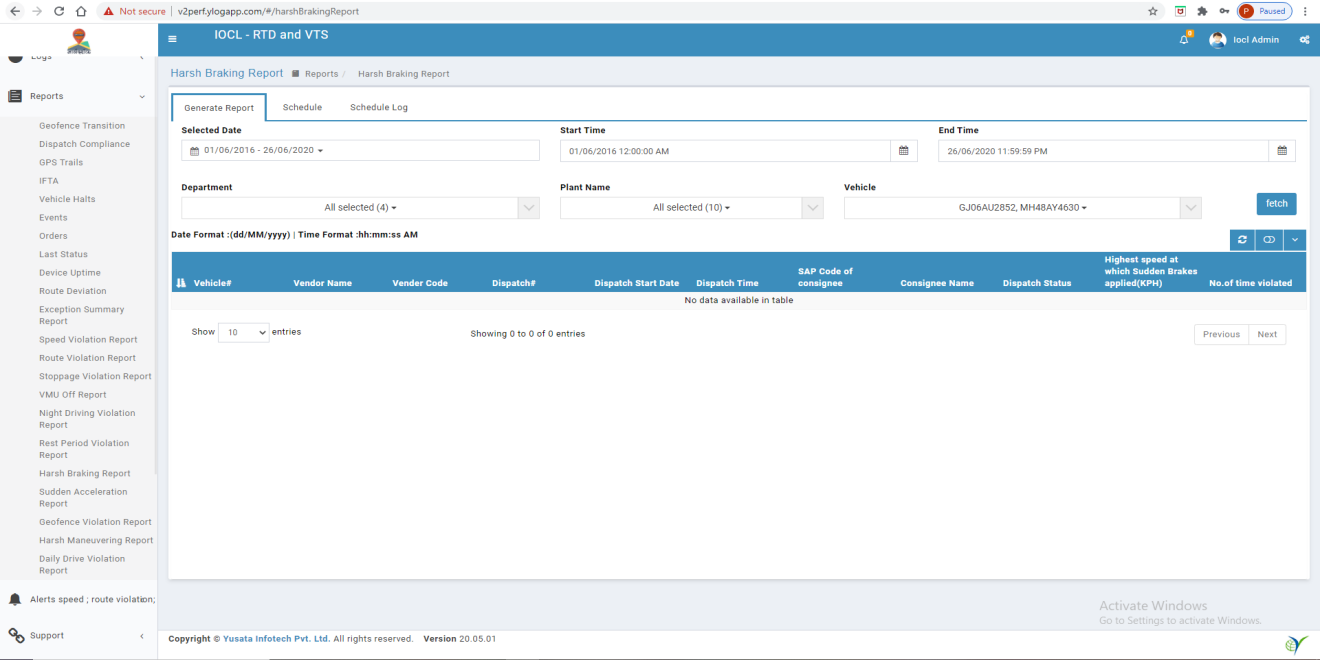
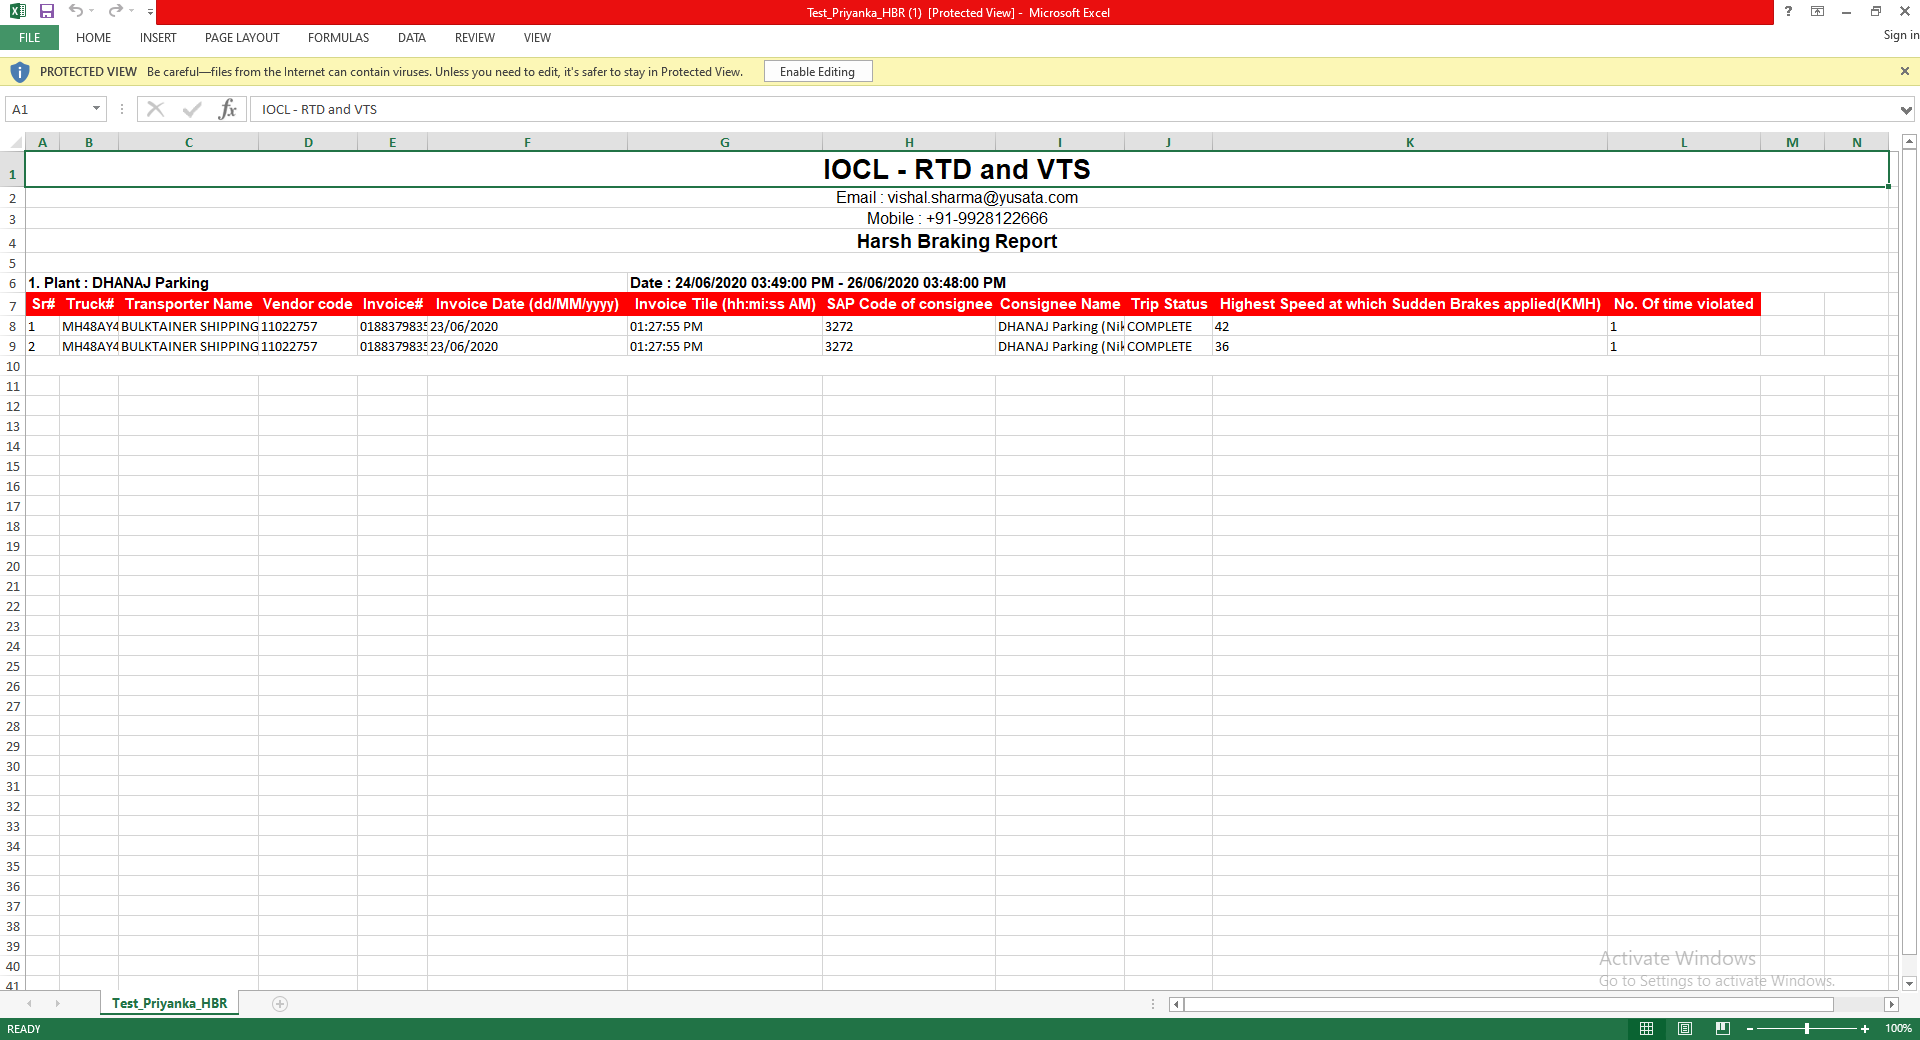
Heading Names Details:
1.Vehicle Number - this is vehicle Number
2.Vendor Name - this is the vendor name of vehicle
3.Vendor Code -vendor code of vendor name
4.Dispatch Number - This is dispatch Number that assign that vehicle
5.Dispatch Start Date - Dispatch schedule date
6.Dispatch Time - Dispatch schedule time
7.Sap code of Consignee - Destination Plant sap code
8.Consignee Name - Destination Plant Manager Name or Destination route name
9.Dispatch Status
10. Highest speed attained suddenly from rest(KPH)
11.No.of time violated
D) Can we add a schedule for mailing report

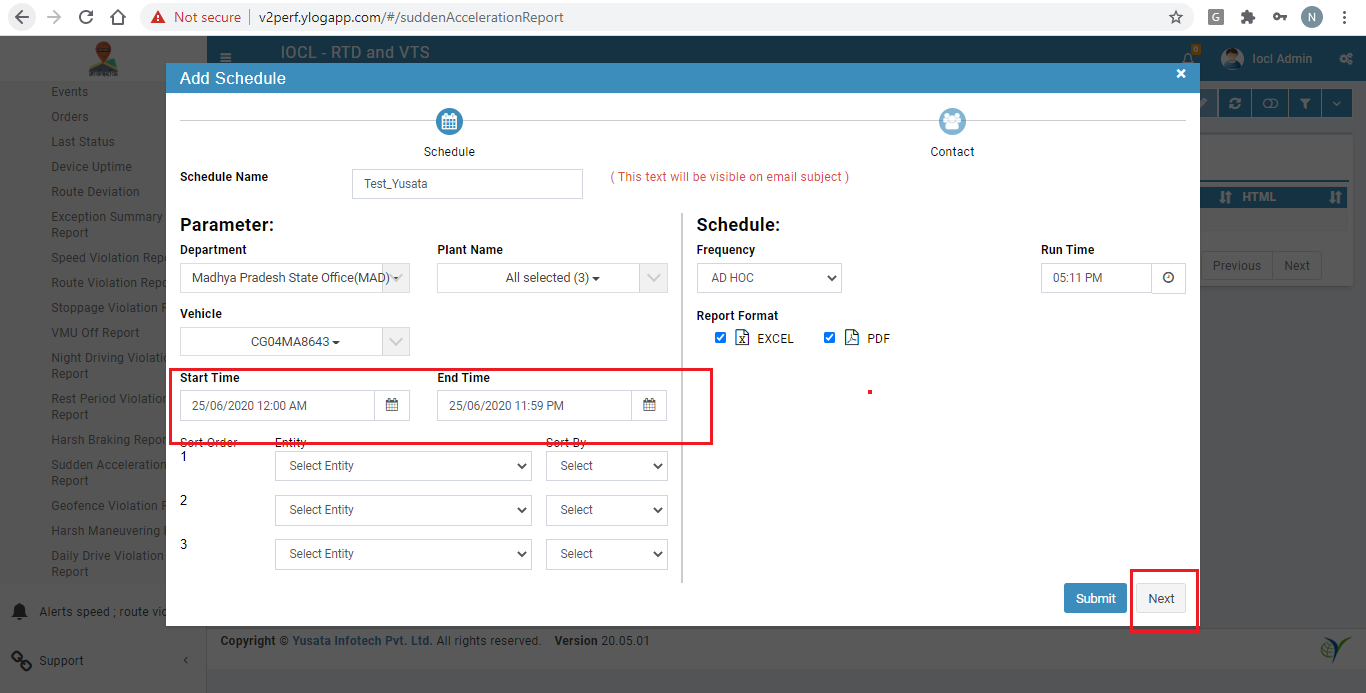
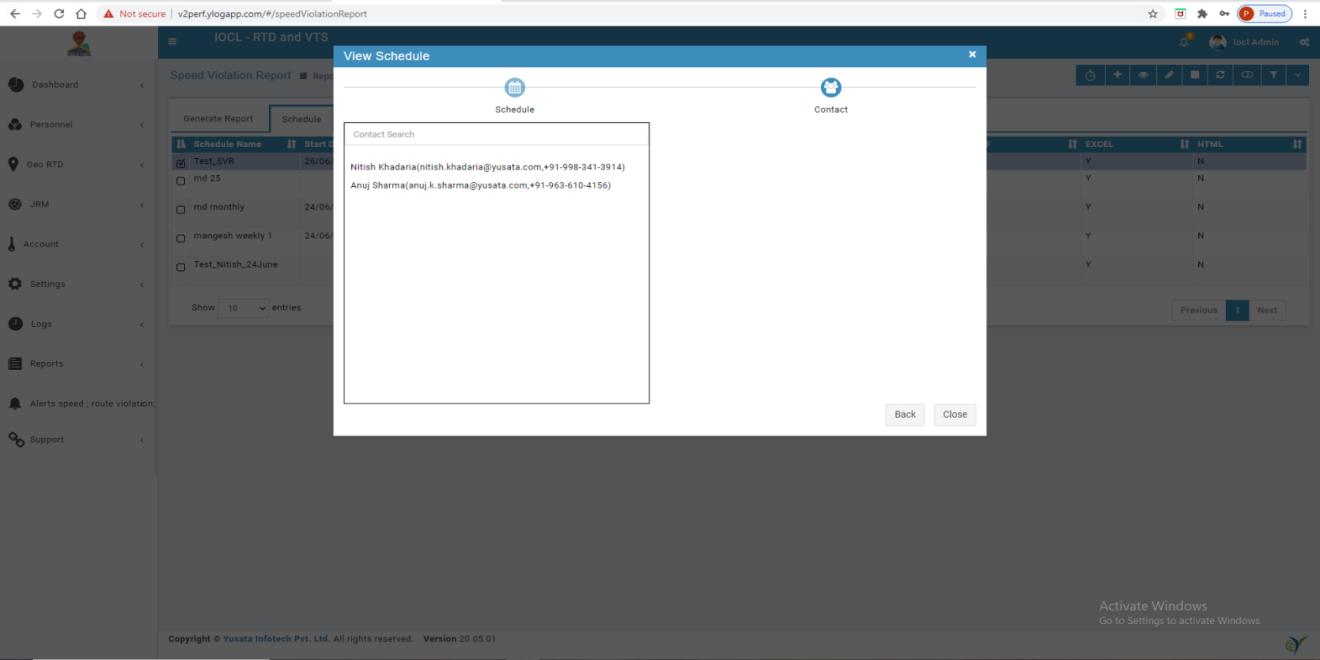
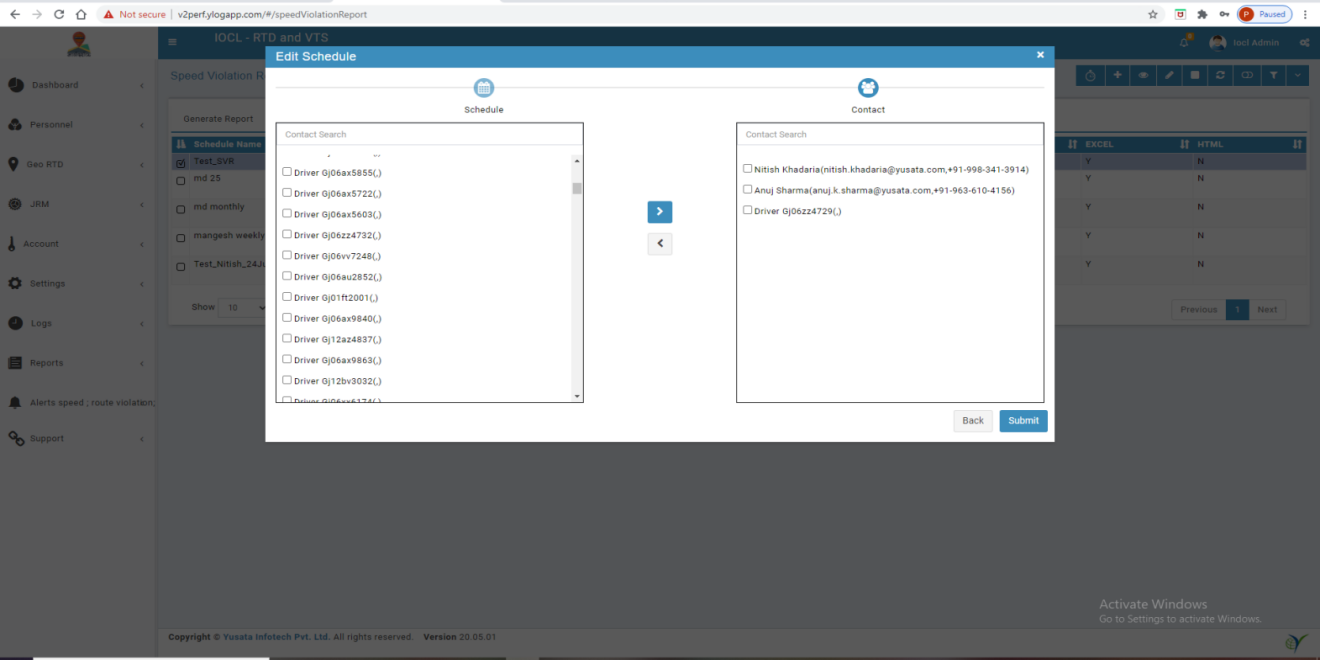
E) Map With Contact

F) Check in List

G) Check in schedule log
H) Check in mail box
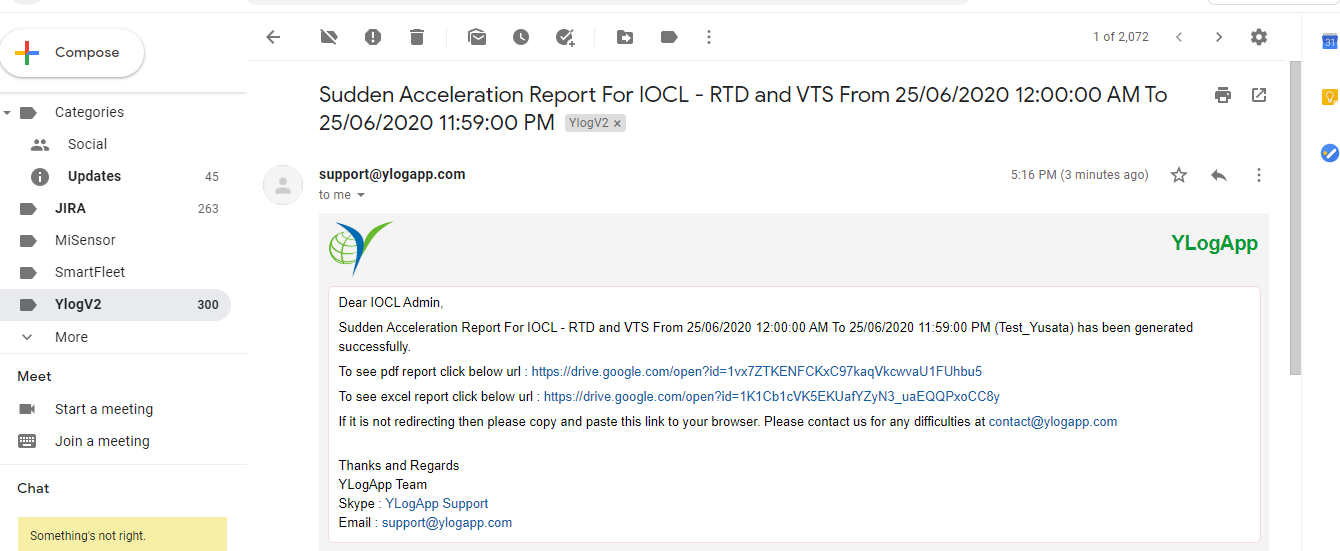
https://drive.google.com/file/d/1vx7ZTKENFCKxC97kaqVkcwvaU1FUhbu5/view
https://drive.google.com/file/d/1K1Cb1cVK5EKUafYZyN3_uaEQQPxoCC8y/view
4. Speed Violation Report
A. Move on Speed violation screen - click on “Speed violation” menu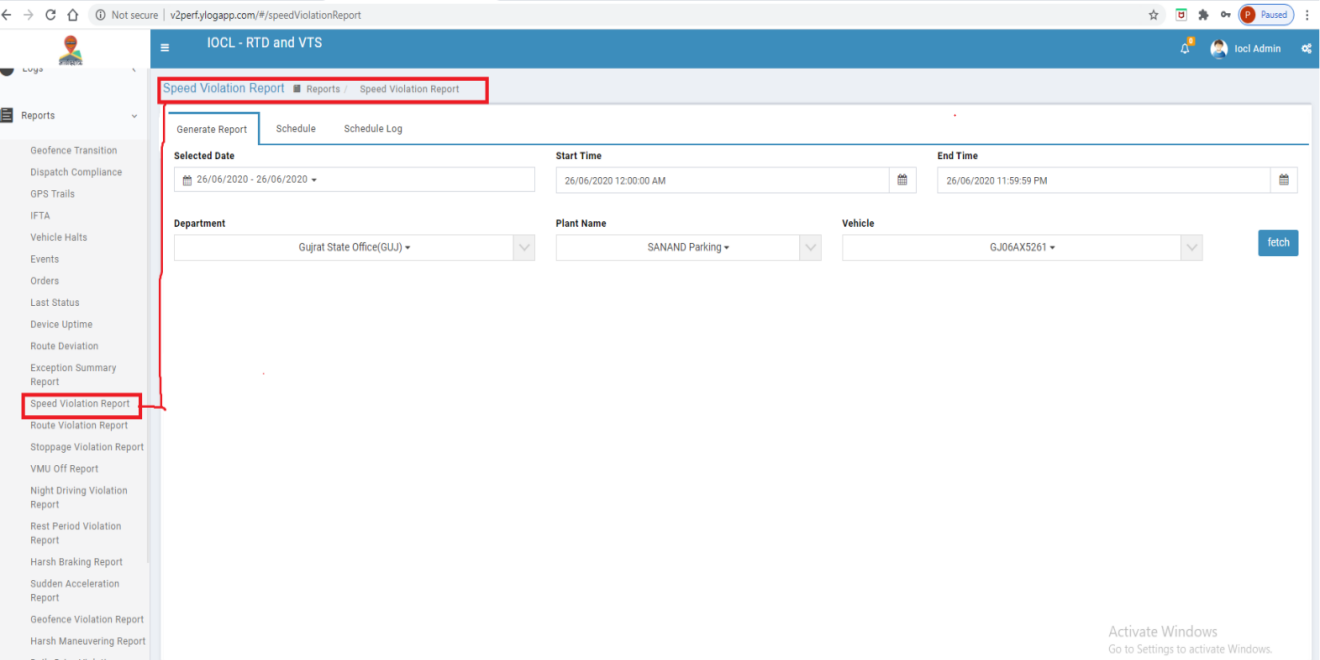
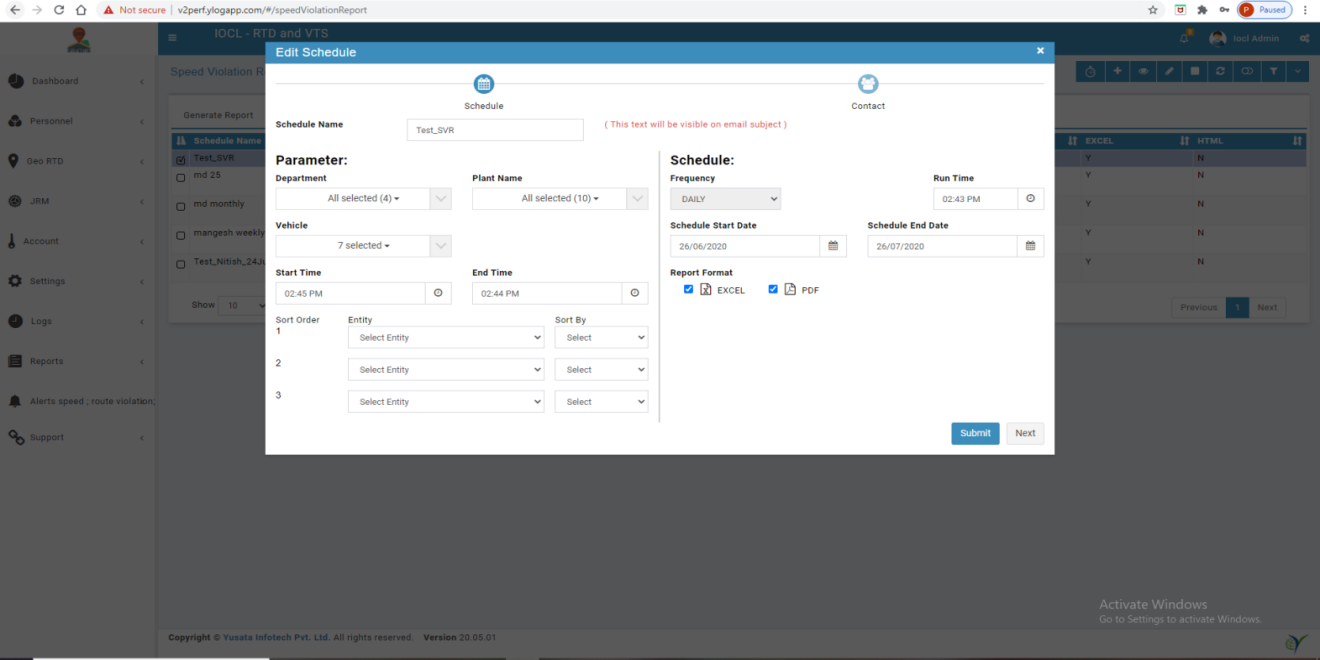
B. Speed violation screen functionality - Here we use date, Department, Plant Name and vehicle as criteria and after select criteria when we click fetch button then data table show accordingly.

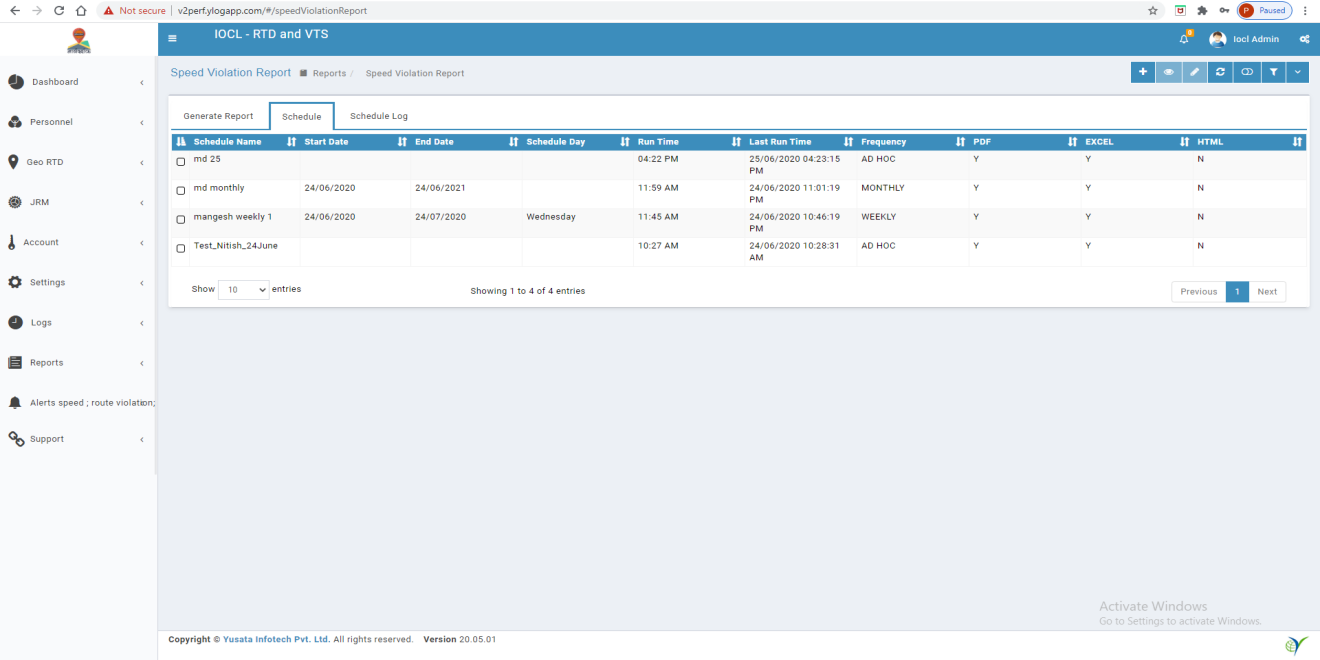
C. Add Schedule - User can add new schedule using add schedule action.
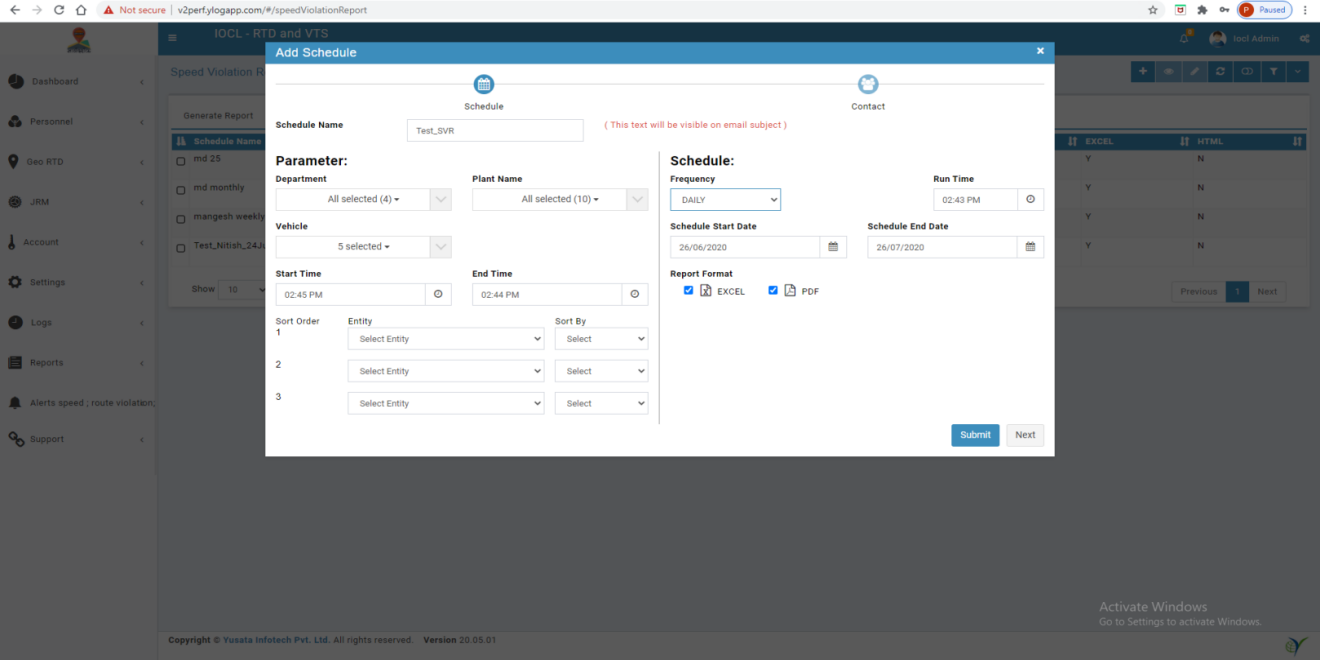
Note :- * Bold letter fields are mandatory
D. Success message after add new Schedule

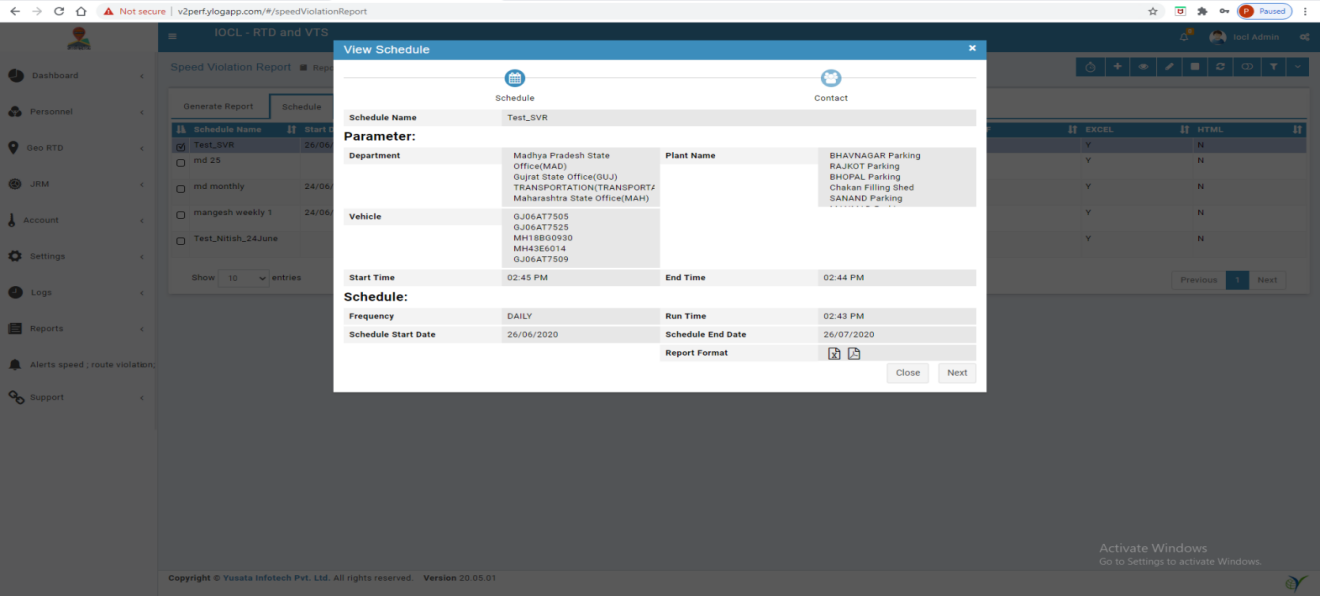
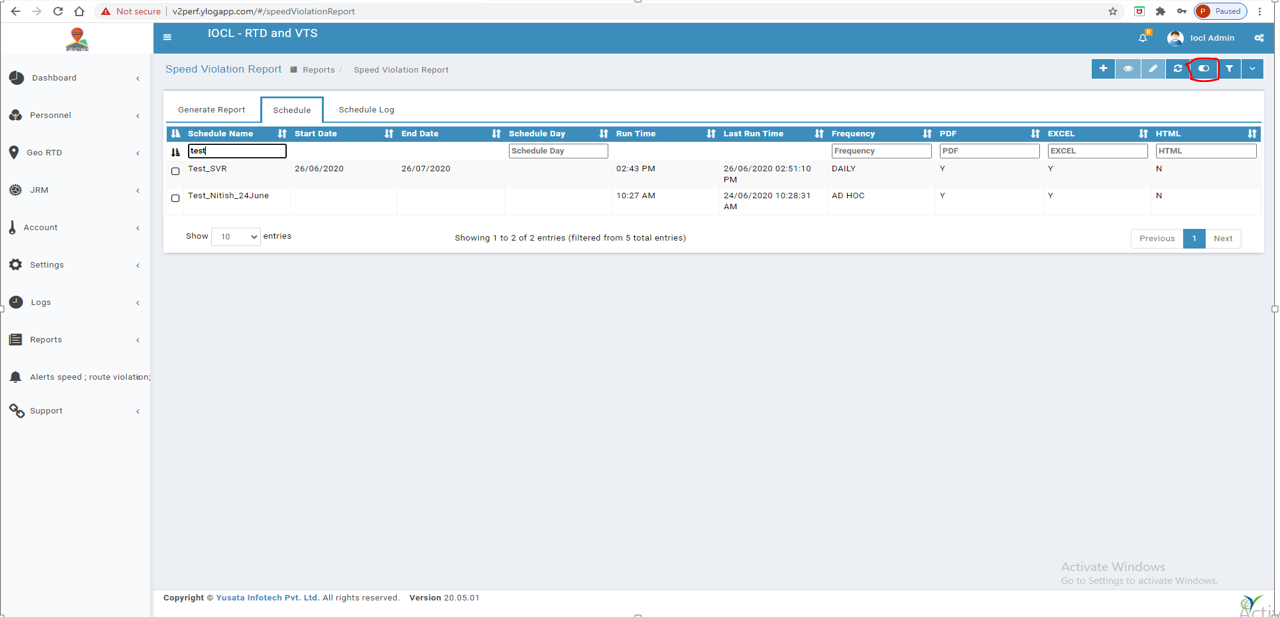
E. View Schedule - User can view schedule using view schedule action.
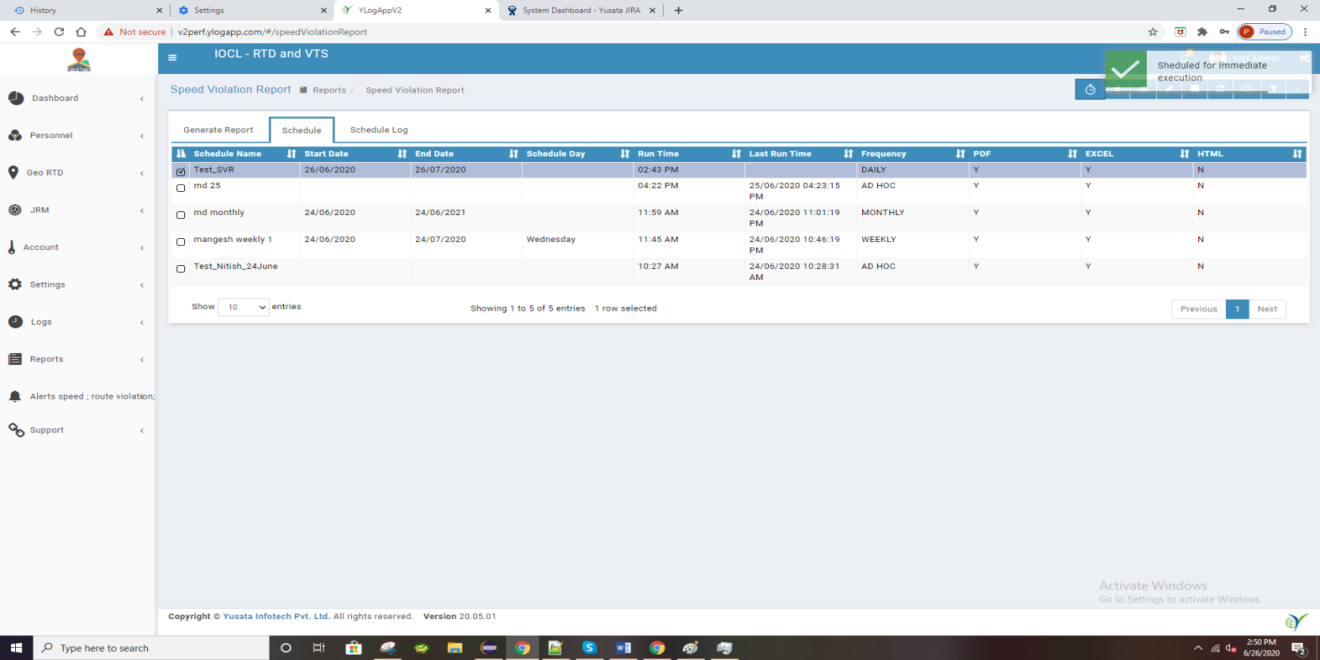
F. Immediate Schedule - User can do immediate schedule using immediate schedule action.
G. Edit Schedule - User can update schedule using edit schedule action.

H. Refresh Schedule Listing - Here user can refresh schedule listing and check newly added schedule by other users.
I. Toggle Search - When click on this action, will appear filter text box under heading bar.
J. Filter Schedule - User can filter records by status (Active/Inactive schedule) and schedule start date, end date.

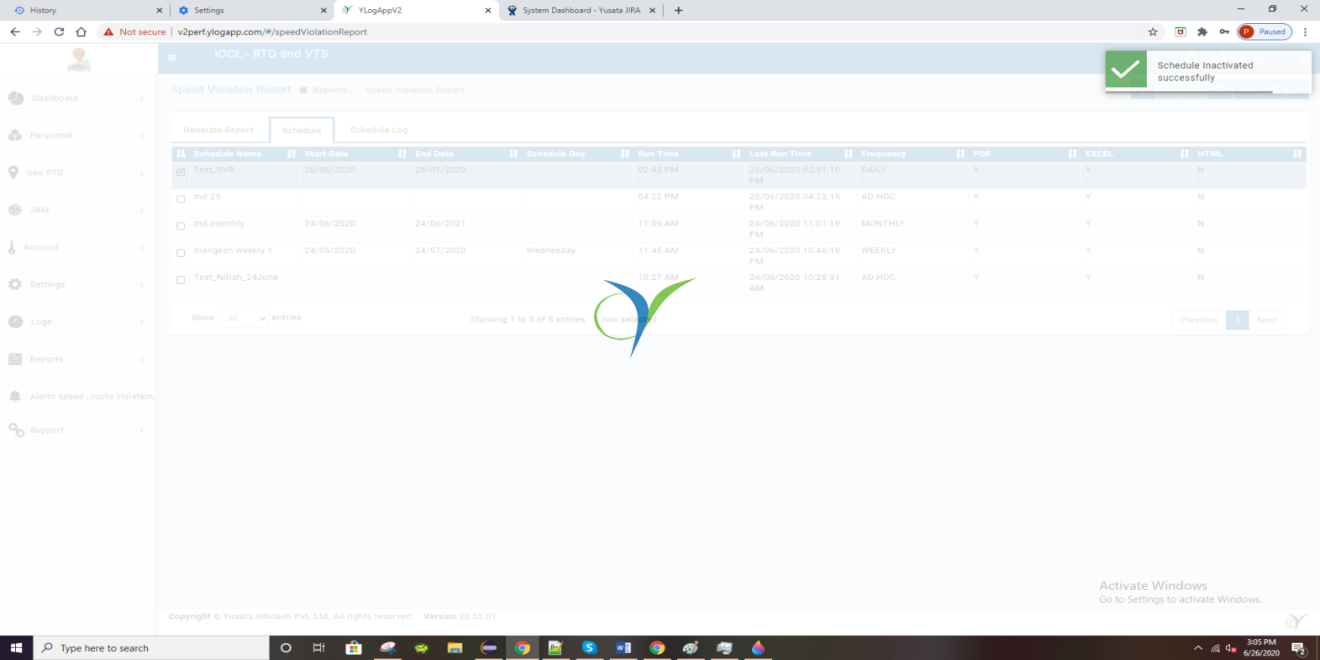
K. Delete Schedule - User can delete schedule using this action, will appear in future release.
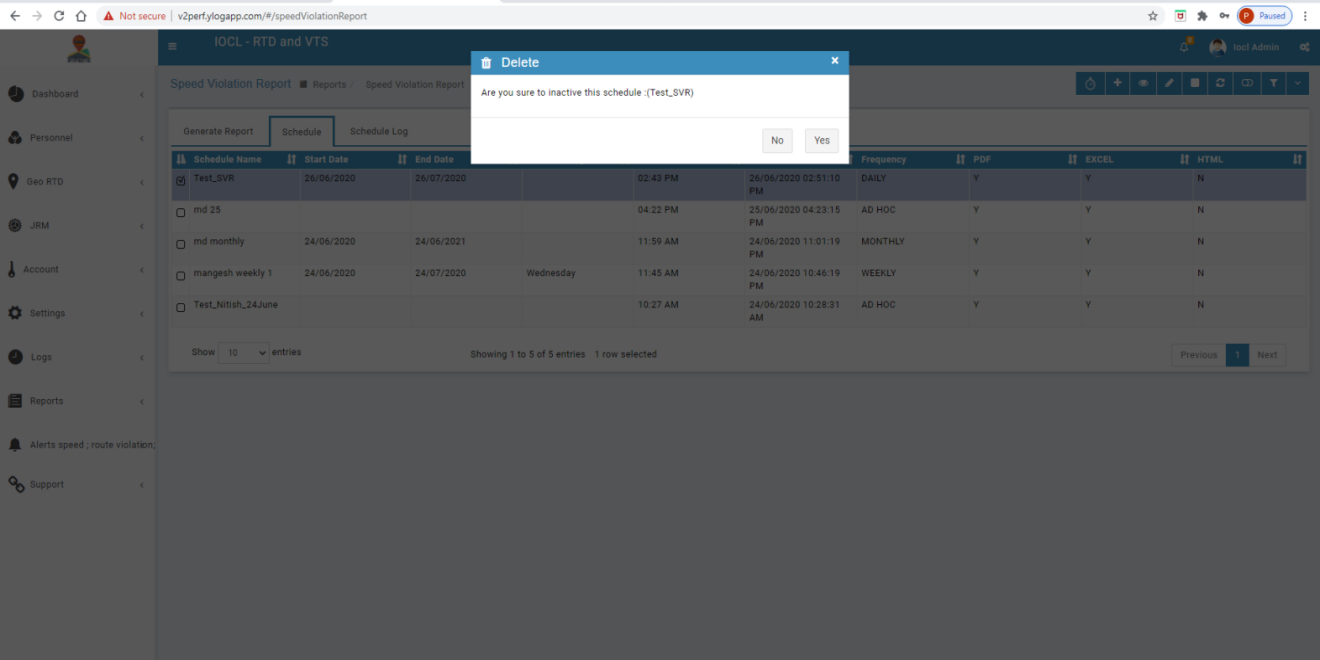
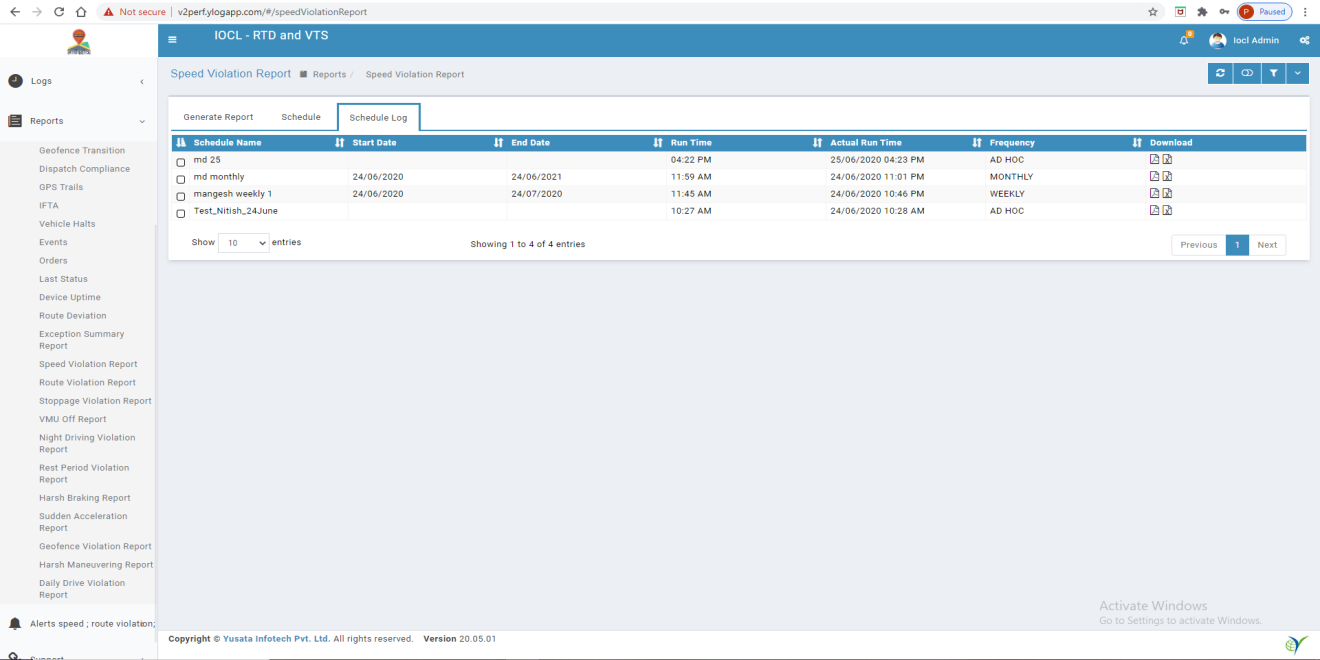
L. Check Schedule Logs
Mail Links :-
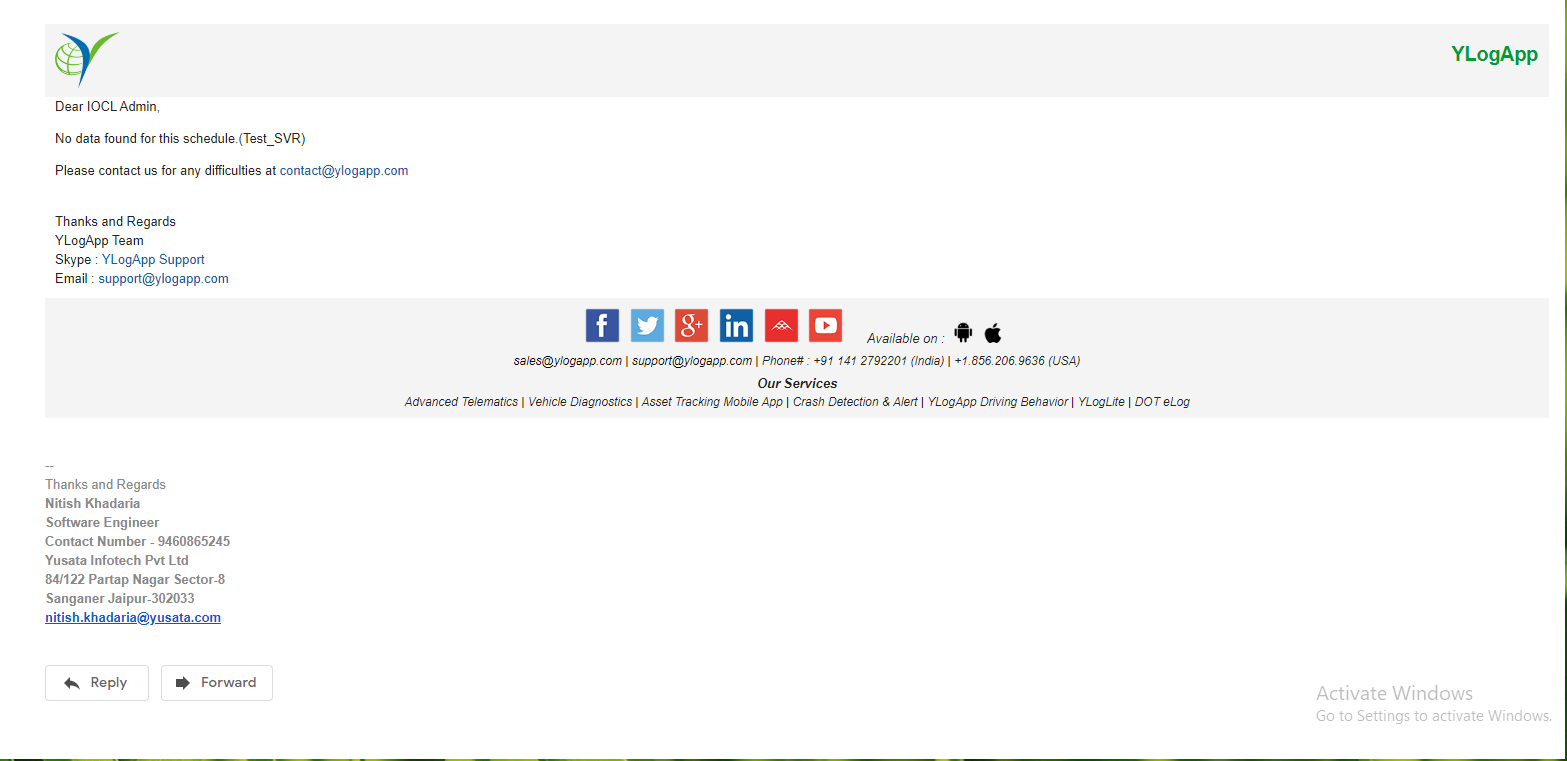
https://drive.google.com/file/d/1dLNqzTw0X-C-_ht5-WWpt8KdiKjN6z6W/view
https://drive.google.com/file/d/17DPSzLl9V_NIwoeuFcLRShYfty70zpIN/view
More Options - In this have Toggle Column, Copy, Excel, CSV, PDF.
i. Toggle Column - User can use this option for hide columns into schedule listing and able to save selected columns.
ii. Copy - Copy listed schedule data and paste into notepad and any other text editor.
iii. Excel - Export as excel file to appeared schedule in listing.
iv. CSV - Export as CSV file to appeared schedule in listing.
v. PDF - Export as PDF file to appeared schedule in listing.
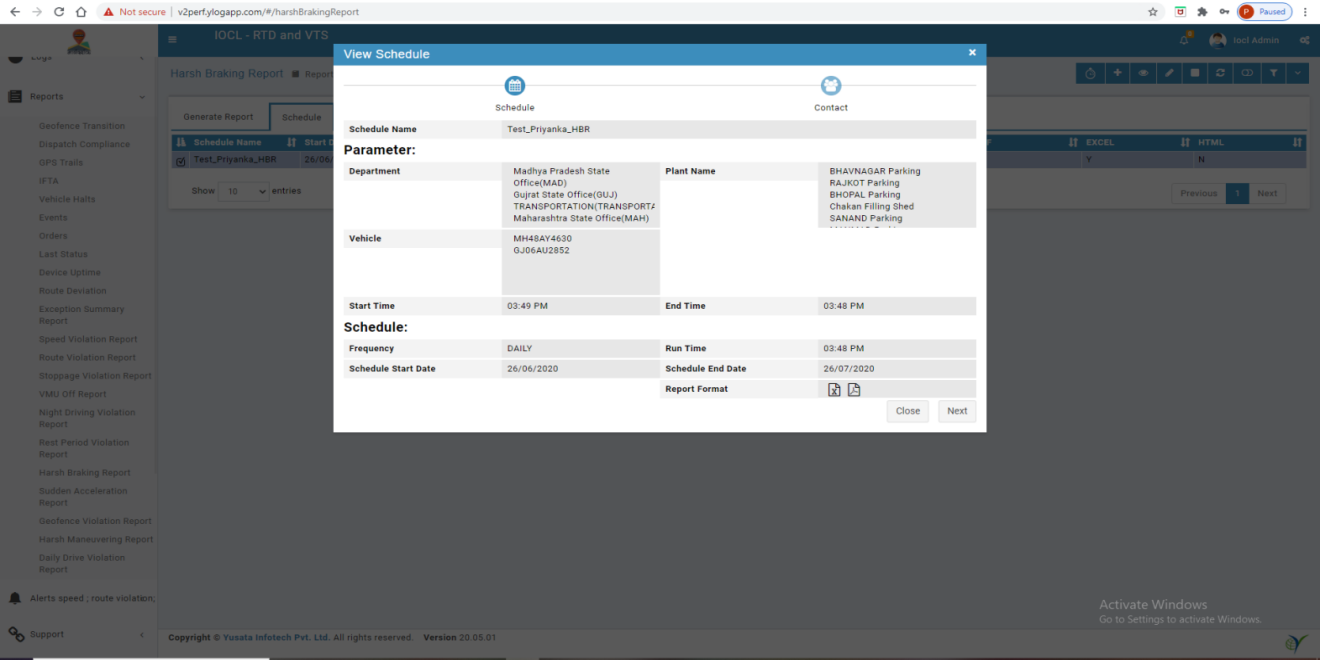
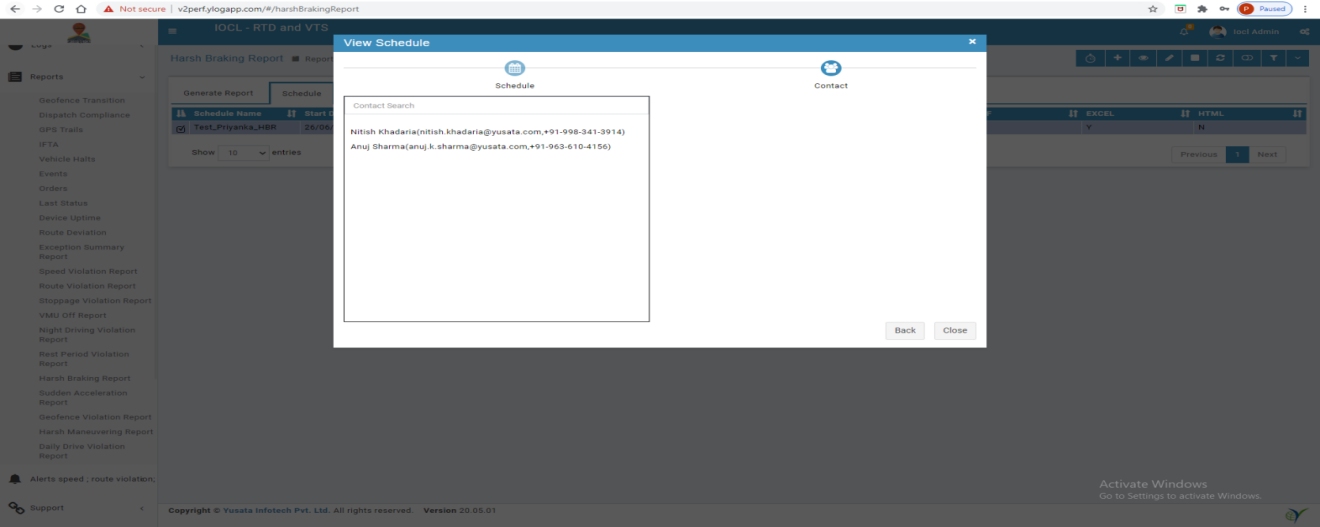
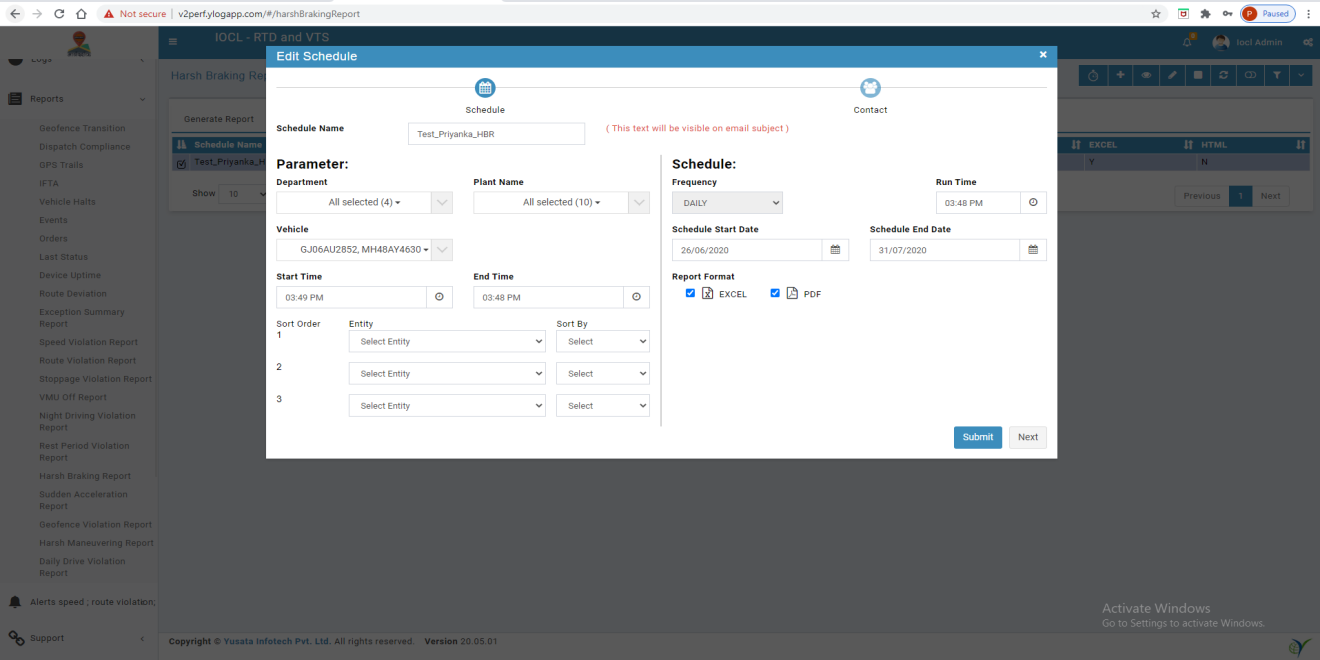
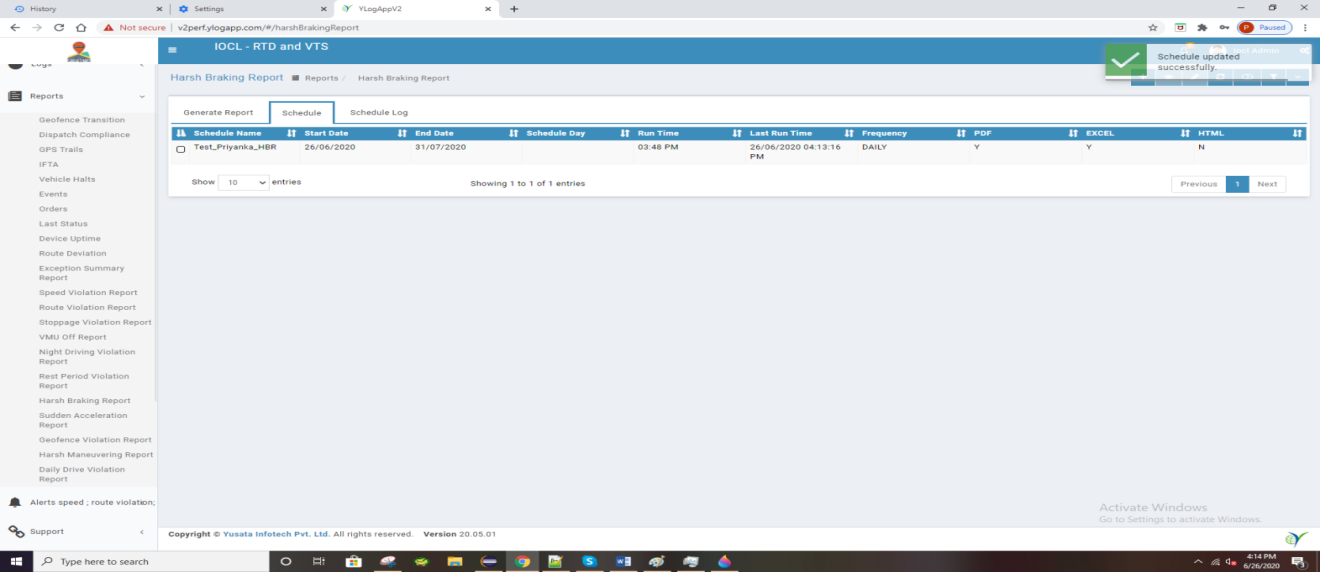
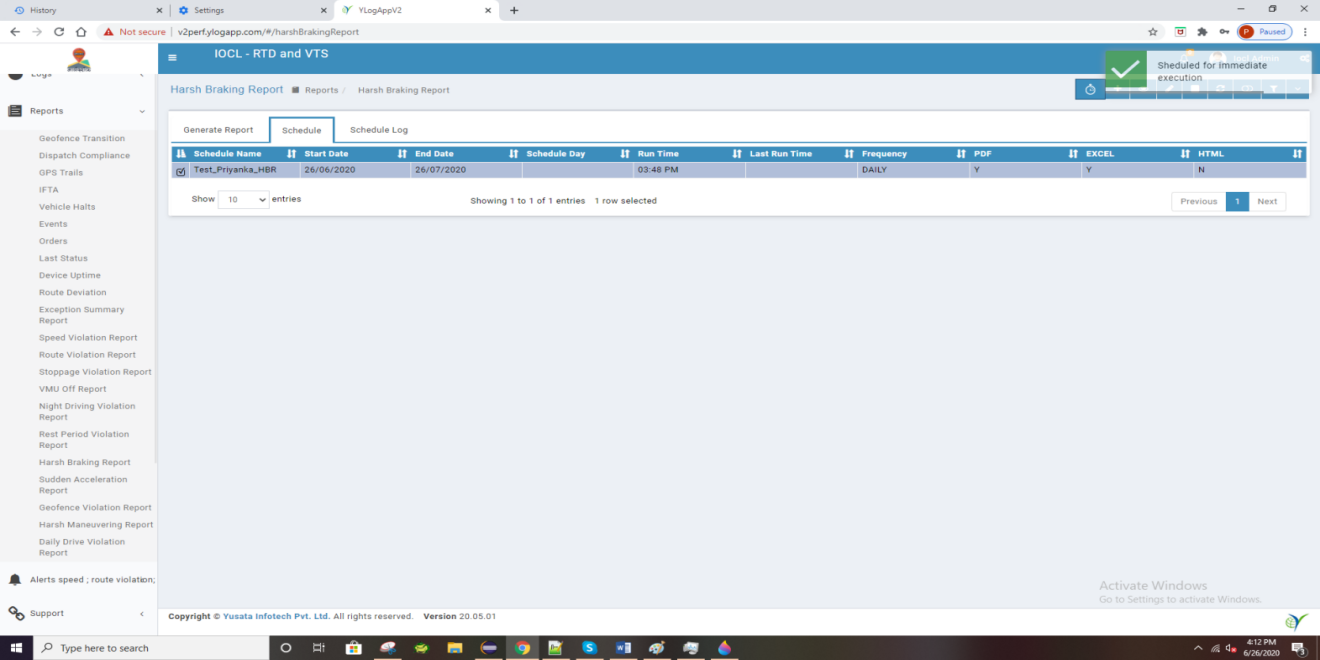
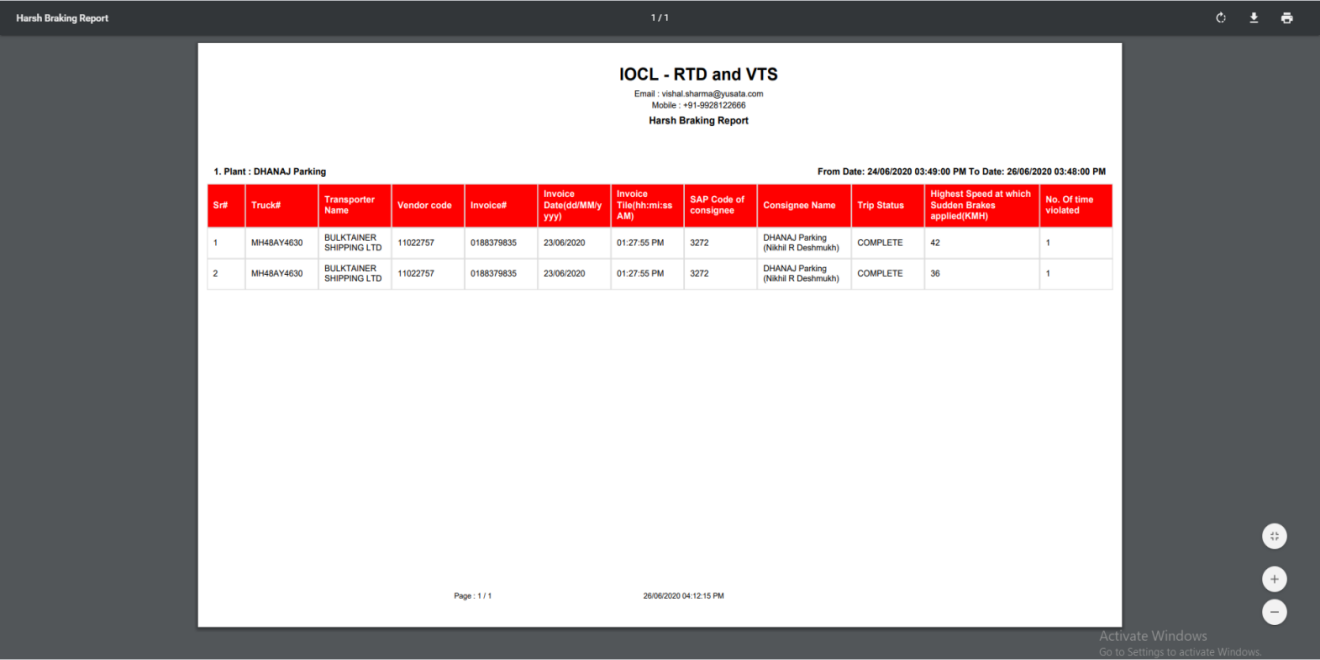
5. Harsh Braking Report:-
A. Move on Harsh Braking screen - click on “Harsh Braking” menu.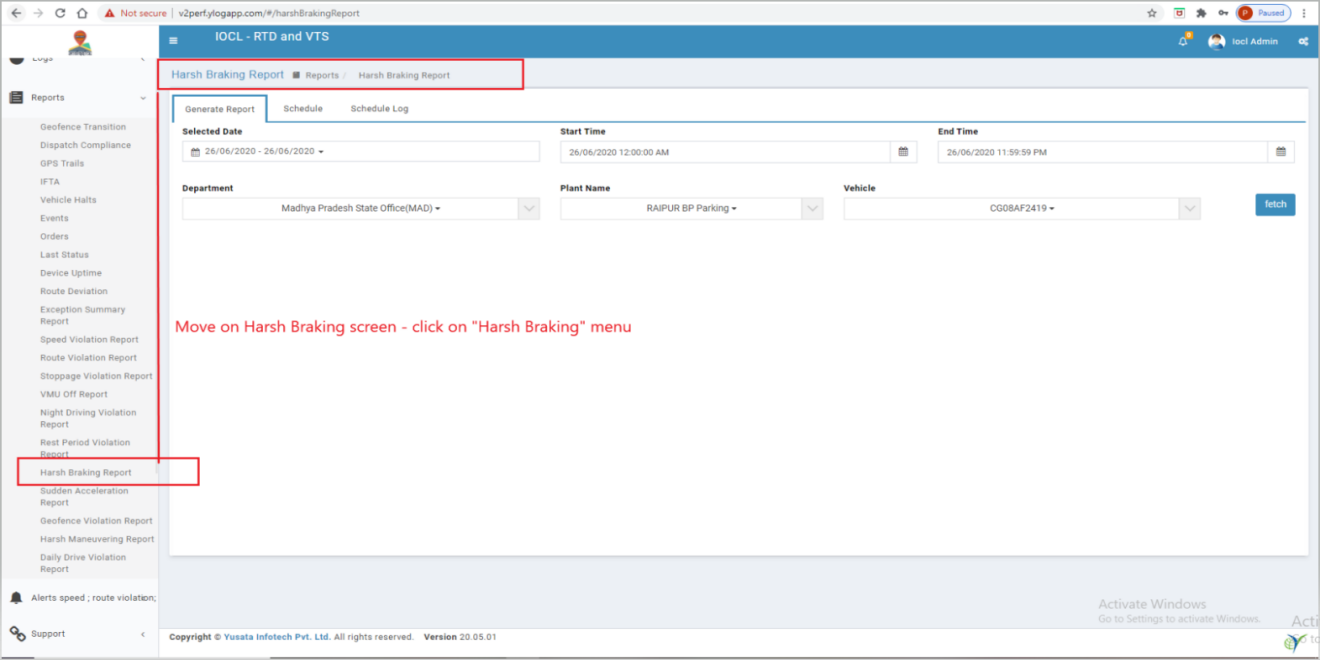
B. Harsh Braking screen functionality - Here we use date, Department, Plant Name and vehicle as criteria and after select criteria when we click fetch button then data table show accordingly.
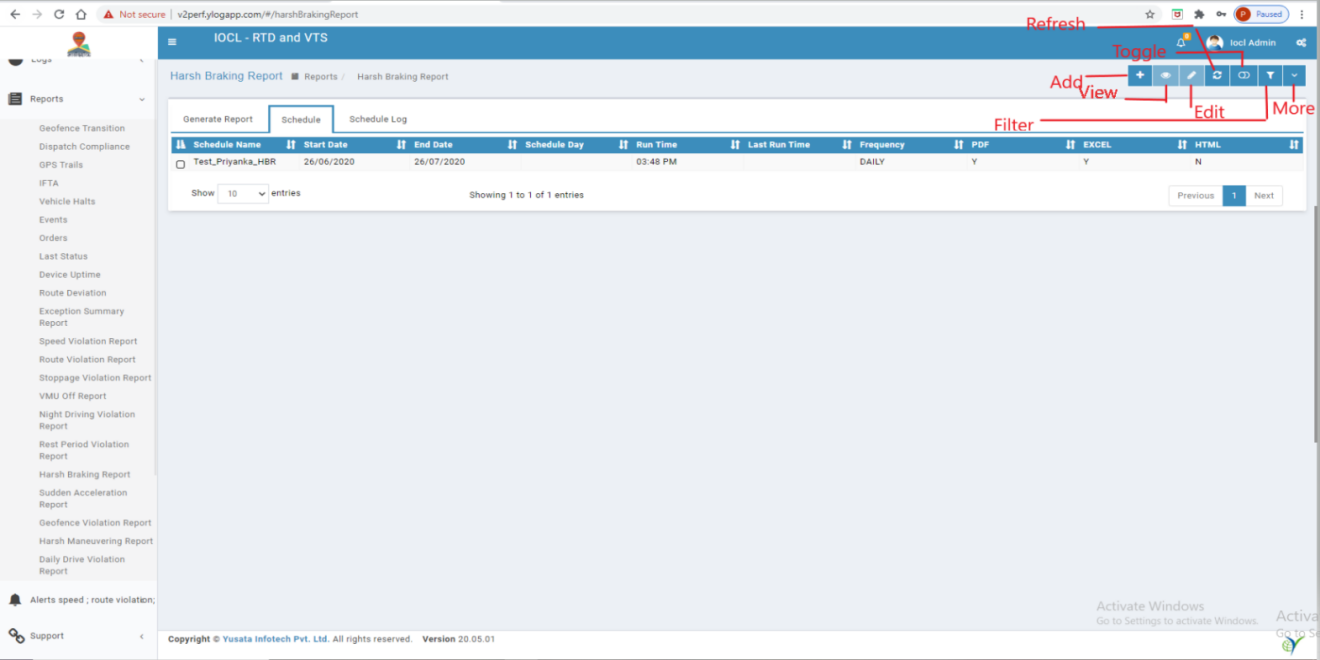
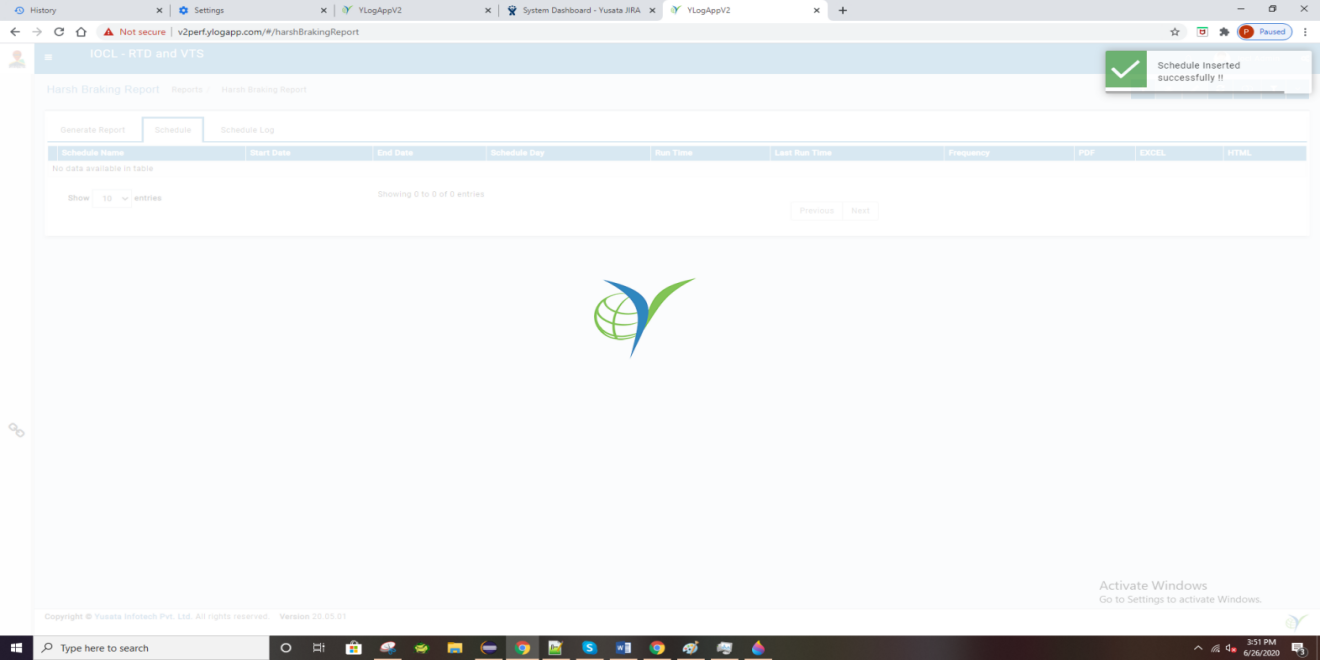
C. Add Schedule - User can add new schedule using add schedule action.
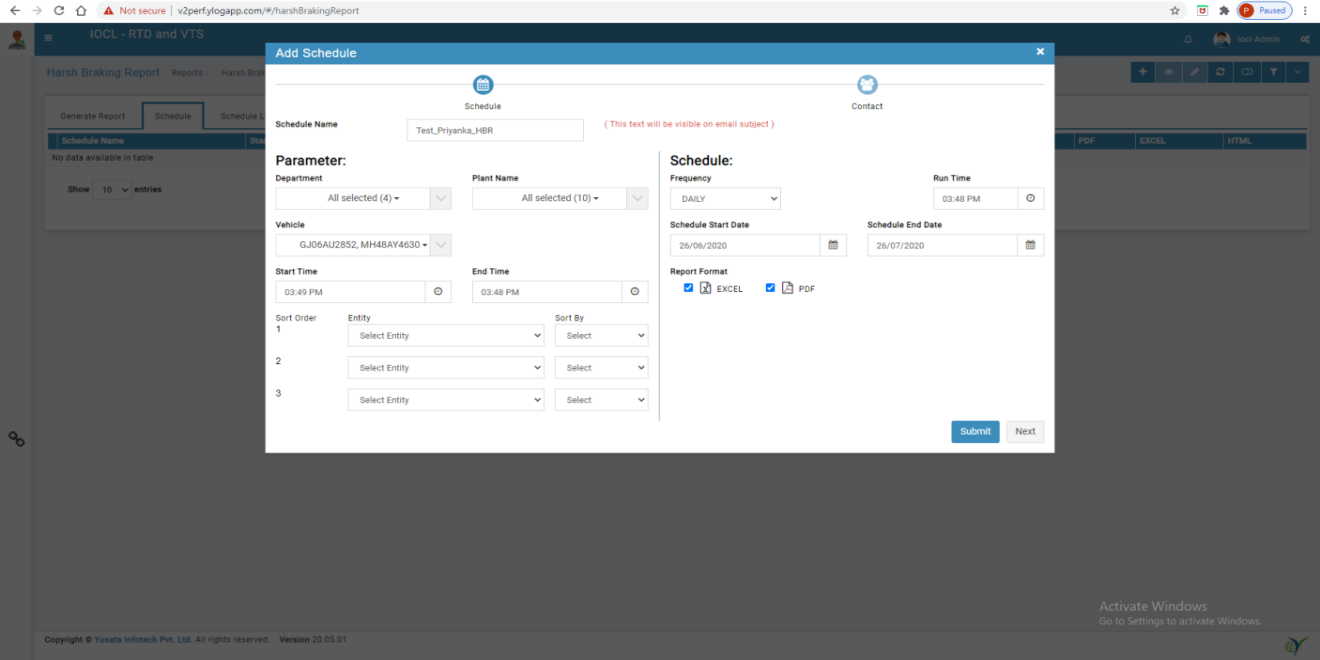
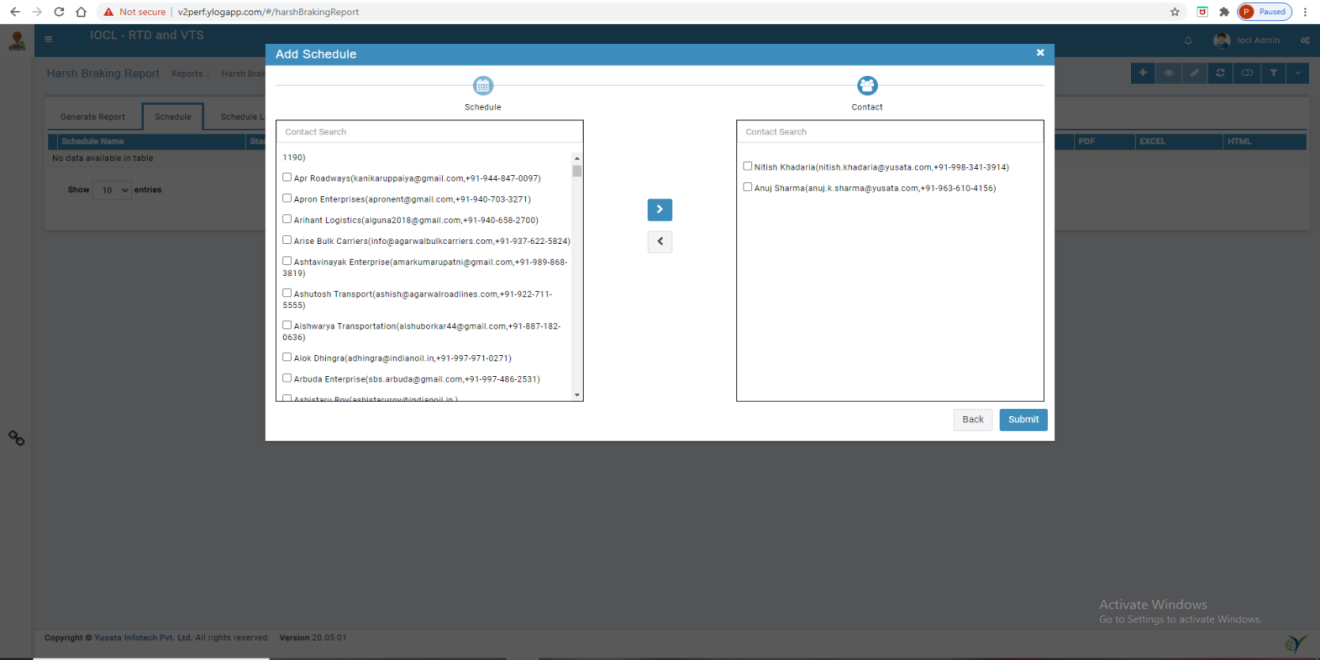
Note :- Bold letter fields are mandatory
D. Success message after add new schedule
E. View Schedule - User can see Schedule information using view Schedule action.
F. Edit Schedule - Schedule information can update by edit Schedule action.
G. Immediate Schedule - User can do Immediate Schedule using Immediate Schedule action.
H. Delete Schedule - User can delete active schedule using delete schedule action.


I. Refresh Schedule Listing - User can refresh schedule listing and check newly added schedule by other users using refresh action.
J. Toggle Search - When click on this action, will appear filter text box under heading bar.
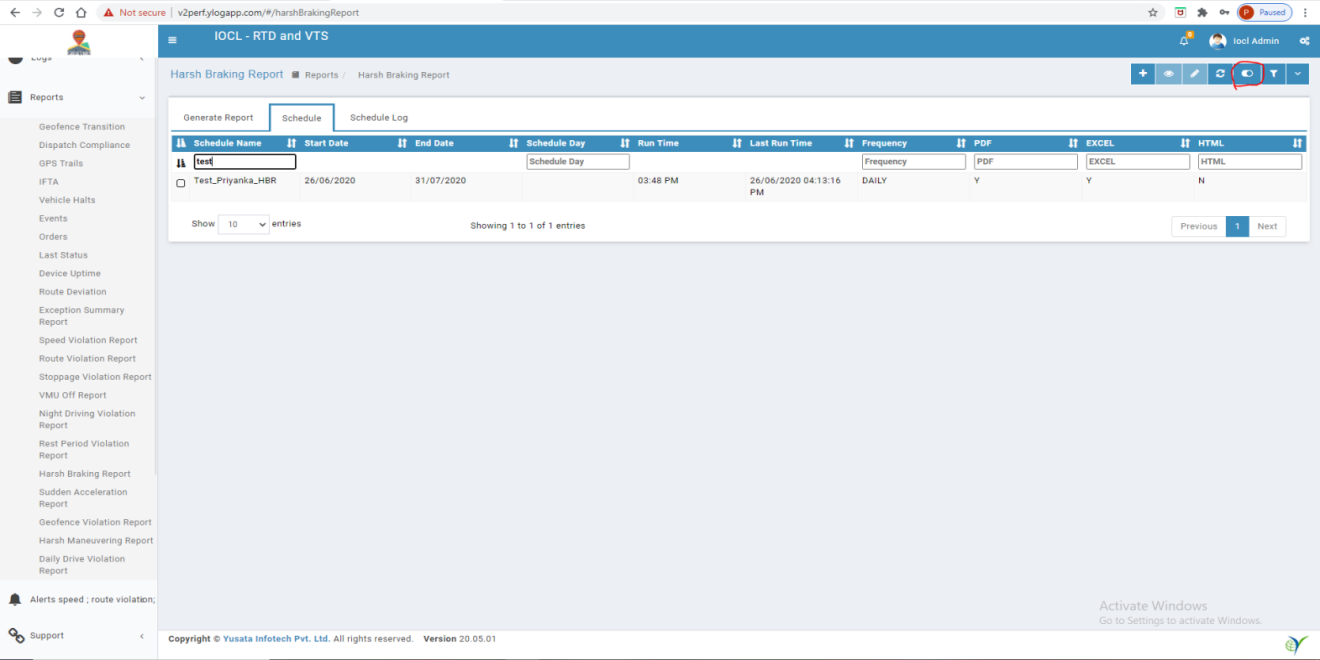
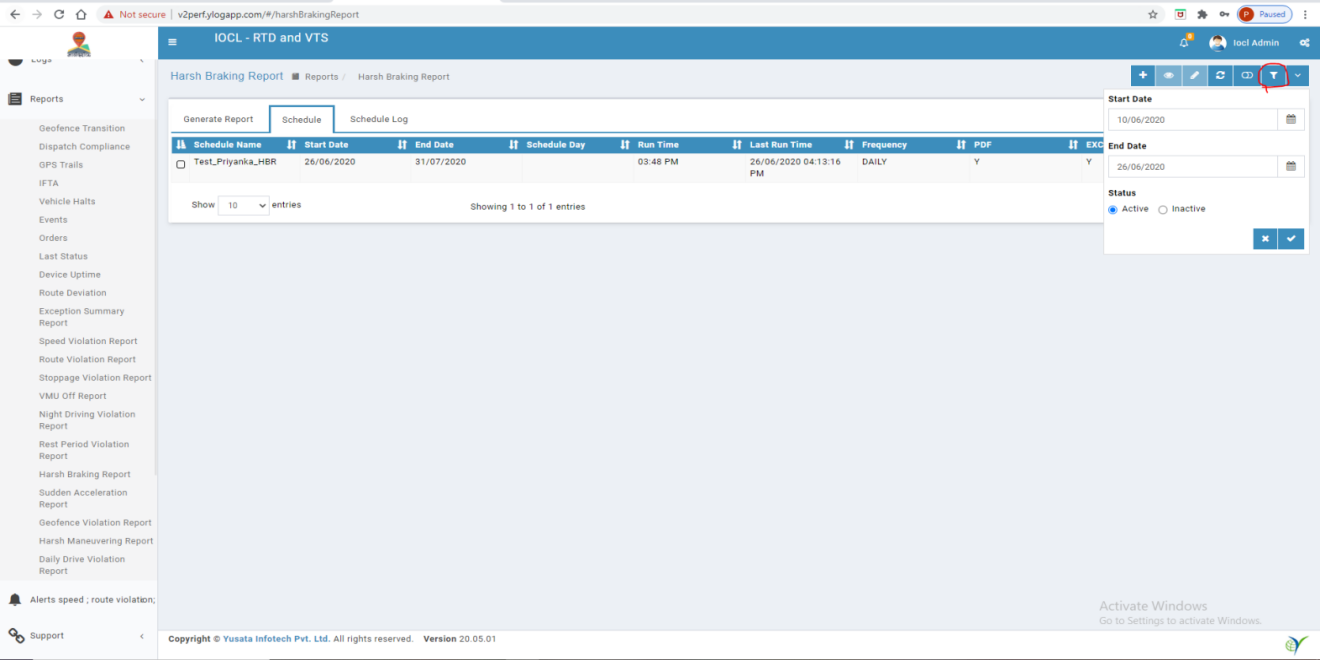
K. Filter - User can filter records by status (Active/Inactive schedule) and schedule start date and end date.
L. More Options- In this have Toggle Column, Copy, Excel, CSV, PDF
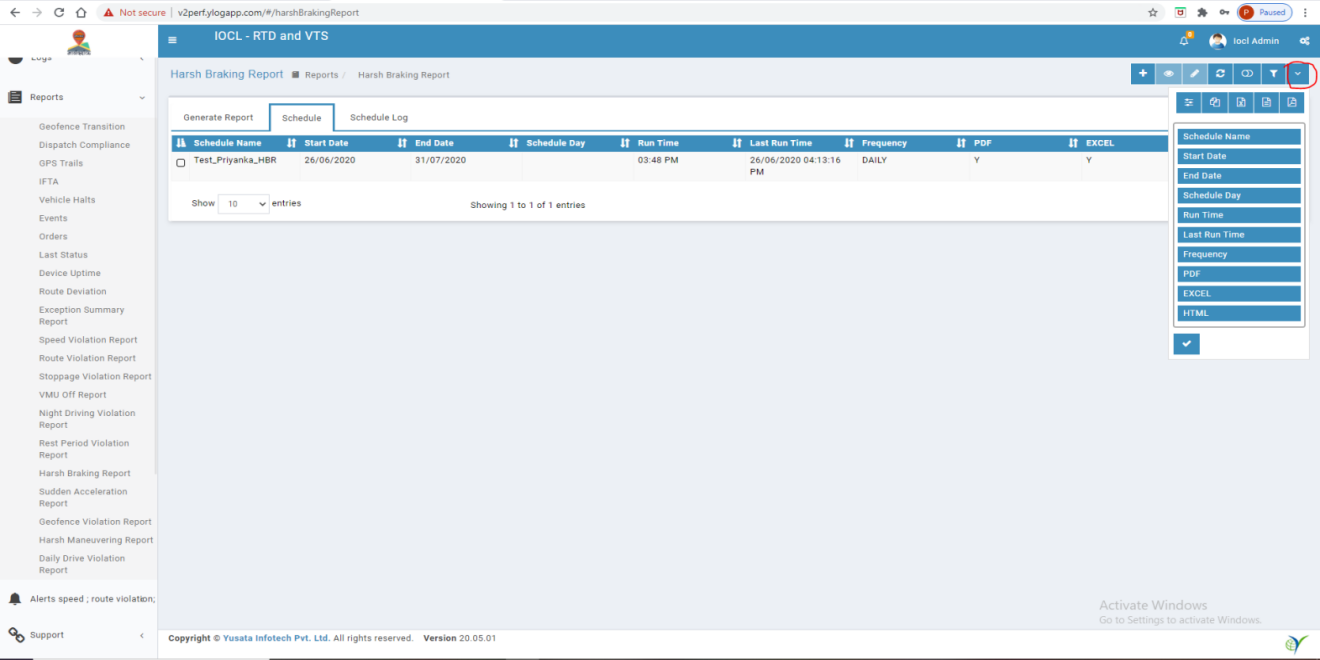
i. Toggle Column - User can use this option for hide columns into schedule listing and able to save selected columns.
ii. Copy - Copy listed schedule data and paste into notepad and any other text editor
iii. Excel - Export as excel file to appeared schedule in listing
iv. CSV - Export as CSV file to appeared schedule in listing
v. PDF - Export as PDF file to appeared schedule in listing
M. Check Schedule Logs


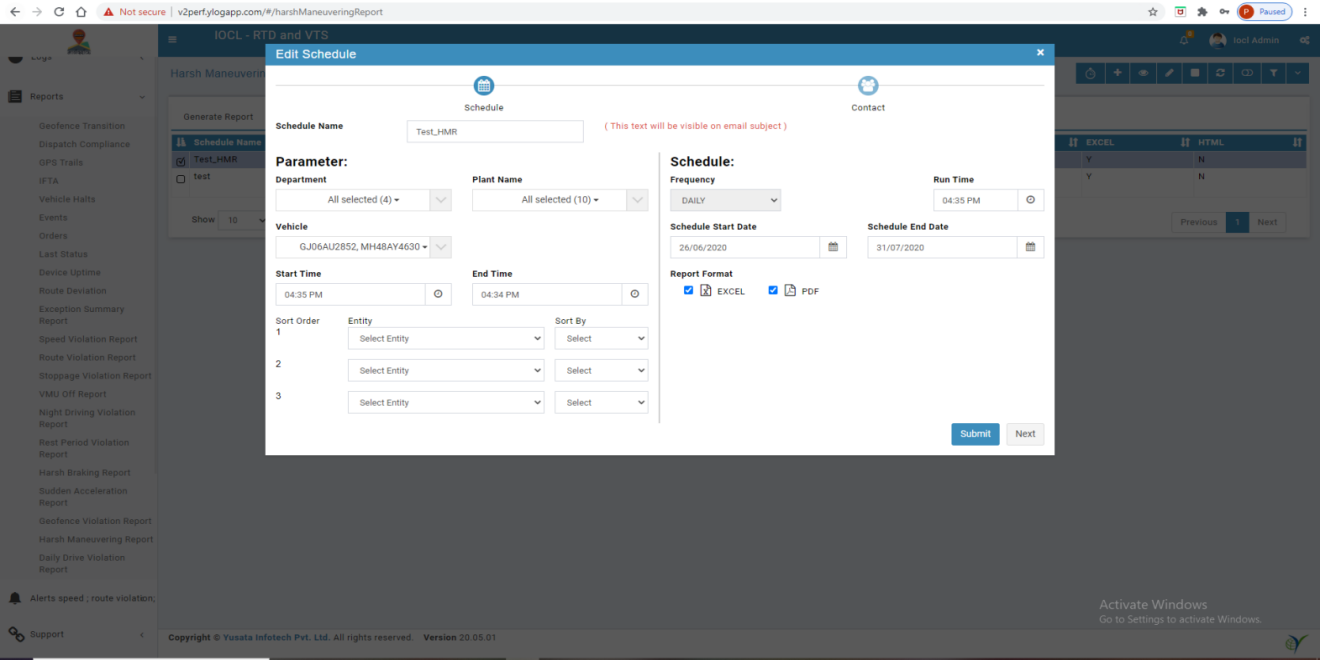
6. Harsh Maneuvering Report:-
A. Move on Harsh maneuvering screen - click on "Harsh maneuvering" menu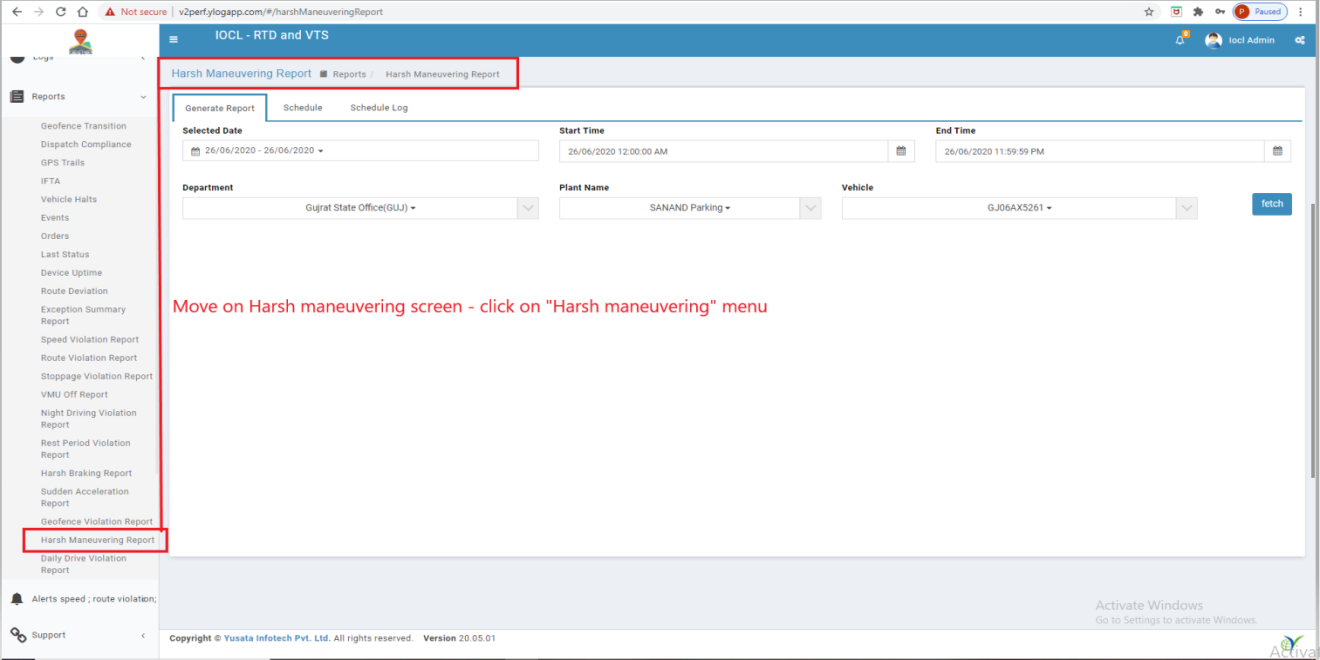
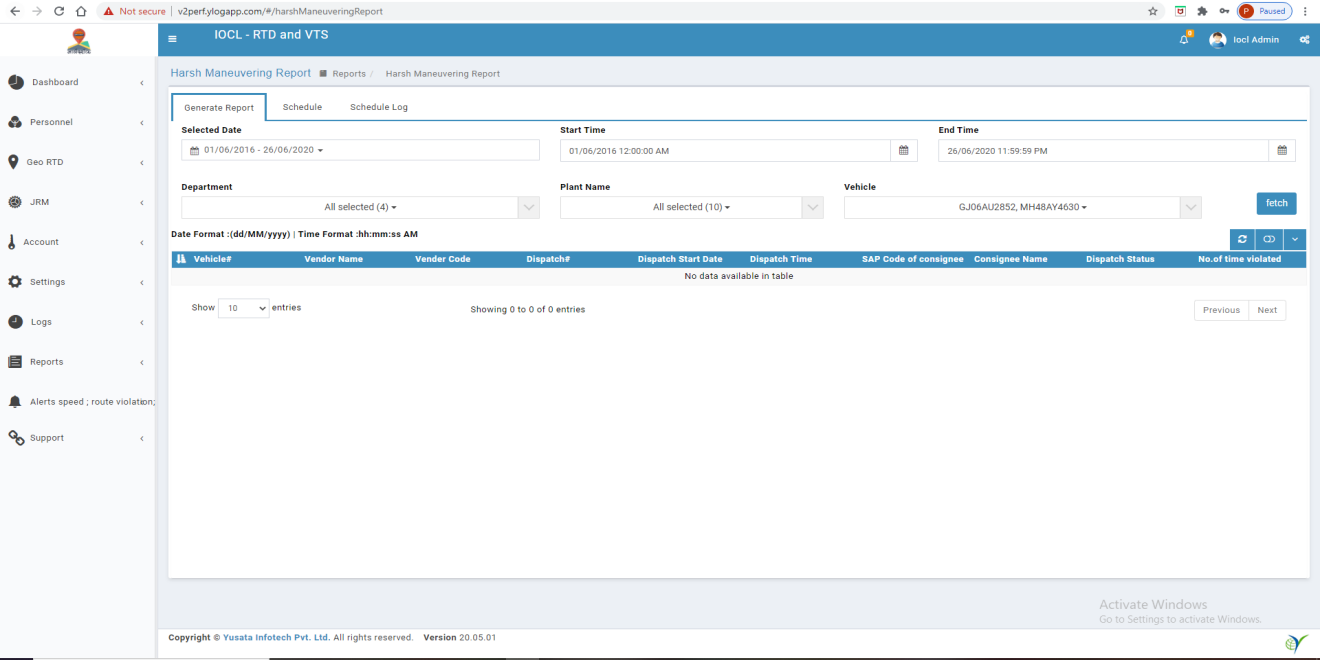
B. Harsh maneuvering screen functionality - Here we use date, Department, Plant Name and vehicle as criteria and after select criteria when we click fetch button then data table show accordingly
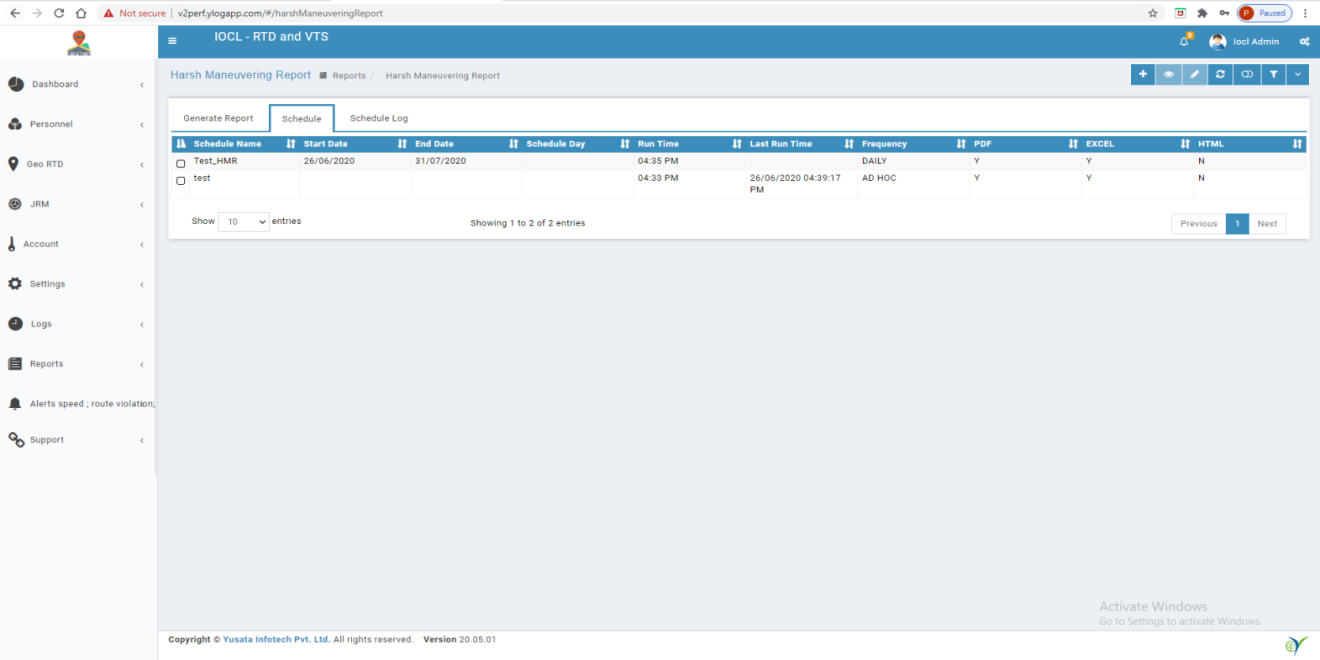
C. Add Schedule - User can add new schedule using add schedule action
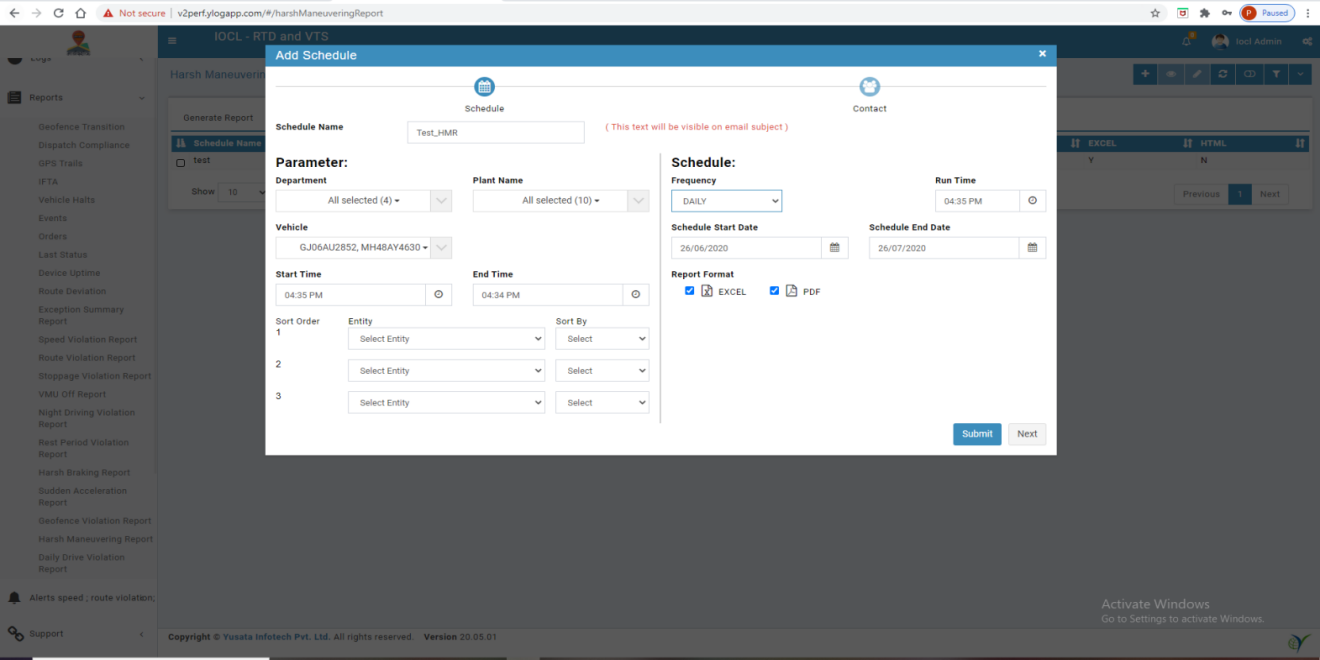
Note :- * Bold letter fields are mandatory
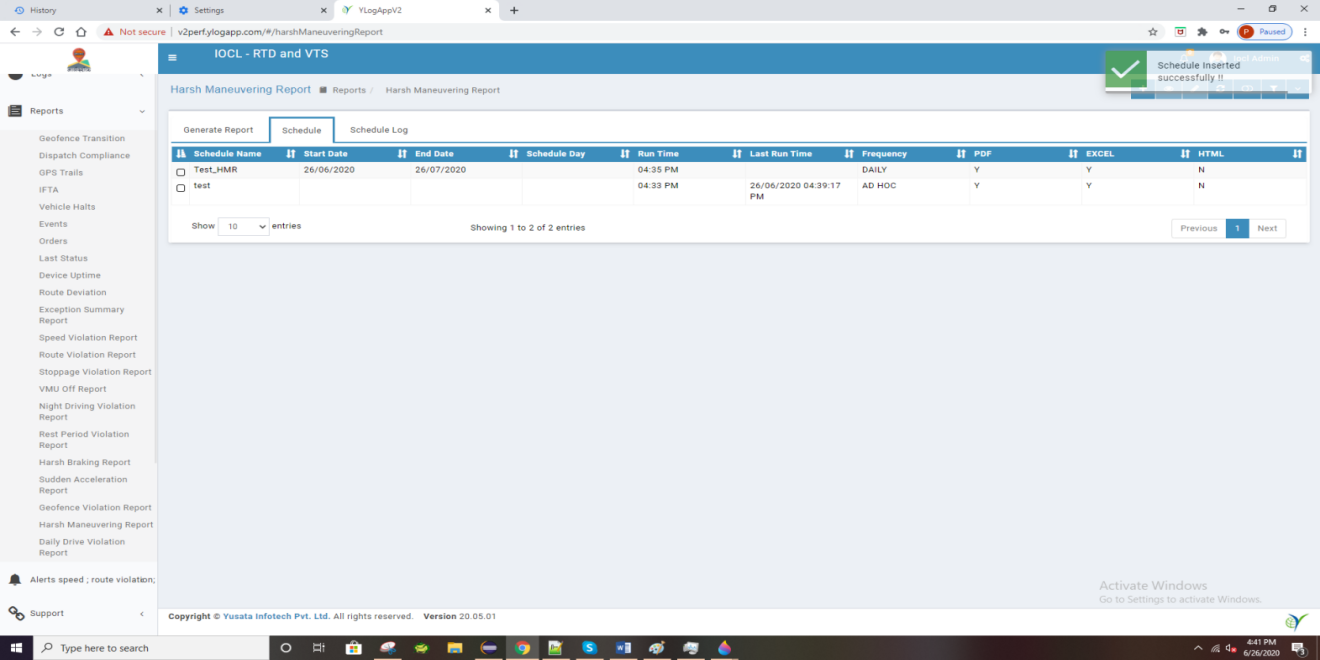
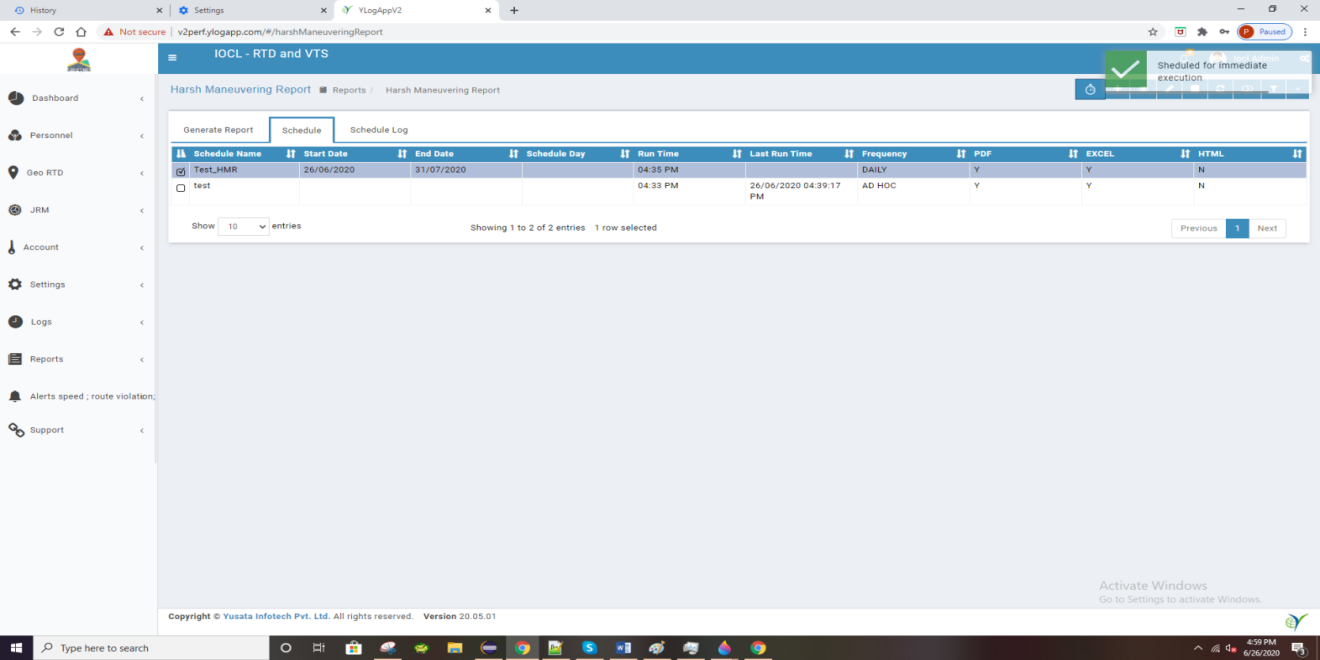
D. Success message after add new schedule
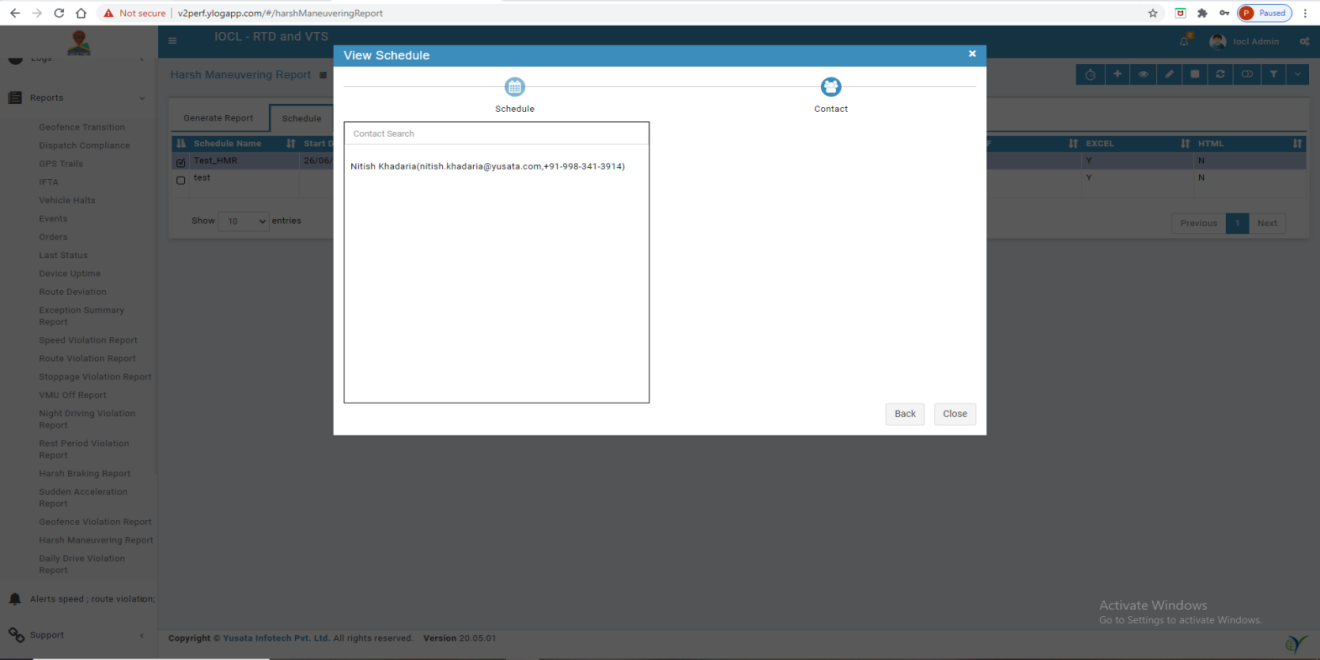
E. View Schedule - User can check schedule information using view schedule action.

F. Edit Schedule - User can update schedule information using edit schedule action.

G. Immediate Schedule - User can do Immediate Schedule using Immediate Schedule action.
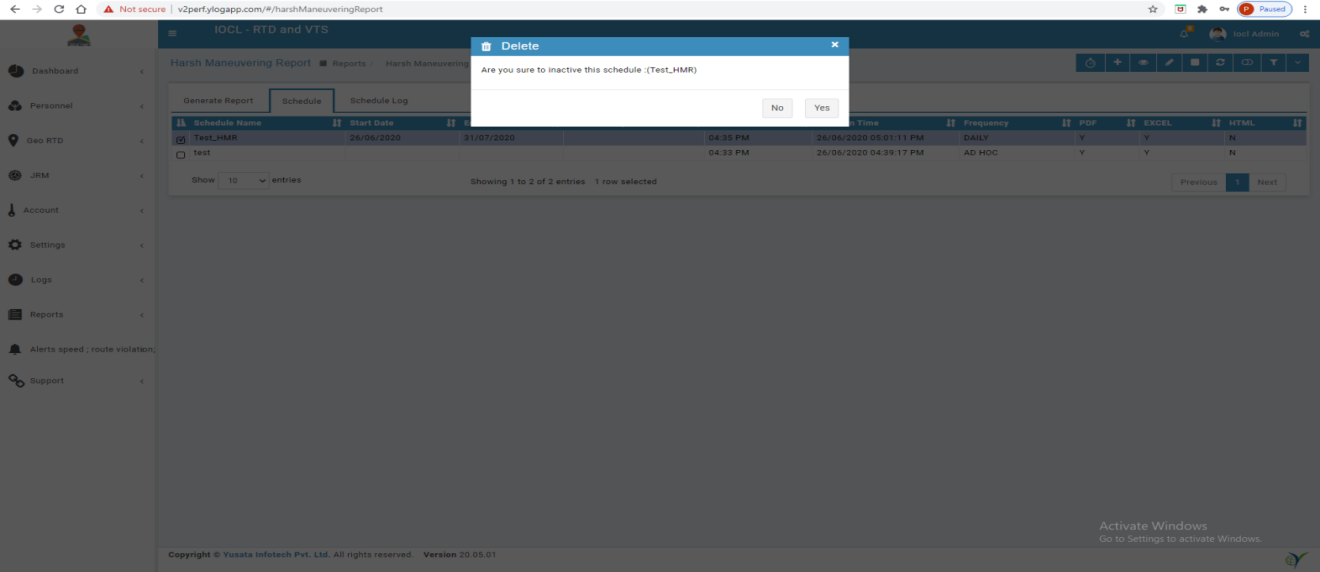
H. Delete Schedule - User can delete active schedule using delete schedule action.

I. Refresh Schedule Listing - User can refresh schedule listing and check newly added chedule by other users using refresh action.
J. Toggle Search - When click on this action, will appear filter text box under heading bar
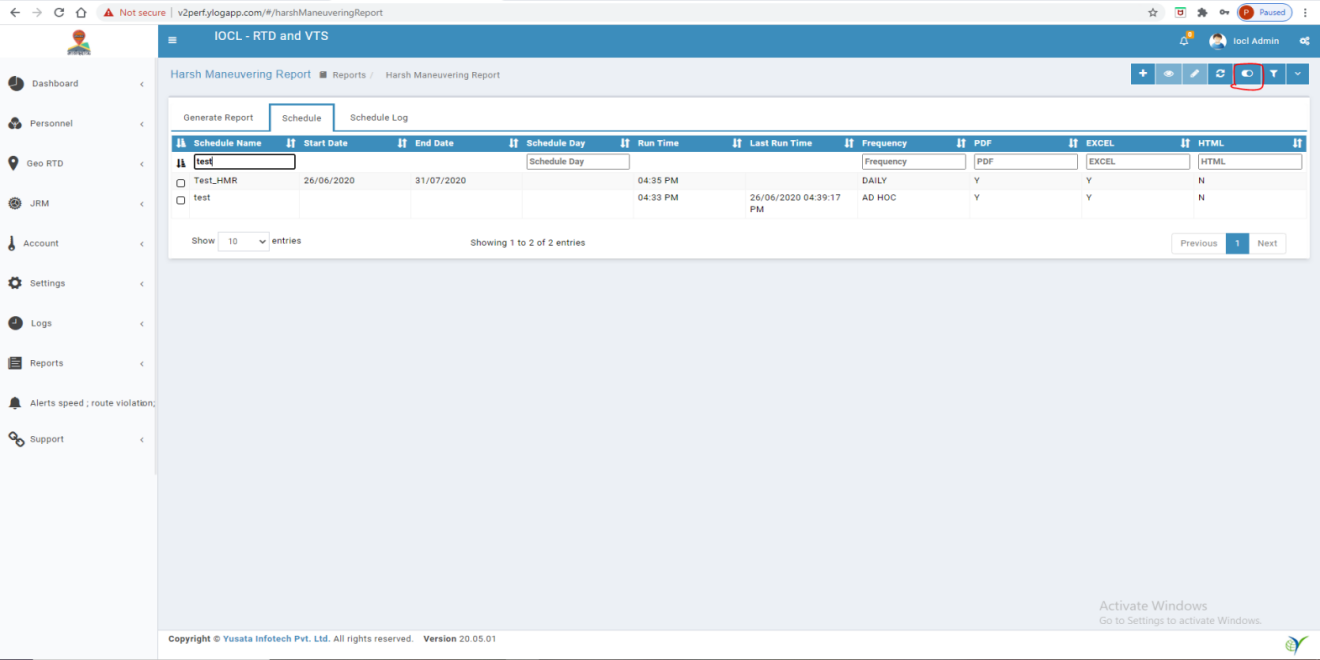
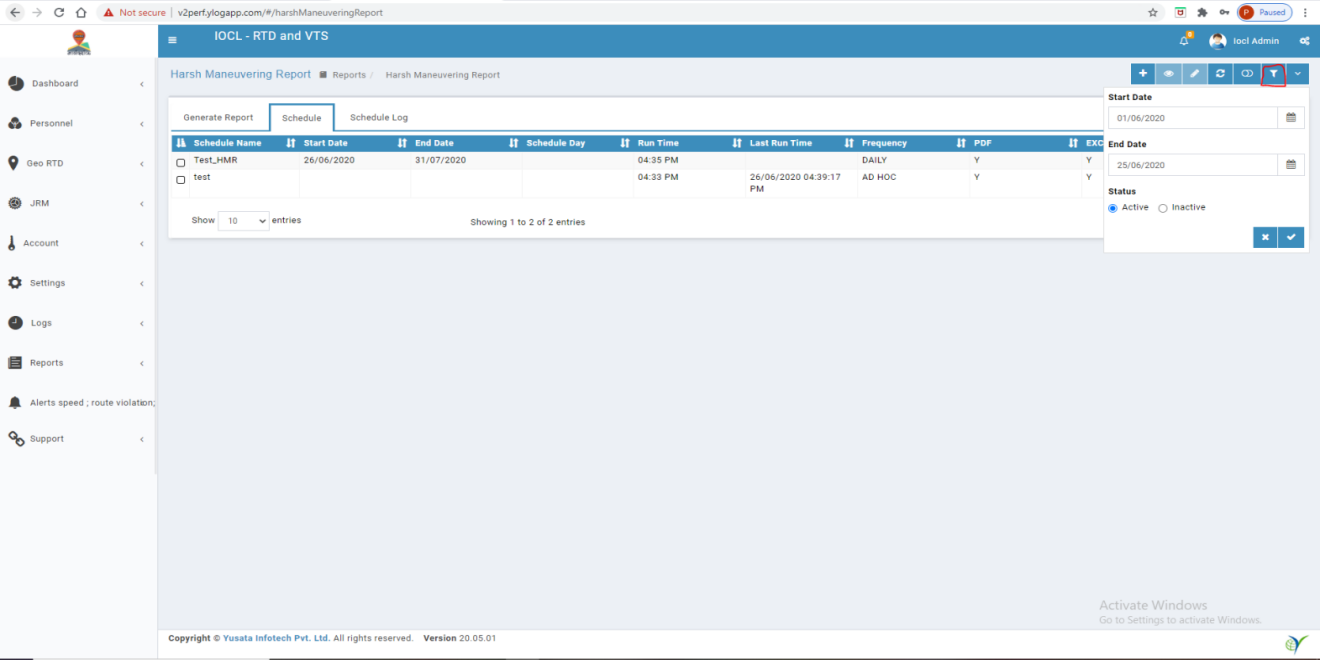
K. Filter Schedule - User can filter records by status (Active/Inactive schedule) and schedule start date and end date.
L. More Options - In this have Toggle Column, Copy, Excel, CSV, PDF
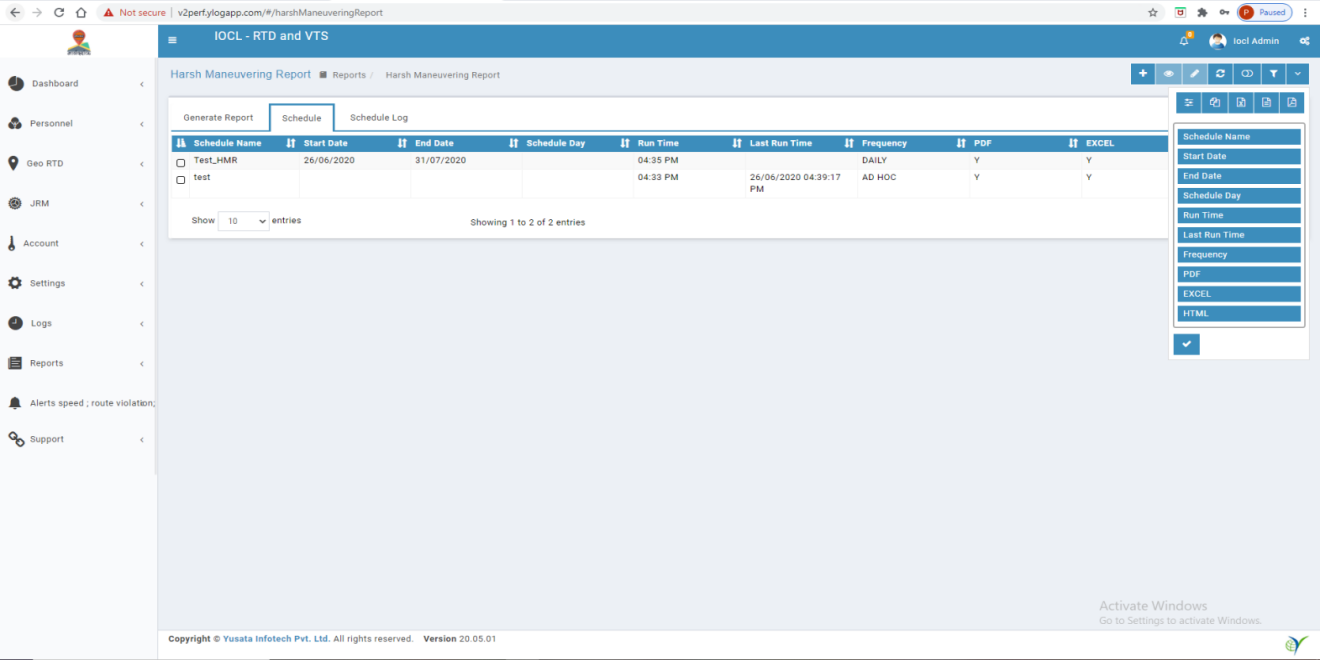
i. Toggle Column - User can use this option for hide columns into schedule listing and able to save selected columns.
ii. Copy - Copy listed schedule data and paste into notepad and any other text editor
iii. Excel - Export as excel file to appeared schedule in listing
iv. CSV - Export as CSV file to appeared schedule in listing
v. PDF - Export as PDF file to appeared schedule in listing
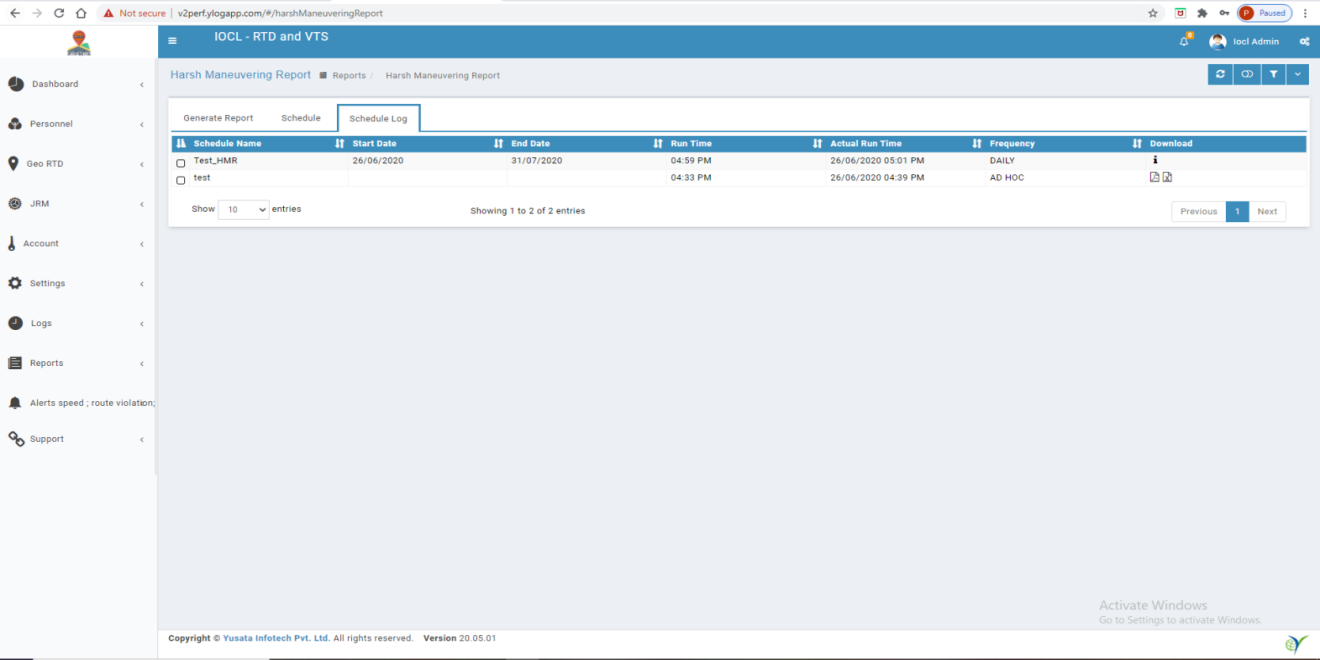
M. Check Schedule Logs
Mail Links :-
https://drive.google.com/file/d/1GgQMdEA3qr6wFKgFc9LwvPcVAWWEfMXB/view
https://drive.google.com/file/d/1oWZGNyXaih-CbmYKneDpgGghZ91iyyBL/view
Changes for VST-12
When schedule a report then all contacts (From User and Contacts ) will be available in Contacts mapping for send mail.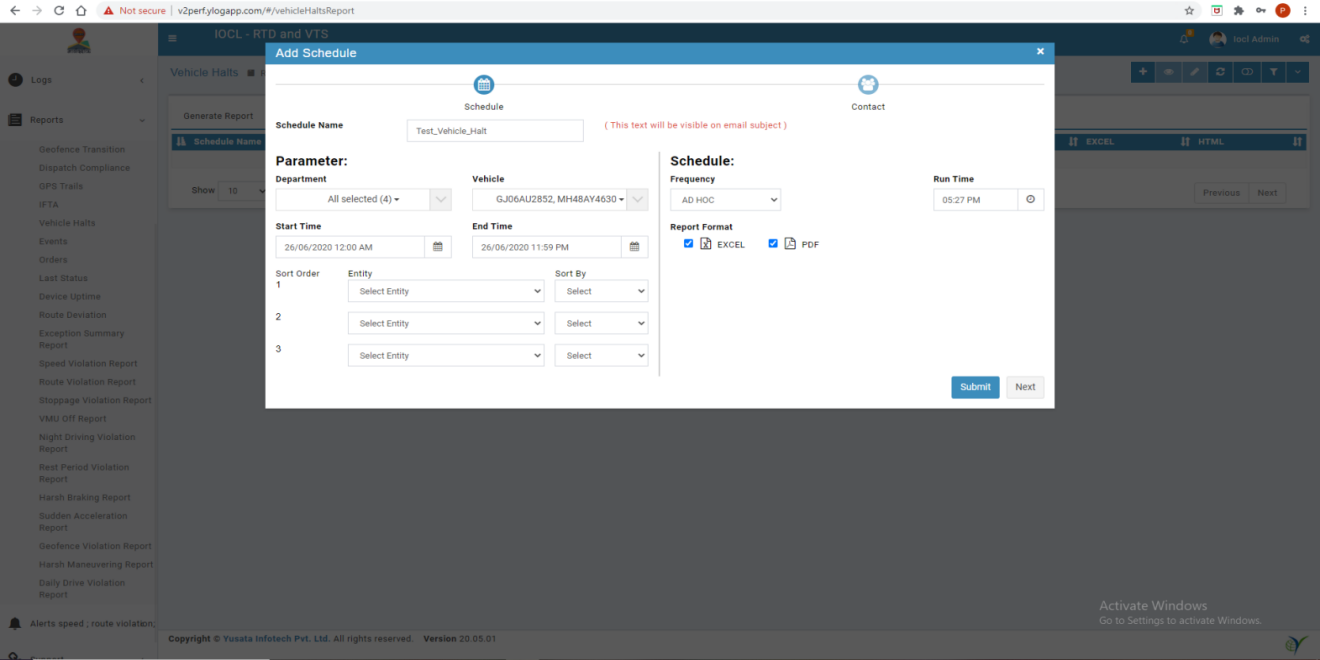

Changes for RTD-57
Now report edit schedule pop up opening which is not opening due to some issue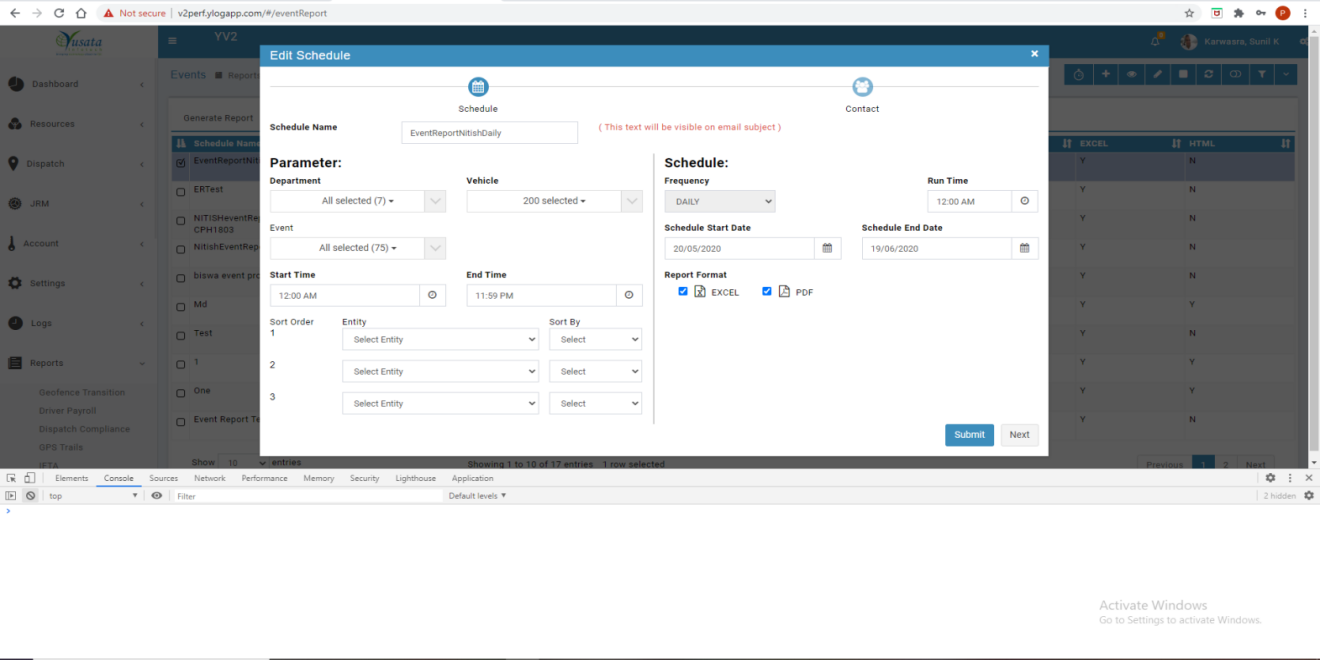
Changes for RTD-57
1. Landscape mode of reports instead of PortraitResolved: Space enough not require Landscape
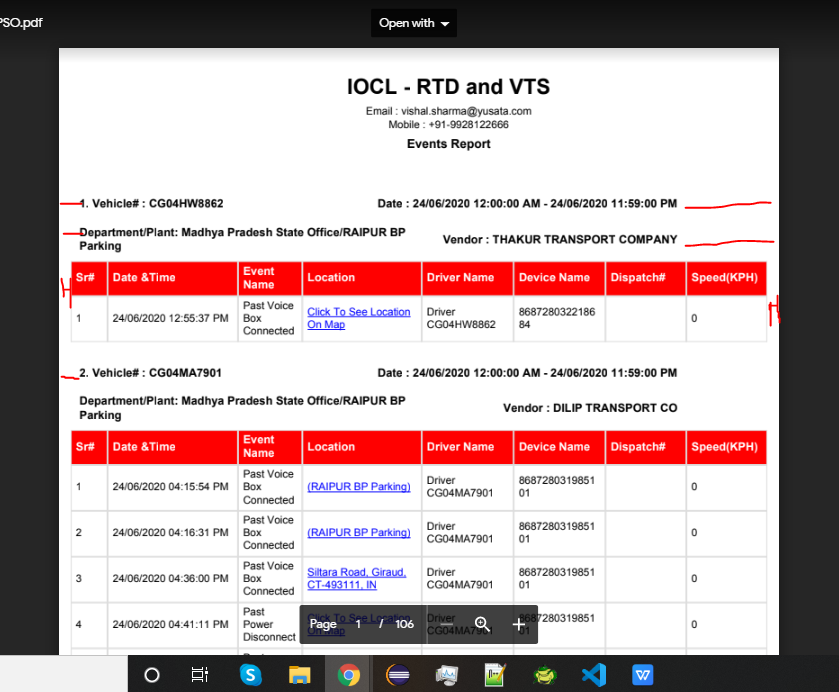
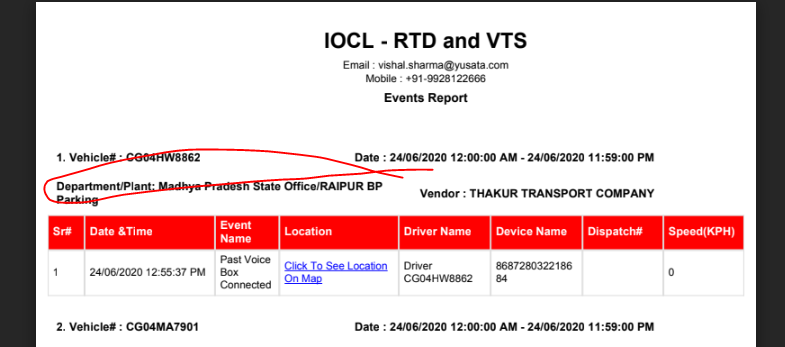
2. Department name can be replace by Plant Name
Resolved: a. Department or Plant name are same for a single vehicle that consolidated because this data are unnecessary for every row.
b. Department name not remove because plant name can be blank for some vehicle so use both Department and Plant Name.
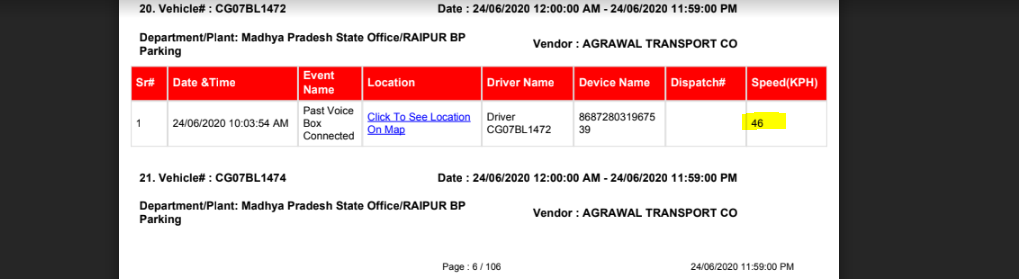
3. Add speed obtained row instead of Driver Name
Resolved: We need a column for speed of vehicle and column is added. And Driver name remove only an option if we face space issue.

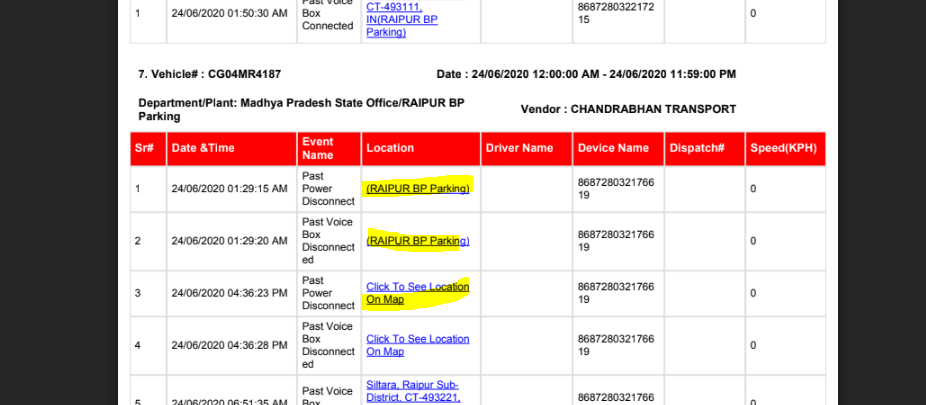
4. Add location hyperlink in the location table of the reports
Resolved:
a. if geofence name is available then show the geofence name with hyper link of Google Map with lat long.
b. If geofence name is not available then show “Click to see Location on Map” with lat long.
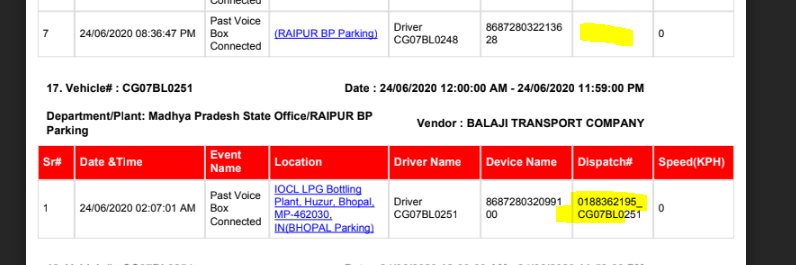
5. Dispatch number is missing in the reports
Resolved: If dispatch number is available then show in report otherwise show blank cell
6. UI in reports gets disturbed randomly
Resolved -
